Daylilies are a gorgeous addition to any garden. Their colorful, trumpet-shaped flowers bloom in a wide range of colors including yellow, pink, red, purple, and orange. Once established, daylilies are also low maintenance perennials that come back year after year with very little care required.
While daylilies are most commonly propagated by dividing existing plants, growing daylilies from seeds is an easy, inexpensive way to add these stunning flowers to your yard or garden. In this article, we’ll walk through the simple process of planting daylily seeds so you can grow these beautiful blooms from scratch.
When to Plant Daylily Seeds
Daylily seeds can be planted in early spring once the threat of frost has passed They need warm soil temperatures to germinate, so wait until the soil has reached at least 60 degrees Fahrenheit before sowing them
In mild climates, you may be able to plant the seeds directly in the garden But if you live in an area with cold springs, it’s best to start the seeds indoors 6-8 weeks before the last expected frost date Once the seedlings have 2-3 true leaves, they can be transplanted outdoors after all danger of frost is gone.
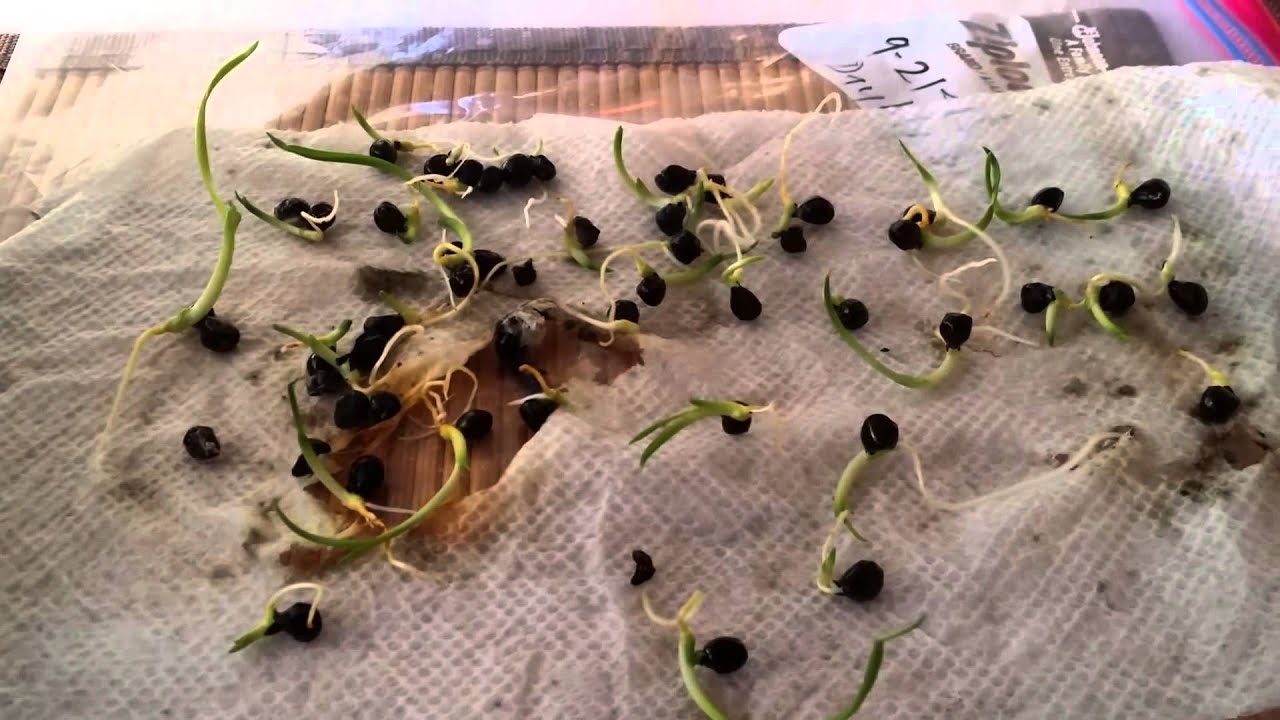
How to Plant Daylily Seeds Outdoors
Planting daylily seeds directly in the garden is an easy process. Follow these simple steps:
-
Prepare the soil: Choose a spot with full sun to partial shade exposure. Daylilies prefer fertile, well-draining soil. Add compost or other organic matter to enrich the soil if needed.
-
Create shallow furrows: Rake the soil smooth and use a hoe or stick to make 1⁄2 inch deep furrows spaced 12-18 inches apart. Planting in furrows helps mark where the seeds are sown for easier care.
-
Sow seeds: Sprinkle seeds along the furrows, spacing them 1-2 inches apart. Cover the seeds lightly with about 1⁄4 inch of soil or sand.
-
Label: Mark the rows with plant labels so you remember where the seeds were planted.
-
Water: Water the planted seeds regularly to keep the soil moist. Aim to keep the top 1-2 inches of soil damp until the seedlings emerge.
-
Nurture growth: In about 1-2 weeks, the daylily seedlings should begin to sprout. When the plants are 2-3 inches tall, thin them so the strongest seedlings are 6-12 inches apart. Keep them well-watered and weed free as they establish.
Starting Daylily Seeds Indoors
If you want to get a head start on the growing season, daylily seeds can be started indoors 4-6 weeks before your last spring frost date. Here’s how:
-
Use seed starting mix: Fill starter trays or pots with a lightweight seed starting mix. Moisten the soil before planting.
-
Plant seeds: Sow 2-3 seeds in each cell, covering with 1⁄4 inch of mix.
-
Provide warmth: Set the containers in a warm spot (65-70°F) with bright, indirect light.
-
Maintain moisture: Cover the containers with plastic wrap or place in a greenhouse dome to retain moisture. Check daily and water just enough to keep the soil moderately moist.
-
Give air circulation: Once sprouted, remove any coverings and allow air circulation around the seedlings.
-
Fertilize: Apply a diluted plant fertilizer once true leaves appear.
-
Harden off: Over 7-10 days, slowly introduce the seedlings to the outdoors to harden them off before transplanting.
-
Transplant: Carefully dig up the seedlings and transplant them to the garden after the last spring frost date. Water well and protect from harsh sun initially.
Caring for Growing Daylilies
Once your daylily seedlings are established in the garden, follow these care tips to help them thrive:
-
Sun and soil: Grow daylilies in full sun to partial shade. They need at least 6 hours of sun per day and fertile, well-drained soil.
-
Water: Supply 1-1.5 inches of water per week in dry periods. Avoid overwatering.
-
Mulch: Apply 2-3 inches of organic mulch around plants to retain moisture and reduce weeds.
-
Fertilizer: Feed with balanced flower fertilizer once or twice during spring growth. Avoid high nitrogen formulas.
-
Deadheading: Remove spent flower scapes after blooms fade to encourage reblooming.
-
Division: Mature plants can be divided every 3-5 years in fall to propagate and rejuvenate the daylilies.
-
Pruning: Cut back foliage to about 6 inches after first fall frost.
-
Winter care: Add a layer of mulch over the dormant fans after pruning to insulate roots over winter.
Troubleshooting Problems
Daylilies are not prone to many issues, but here are some potential problems and solutions:
-
Failure to flower: This can be caused by too much shade or nitrogen. Move plants to a sunny spot and use a balanced fertilizer.
-
Leaf spots or rust: Improve air circulation and avoid overhead watering. Remove affected foliage and treat with fungicides if needed.
-
Insect pests: Aphids, thrips, spider mites, and Japanese beetles may sometimes infest plants. Control with organic insecticidal soaps or neem oil.
-
Rodent damage: Mice, voles or squirrels may eat roots and buds. Use traps, repellents, or barriers to protect plants.
Enjoying the Benefits of Daylilies
Growing daylilies from seed does take some patience, as most plants won’t bloom until their second or third year. But the wait is well worth it when those vibrant, carefree flowers finally arrive! Daylilies add three seasons of interest to the garden with their lush summer foliage, abundant blooms, and striking winter forms.
Starting these versatile perennials from seed is very rewarding. As your plants establish and multiply over the years, you’ll have plenty to share with gardening friends and family too. Before long, you may have beautiful drifts of daylilies gracing your landscape – all grown yourself from just a small seed packet.
So give seed propagation a try this spring and enjoy watching your new daylily garden take shape. The simple process of nurturing those tiny seeds yields amazing results! With a bit of time and care, you’ll have vibrant flowers blooming in every hue.
Email me a log in link Account Email CAPTCHA
No promotional rates found.
Get the latest Daily Sentinel headlines in your inbox!
Success! An email has been sent to with a link to confirm list signup.
Error! There was an error processing your request.
Sorry, an error occurred.
Account processing issue – the email address may already exist User information Username (Optional)
Thank you .
Your account has been registered, and you are now logged in.
Check your email for details.
Invalid password or account does not exist Email Address Password
Submitting this form below will send a message to your email with a link to change your password. Email or Screen Name CAPTCHA.
The email address associated with your account has been sent an email with instructions on how to change your password.
How to Grow Daylily Seeds (Growing Germination) Daylilies
FAQ
How do you plant daylilies from seed?
Do you soak daylily seeds before planting?
Do I need to stratify daylily seeds?
How do you grow daylilies from seed?
It’s possible to plant the seed immediately. Growing daylilies from seed is easy and can be sown directly in the ground in most climates. In moist soil with lots of incorporated organic matter, sow the seeds at a depth of ½ to ¾ of an inch (1-2 cm.). Keep the soil moist until seedlings emerge, which should take one to two weeks.
Are daylilies easy to grow?
Growing daylilies from seed to bloom is very easy to do. All it takes is a little time and patience. The seeds are easy to grow if you use the right techniques, and the anticipation of the new blooms is very exciting. Each daylily seed offers the potential for a new cultivar or hybrid, and each seed is unique in it’s own way.
When should I plant daylily seeds?
Time frame for planting daylily seeds is different for different growing zones. Here in zone 5b I place the seeds in the cold moist chill starting in March, and start planting in April. There are other gardeners who start much earlier in the season and grow them under lights before planting outside.
Where can I buy daylilies?
You will not likely be able to purchase them at a local store, but certainly can find them online. Hybridizing- you can take two daylilies in your garden and dab the pollen of one to the pistol of the other, crossbreeding to create new seeds, which will grow inside a developing seed pod until mature.