You just got your Zombie Myco All In One Mushroom Grow Bag. Now what do you do?
All in one mushroom grow bags provide an easy, convenient way to cultivate gourmet mushrooms at home. These pre-inoculated blocks contain sterilized substrate and spawn, allowing you to skip complex preparation steps. With simple maintenance, the mycelium will colonize the block and produce bountiful mushrooms. Follow this complete set of all in one grow bag instructions to get your fungi growing in no time!
Selecting an Ideal Growing Space
Choosing the right location is the first step for your all in one grow bag Find an indoor spot protected from direct sun, drafts and extreme temperature swings A basement, garage or insulated shed are often suitable. The ideal temperature range is 65-75°F. Avoid areas that get over 80°F or under 55°F. High humidity between 70-90% is also key, so consider increasing ambient moisture with a humidifier. Good air circulation is important but avoid strong, direct fans blowing on the bags.
Sanitizing Your Workspace
Set up a clean working area before handling your grow bag. Clear the space of clutter and wipe down surfaces with 70% isopropyl alcohol. Working in front of a flow hood or still air box provides added contamination protection. Thoroughly wash your hands and wear latex gloves when manipulating the bag. Sanitize the injection port, scissors knives or any other tools with alcohol wipes. Take precautions against introducing contaminants.
Inoculating the Grow Bag
Once your workspace is prepped, you can inoculate the all in one bag. Begin by flame sterilizing the needle tip of your liquid culture syringe Let it cool before injecting 2-5 mL of culture through the bag’s injection port Using a spore syringe will delay colonization by 1-3 weeks during germination. Distribute the inoculant evenly by gently massaging the bag after injecting. Store any leftover culture properly in the fridge.
Incubating the Bag for Colonization
Place your inoculated grow bag in your prepared growing area, out of direct light. Ideal colonization temperatures are 70-75°F. Avoid temperatures below 60°F or above 80°F. Be patient – full colonization can take anywhere from 3 weeks to 3 months depending on variables. Resist disturbing the bag until the mycelium nears 100% colonization. White mycelium will spread from the injection site when growth commences.
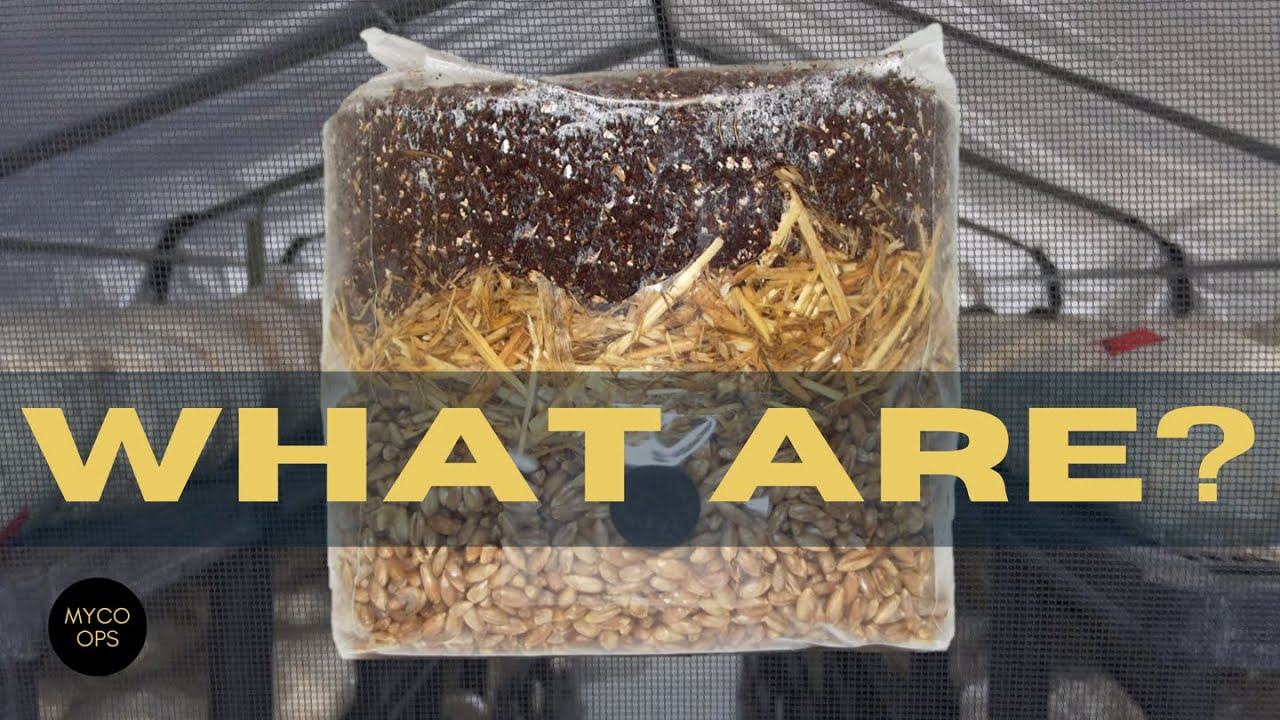
Mixing the Substrate for Even Colonization
Once the bag is almost fully colonized, gently break apart any clumps and mix the substrate to disperse mycelium. Don’t be too rough. This will speed colonization of remaining uncolonized areas. After mixing, let the bag sit undisturbed for 1-2 more weeks until dense, white mycelium permeates the entire substrate. Forcing early fruiting leads to poor results. Patience pays off!
Initiating Fruiting Conditions & Pinning
Mycelium needs proper conditions to produce mushrooms. After full colonization, introduce light and fresh air to trigger pinning. 12 hours of daylight prompts primordia formation. Cut a few small gas exchange holes if the bag lacks filters. Avoid direct sunlight which can overheat the bag. Keep humidity high and fan the bag daily to refresh air.
Within a week, small white pins should emerge from the block. Resist the urge to alter conditions or manipulate the bag while pins develop. Changes could cause aborts. Once pins mature into small mushrooms, you’re ready for the next steps.
Preparing the Grow Bag for Optimal Fruiting
To generate the best harvest, prep the grow bag when mushrooms reach 2-4 inches tall. First, make a horizontal slit about 1 inch below the substrate line to prevent side pinning. Secure the area under the slit with a rubber band or tape. Next, cut an X-shaped gap just above the substrate level to expose the developing caps. Leave the back and bottom sealed.
Mist the inside walls through the X-slits 1-2 times daily to maintain humidity. Avoid directly spraying the mushrooms or block which can cause rotting. Some growers remove the top fully but this dries out the substrate faster. The X-cut method balances moisture and air exchange.
Determining the Best Time to Harvest
Unlike produce, mushrooms grow extremely fast and don’t last long before spoiling. Check your grow bag at least once a day and harvest each mushroom as soon as the cap edge begins curling under. Harvest before veils break open or caps flatten out. Twist mushrooms gently to remove without damaging the block. Use a sharp knife to cut away stems left behind.
Handle mushrooms delicately to prevent bruising which decreases shelf life. Refrigerate promptly after harvesting for longest freshness. Don’t leave overmature mushrooms on the block as they attract pests and can rot. Pick frequently for maximum yields.
Flushing the Grow Bag for Additional Harvests
Even after the first flush, your grow bag still has potential. To rejuvenate it for another crop, first remove all mushroom stems. Then seal it up and soak the block in cool water for 6-12 hours. Drain excess moisture and let it recover for 5-7 days. Rinse and repeat the fruiting process, allowing air exchange once new pins emerge. With proper care between flushes, you can often harvest 3-4 times from each bag.
Avoiding Contamination During Fruiting
Bacterial blotch, mold and other pathogens can quickly ruin a grow. Isolate and dispose of any bags showing green, black or orange growth. Disinfect the area to prevent spreading contamination. To limit risks, don’t open the bag unnecessarily, use sterile procedures when handling, and maintain cleanliness in the growing space. Good air flow also prevents problems. Act fast at first sign of trouble.
Tips for Maximizing All In One Grow Bag Yields
Following best practices will help ensure your grow bag produces the highest mushroom yields possible:
-
Maintain a stable, ideal temperature range
-
Keep humidity levels between 80-95%
-
Provide 12 hours of moderate daylight
-
Fan and ventilate the bag daily
-
Pick mushrooms as soon as they mature
-
Avoid overhydrating or drying out the block
-
Keep pests like fungus gnats and mites away
-
Sanitize tools and workspace frequently
-
Act promptly if contamination appears
With this complete set of all in one grow bag instructions, you’ll understand each step required to nourish abundant and delicious mushroom harvests at home. Just provide your bag with the right care and growing conditions, then enjoy the fruits of your fungal labor!
Step #3 – “Fruit”
- Ensure your fruiting block is now 100% colonized.
- Hold up the top of the bag until it’s fully inflated, then slowly fill it with clean air.
- Put the bag somewhere that gets light every day for about 8 to 14 hours. A simple fluorescent bulb is enough light for mushrooms. They prefer light in the 5000-6000k light spectrum.
Wait ~2 Weeks
Step #2 – “Mix”
- Ensure grain is at least 50-100% colonized with white mycelium.
- Gently break up mycelium growth.
- Fully mix grain layer and substrate layer together.
- Return bag to cool dark location
Wait ~3 Weeks
Myco Labs All in One Grow Bag Instructional Video
FAQ
How long do you colonize all in one grow bags?
When to break up all in one grow bag?
When to fruit all in one grow bag?
What is an all-in-one grow bag?
Versatility: The all-in-one grow bag is not just limited to one type of mushroom. Whether you’re keen on using mushroom spores or a live culture, the bag is designed to support the growth and development of mushrooms of various species. Efficiency: The all-in-one approach streamlines the mushroom cultivation process.
What is an all-in-one mushroom grow bag?
In essence, the all-in-one mushroom grow bag offers a holistic approach to mushroom cultivation. Every component, from the bottom of the bag to the top, has been designed with the mushroom’s lifecycle in mind, ensuring that cultivators, whether beginners or experts, have the best chance at growing their own delicious mushrooms at home.
What is an all-in-one grow?
The genius behind the all-in-one grow concept is its comprehensive approach. Instead of juggling multiple components, cultivators can now rely on a single grow bag with mushroom substrates and all the necessary elements for the entire cultivation process, from the initial spawn bag phase to the final fruiting stage.
What can I do with a mushroom grow bag?
Post-Harvest Care: Once you’ve harvested your mushrooms, you can choose to use a mushroom grow bag for another round of cultivation or dispose of the substrate. The all-in-one mushroom grow bag simplifies the intricate process of mushroom cultivation, making it accessible even to beginners.
- How to Grow Gorgeous Climbing Roses on a Wooden Fence - March 24, 2026
- Avoid These Plants When Companion Planting with Oregano - March 24, 2026
- 15 Great Trees to Plant Near Your House - March 24, 2026