Russian sage is a great plant for the ornamental garden because it blooms early, has a nice texture, and doesn’t mind being dry. Some gardens have lavender flowers that last up to fifteen weeks, but most only get ten. This fragrant woody perennial starts blooming in the middle of summer and keeps blooming for that long.
The Russian Sage plant is tall and has an airy, textural habit. It looks great with perennials like tall verbena or coneflowers that can match its height and bring out its color. It’s a pollinator-magnet and a perfect plant for those areas of poorer soil in your garden. Just make sure that soil is well-drained, Russian sage doesn’t like wet feet during any season!.
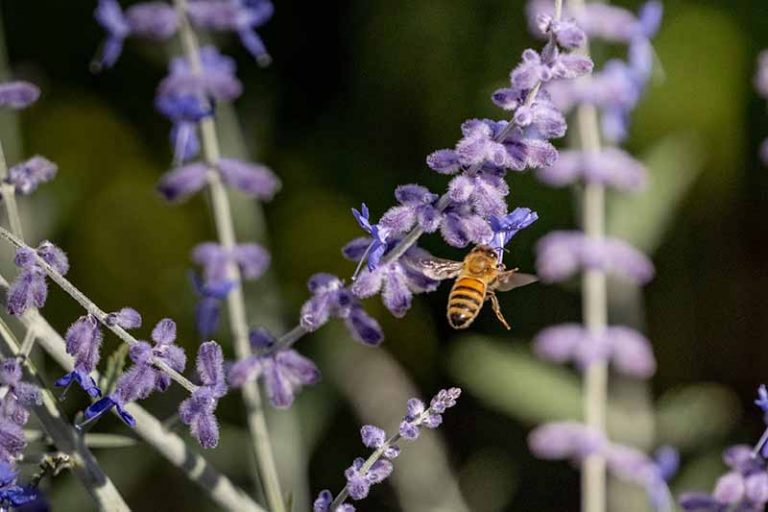
Russian sage is a gorgeous perennial that brings lovely purple-blue blooms and silver foliage to gardens from midsummer into fall. It has a beautiful, airy look and a lovely fragrance that makes it a joy to have in your outdoor space. If you already grow Russian sage, you may be wondering if you can divide it to propagate more plants – and the answer is yes! Dividing Russian sage is totally possible with some simple steps.
In this complete guide, we’ll cover everything you need to know about dividing your Russian sage successfully We’ll look at when to divide it, how to divide the roots, tips for transplanting and caring for the new divisions, and more. Read on to learn all about dividing this incredible plant!
An Overview of Russian Sage
Before we dive into dividing, let’s start with a quick overview of some key facts about Russian sage that are useful to know:
-
Russian sage (Perovskia atriplicifolia) is a perennial plant in the mint family Lamiaceae. It is native to Central Asia.
-
It grows 3-5 feet tall and 2-4 feet wide. The slender spikes of tubular purple-blue flowers bloom from midsummer well into fall.
-
The leaves are finely cut and silvery gray in color. The foliage has a lovely fragrant scent when rubbed or brushed.
-
Russian sage thrives in full sun and dry, well-drained soil. It is drought tolerant once established.
-
This plant spreads by self-seeding and is known to take over garden beds. Dividing it regularly helps prevent overcrowding.
-
Russian sage attracts butterflies and pollinators to the garden. It also works beautifully as a cut or dried flower.
When to Divide Russian Sage
Russian sage should be divided every 2-3 years in either early spring or fall. Here are some signs it’s time to divide:
-
The center of the plant is dying out and growth looks leggy.
-
Blooms are smaller and less prolific than previous years.
-
It has overgrown its space in the garden.
-
You simply want more plants! Dividing in spring or fall gives new divisions time to establish roots before winter dormancy or summer heat.
Avoid dividing when the plant is in full flower during mid to late summer. You want the buds to be dry and inactive.
How to Divide Russian Sage
Here are the simple steps for successfully dividing your Russian sage:
1. Cut the Stems Back
Start by cutting back the stems to about 6-8 inches above the ground using pruners or garden shears. This reduces water loss during transplanting.
2. Dig Up the Plant
Dig up the entire plant with a shovel, making sure to dig at least 6 inches out from the outermost roots. Take care to retain as much of the root system as possible.
3. Remove Excess Soil
Gently shake or hose off some of the soil from the roots so you can see where to divide them. Try to keep fibrous feeder roots intact.
4. Divide the Roots
Using your hands, gently pull apart the root mass into smaller sections. For large plants, divide into thirds or quarters. Smaller plants can be halved. Each division should have a good portion of roots and crown stems.
5. Keep Roots Moist
As you work, keep the separated root divisions in a bucket of water so they don’t dry out.
6. Prepare New Planting Holes
Dig holes for the new divisions as deep as the root mass, spacing them 18-24 inches apart. Mix compost or organic matter into the soil to enrich it.
7. Transplant Divisions
Place each division in its new planting hole. Make sure the crown is level with the soil surface. Fill holes with amended soil, firming it gently around the roots.
8. Water Thoroughly
Water each new division well after planting to remove any air pockets in the soil.
9. Mulch Around Plants
Once the ground starts to freeze in late fall, mulch around the new plants to protect the roots through winter.
Caring for Newly Divided Russian Sage
Here are some tips for looking after your newly divided Russian sage plants:
-
Water regularly for the first few weeks after transplanting, especially during droughts.
-
Stake larger divisions if needed to keep them upright until the roots establish.
-
Prune back any dying or damaged growth to stimulate new shoots.
-
Apply a balanced fertilizer or compost in early spring to encourage growth.
-
In very hot climates, provide some afternoon shade the first summer after dividing.
-
Cut plants back to 6 inches in late fall after the first hard frost.
-
Avoid trimming, fertilizing, or disturbing roots once buds form in summer.
With proper care, your new Russian sage divisions should be fully established plants within 1-2 growing seasons. They will reward you with their signature floral show and fragrance year after year!
Troubleshooting Problems With Divided Plants
If your divided Russian sage plants struggle and appear stunted the first season, here are some common issues and solutions:
Problem: Plants are wilting or leaves are yellowing.
Solution: Drought stress, underwatering. Improve drainage if needed and water more frequently until established.
Problem: Stems are falling over and growth is lanky.
Solution: Not enough sun. Move to a full sun location once dormant in late fall/winter.
Problem: Few flowers or dieback.
Solution: Transplant shock. Prune back damaged areas and wait for regrowth next year.
Problem: Failure to thrive or plants die.
Solution: Root damage during division. Avoid dividing future plants in summer heat. Water more initially.
Key Takeaways on Dividing Russian Sage
Here are the key tips to remember:
- Divide when plants are dry and dormant in spring or fall
- Cut back stems first, then dig up and divide the roots
- Keep roots moist and transplant into enriched soil
- Water frequently after transplanting new divisions
- Allow divisions a full season to establish before flowering
- Troubleshoot any issues to get plants healthy
With this handy guide, you can feel confident dividing your own Russian sage plants. You’ll love having more of these fragrant, butterfly-attracting perennials gracing your garden beds. Enjoy their beauty for many years to come!
How to Grow Russian Sage Throughout the Season
Growth Habit: Russian sage is a tall plant, 3-5 feet in height with a spread of 2-3 feet. There are gray-green leaves that look like lavender, and the flowers on the tall panicles have a similar color and feel. Plants create a woody base over time that should be cut back in early spring.
Staking: Though Russian sage is a tall plant, it is not normally staked. Locating it in a very sunny position will create a strong plant that will not flop over.
Watering: Russian sage is very hardy in dry conditions once it’s fully grown, but it needs to be watered regularly for the first year in the garden to make sure its roots are deep and resistant to drought. At that time, allow it to dry out between waterings. It should not be overwatered in following years, and will perish in soils that are not well-draining.
For fertilizing, you don’t need to do anything extra, but a light covering of compost in the spring can be helpful.
Putting down mulch: In the winter, mulch can be used to protect plants that are more likely to get hurt, but Russian sage doesn’t need it during the growing season. And if you have to mulch for looks’ sake, do it lightly and keep it away from the plant’s crown. Consider using gravel or creating a gravel garden with other drought tolerant plants.
Cutting In the winter landscape it is a visual bonus, offering a ghostly, airy appearance on frosty mornings.
In colder northern climates, the plant may die back to the ground. It can be helped by being cut back after the first frost in the fall and lightly mulched with straw or garden waste to protect it.
When & Where to Plant Russian Sage
Russian Sage can be planted in either the early spring or late fall. Put your plants somewhere sunny with grittier soil (sandier loam) to help it drain well and make sure they can survive the winter.
Light: Full sun is recommended for Russian sage. Part sun conditions will cause the plant to become leggier and flop over.
Soil: Russian sage is a terrific choice for poorer soils that are on the rocky side. It does well in alkaline conditions (pH > 7) and does not tolerate boggy, acid soils.
Space: When you plant Russian sage, put it 24 inches apart so that it can grow wide over time.
The Russian sage plant grows slowly and doesn’t spread. Instead, the stems at the base of the plant are woody. At maturity, it can create offsets (‘mini’ plants with partially developed root systems) at its base.
For best results, plant Russian sage in the early spring or early fall. This will give its roots time to grow during the off-season.
How to Divide Russian Sage
- The Moderate Growth Rate of the Stunning Edith Bogue Magnolia - April 10, 2026
- Cultivating Vibrant Dahlias in Garden Beds – A Complete Growing Guide - April 10, 2026
- Mediterranean Pink Heath in Summer – Tips for Care and Maximizing Bloom - April 9, 2026