Have you ever thought about whether it would be simple to grow mushrooms at home without having to buy a new kit every time?
To find out, I went to visit mushroom expert, Ivan Lucas, who runs Mushroom Box.
Ivan explained that the choice of the mushroom you grow is critical to success. The easiest are the oyster mushrooms. They will grow happily and quickly inside, in almost any space (even under your bed!) on chopped straw, cardboard, old cotton clothes, unbleached paper, or a mix of these. Coffee grounds can also be used but are more difficult because they easily go mouldy.
While chopped straw is the best medium for growing things, it may be hard for some of you to find in small amounts where you live (it is for me). So I asked Ivan to show us how to use waste card, which IS usually in plentiful supply.
There are many varieties of oyster mushrooms. Two good choices of oysters to grow first are:
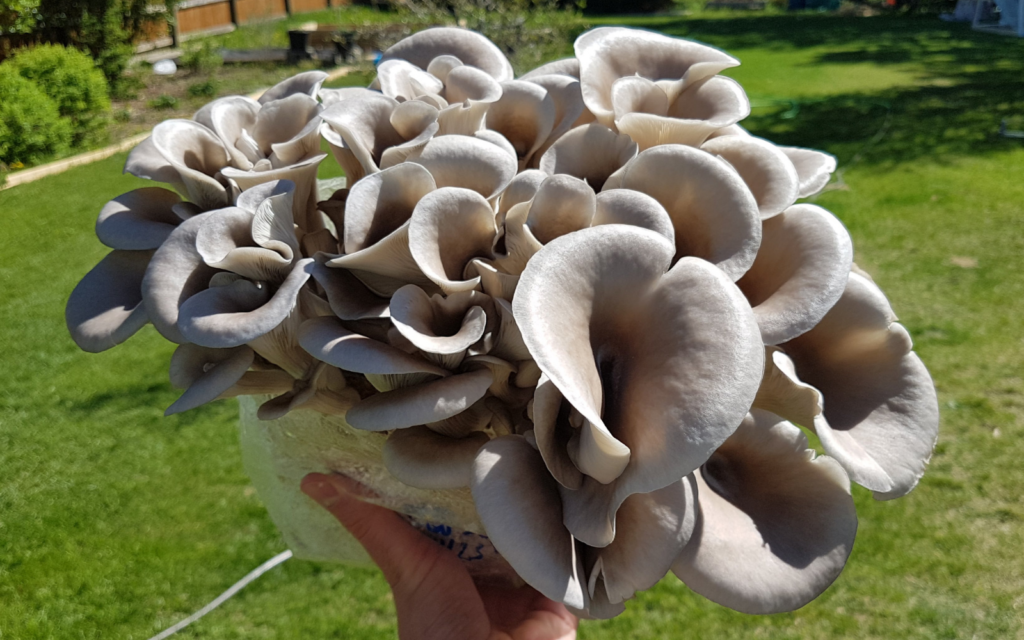
Adding fresh, homegrown mushrooms to your meals is easier than you think with the beginner-friendly blue oyster mushroom. These mild, versatile mushrooms can be grown indoors or outdoors using inexpensive materials, making them an accessible hobby for everyone.
In this comprehensive guide, we’ll cover everything you need to know to start growing delicious blue oysters right at home.
An Overview of Blue Oyster Mushrooms
Blue oyster mushrooms (Pleurotus ostreatus) are a cold-weather mushroom native to North America, Europe and Asia. They earned their name from their oyster-shaped caps that range from pale gray to deep blue-gray depending on temperature during growth.
These mushrooms have a mild, slightly sweet flavor and firm meaty texture. Their nutrient-dense caps and stems are rich in B vitamins, vitamin D protein, and antioxidants.
Blue oysters are known for being one of the easiest gourmet mushrooms to grow thanks to their vigorous growth and resistance to disease. They’re a top choice for beginners looking to cultivate mushrooms indoors or outdoors.
Choosing a Growing Method
Blue oysters are highly versatile when it comes to growing methods. Here are some of the most common ways to cultivate them at home:
-
Indoor grow kits – All-in-one kits contain a pre-inoculated growing medium. Just open, mist, and harvest!
-
Fruiting blocks – Inoculate sterile sawdust blocks and grow in a humidity tent or bucket.
-
Bagged substrates – Inject grain spawn into grow bags filled with pasteurized straw or wood chips.
-
Outdoor logs – Inoculate freshly cut logs with plug spawn. Grow in shady, moist areas.
-
Garden beds – Mix grain spawn into wood chip beds or potting soil. Maintain moisture.
-
Monotubs – Layer spawn throughout trays filled with a nutritious bulk substrate.
No matter which growing method you choose, the key requirements are consistent humidity, moderate temperatures, and adequate fresh air exchange once pinning begins.
Step-by-Step Instructions
Follow this simple process for growing blue oysters at home:
1. Choose Your Growing Method
Consider your space, budget, and skill level. Grow kits are the easiest starting point for beginners. Expand to more hands-on techniques like monotubs or logs once you gain experience.
2. Obtain Sterile Spawn
Purchase spawn specific to growing blue oyster mushrooms, such as grain spawn, sawdust spawn, or plug spawn. Never use spawn from the wild.
3. Prepare Growing Medium
Pasteurize bulk substrates like straw to kill contaminants. Kits and blocks come pre-inoculated and sterilized. Logs should be freshly cut green wood.
4. Introduce Spawn to Medium
Mix, inoculate, or layer spawn throughout your growing medium according to your chosen technique.
5. Allow Mycelium to Colonize
Keep growing area dark, humid, and around 60-75°F. Let the mushroom mycelium fully colonize the substrate. This takes anywhere from 1-12 weeks.
6. Initiate Fruiting Conditions
Increase fresh air exchange, light, and humidity to trigger pinning. Mist substrate and harvested mushrooms to maintain humidity above 85%.
7. Harvest Mushrooms
Pick mushrooms clusters when caps first start to flatten out. Harvest frequently to encourage new flushes. Store fresh in the fridge up to one week.
Tips for Success with Blue Oysters
Follow these best practices to get a bountiful harvest:
-
Sterilize everything that touches your growing medium to prevent contamination.
-
Avoid over-handling bags and containers once mycelium begins colonizing.
-
Discard any blocks or bags with green, black, or foul-smelling mold. Bury outdoor logs.
-
Pick mushrooms young before spores start dropping to extend shelf life.
-
Give your grow area plenty of airflow during fruiting. Blue oysters are sensitive to high CO2.
-
Start on a small scale your first try. Troubleshoot any issues before expanding.
Enjoying the Fruits of Your Labor
Once you get the basics down, blue oyster mushrooms will provide a consistent supply of flavorful fresh mushrooms. They’re easy to incorporate into many recipes like soups, stir-fries, and pasta dishes. Simply sauté them in olive oil and garlic for a tasty side.
Growing your own mushrooms is extremely rewarding. In no time, you’ll be hooked on cultivating different gourmet mushroom varieties at home. The blue oyster is the perfect starting point on your mushroom growing journey!
Step 1: Pasteurise the cardboard
Kill most of the microbes that are living on the cardboard before you put your oysters on it. This will give your oysters a better chance of survival and keep the card from getting moldy. One easy but effective way to do this is to soak it in boiling water. This is called pasteurization. Oyster mushrooms are “primary decomposers,” which means they are one of the first living things to move in after a tree or plant has died. Also, they can’t fight off other molds and bacteria very well, which is another reason why pasteurization is so important.
- Prepare your cardboard. As you can see in the video, egg trays don’t need any extra work before they can be used. But if you’re using cardboard boxes, you’ll need to either tear the card into strips or cut it into squares of the same size and layer the mushroom spawn between them.
If you cut your cardboard up into squares, you can sandwich the spawn between each layer after pasteurisation (in the same way Ivan does with the egg trays in the video).
- Next, put the cardboard in a heat-resistant container like a bucket, bowl, or strong, heat-resistant plastic bag. Boil the kettle and pour hot water over the cardboard until it is completely covered. If you press the card down, you can use less water. Cover the bucket with a lid and let it cool down for eight hours or overnight.
Soaking the cardboard in boiling water is vital to kill off contaminating organisms. Make sure the water is completely cool before adding the mushroom spawn.
Step 3: Colonisation of the cardboard
In this step, the mushrooms are put somewhere warm for a few weeks so that they can grow on the cardboard.
- Inside a bigger plastic bag (like a trash bag), do not make any holes in the bottom. Place the egg trays or card strips inside it. Close this to exclude the fresh air. There will be more carbon dioxide inside the bag, which will help the mushroom grow through the cardboard sheet.
- After that, put the bag somewhere warm. For blue gray oysters, it needs to be at least 10 0C and for pink oysters, it needs to be at least 180C. Some warmer places, like an airing cupboard, will help them settle in faster.
- Once every two days, open the bag to make sure there aren’t any water pools at the bottom (moisture is good, but water pools are not). If you find excess water, pour it out.
- For 3 to 4 weeks (pink oysters) and 4 to 6 weeks (blue-grey oysters), close the bag up again and put it back somewhere warm. They do not need light during this stage. You can just leave them during this time. You could write them down or put a note on your phone to remind you so you don’t forget!
After about four to eight weeks (depending the species and the temperature), the cardboard should be fully colonised by the mushrooms. When you open the bag you will see white mycelia (mushroom strands) all over the card. If it does not look fully colonised, put it back in the bag for another week or two.
How To Grow Blue Oyster Mushrooms
FAQ
Are blue oyster mushrooms easy to grow?
What is the best wood to grow blue oyster mushrooms?
What part of blue oyster mushroom is edible?
How do you grow oyster mushrooms?
The most widely-used substrate for growing oyster mushrooms is straw. There are two key growing periods, called the incubation period (steps 1 to 4 below) and the fruiting period (steps 5 to 7). Poke holes in the bag to allow excess water to escape and allow exchange of air. Place the bag in a sheltered and warm environment above 70˚F.
What temperature does a Blue Oyster mushroom grow?
Blue oyster mushroom. source The blue oyster mushroom usually colonizes its growing media quickly. They are a cold-weather variant of the pearl oyster mushroom, Pleurotus ostreatus, and grow in temperatures from 45-65 degrees Fahrenheit, although they do not fruit heavily unless it’s around 60 degrees.
Can you grow Blue Oyster mushrooms?
Growing Blue Oyster mushrooms can be an incredibly rewarding experience, both culinary and therapeutically. The sense of accomplishment when harvesting your own mushrooms is unparalleled.
How long does it take to grow oyster mushrooms?
A: It takes anywhere from 2 to 4 weeks, with conditions that are right for growing them. Q: Can you grow oyster mushrooms at home? A: Absolutely! This guide will give you all the information you need to do so.
- How to Grow Gorgeous Climbing Roses on a Wooden Fence - March 24, 2026
- Avoid These Plants When Companion Planting with Oregano - March 24, 2026
- 15 Great Trees to Plant Near Your House - March 24, 2026