If you like how sage gives food its own unique flavor, you probably grow this lovely herb in your home garden. Yet over time, sage plants tend to get a bit woody and need to be replaced. One of the best ways to acquire new plants is by propagating sage from existing ones.
As both a culinary and ornamental plant, sage is a wonderful addition to any herb garden. Its soft gray-green leaves and pretty purple flowers provide year-round interest. And being able to harvest and dry fresh sage for cooking is such a joy. The trouble is, after a few years, sage plants tend to get woody and stop producing vigorous new growth. The best way to renew your sage patch is to propagate new plants from cuttings. It’s easy, fun, and produces identical clones of your existing plants.
Why Grow Sage from Cuttings?
Taking cuttings from mature sage plants is faster and more reliable than growing sage from seed. Sage seeds can take up to 75 days to produce harvestable leaves. But propagating from cuttings bypasses the germination wait. With proper care, you can have fresh young sage plants ready to transplant in as little as 4-6 weeks!
Other benefits of growing sage from cuttings include:
-
Produces genetically identical plants. Cuttings preserve all the desired traits of the parent plant.
-
Allows you to multiply special varietals. propagate unique sage cultivars like tricolor, golden, pineapple, etc.
-
Saves money. Get free starts vs buying new plants.
-
Provides materials for sharing. Pass along cuttings to fellow gardeners
-
Fun propagation project for beginners Great way to learn plant cloning,
-
Low maintenance. Sage cuttings thrive with minimal intervention.
When to Take Sage Cuttings
The best time to take sage cuttings is spring through early summer when plants are actively growing. This tender new growth will root the quickest. Take 4-6 inch cuttings from the tips of healthy stems. Avoid the older woody parts down by the base of the plant.
You can also take hardwood cuttings in late fall after plants go dormant. Use a pencil-thin stem that has recently hardened off. Remove all leaves then store cuttings over winter in a cool spot until ready to plant in spring.
Gather Your Propagation Supplies
Before taking your cuttings, have these supplies on hand:
- Clean, sharp scissors or garden snips
- Small containers – glasses, jars, pots, trays, etc.
- Rooting hormone (optional but recommended)
- Seed starting mix or potting soil
- Water – filtered or distilled is best
Step-By-Step Guide to Rooting Sage Cuttings
Follow these simple steps for propagating sage from cuttings:
1. Snip Off Cuttings
Use sharp, clean scissors or snips to take 4-6 inch stem cuttings from the tips of healthy sage growth. Make a straight or angled cut just below a leaf node.
2. Remove Lower Leaves
Strip off the bottom 2-3 inches of leaves from each cutting. This is where the roots will emerge.
3. Dip in Rooting Hormone (Optional)
Dip the bare end of each cutting in rooting hormone powder or gel. This encourages faster root development.
4. Insert in Soil or Water
Stick cuttings at least 2 inches deep either directly into pots of soil or place in jars of water.
5. Provide Warmth and Light
Set containers in a warm spot (65-75°F) with bright, indirect light. Avoid direct hot sun.
6. Change Water Weekly
For water rooting, replace water weekly to prevent rotting. Let soil cuttings dry out between waterings.
7. Watch for Root Growth
Check for root development after 2-3 weeks. Look for white bumps emerging from stems.
8. Transplant with Roots 1-2 Inches Long
Once rooted, plant out sage cuttings into the garden or larger pots. Harden off first.
It’s that easy! In just 1-2 months from cutting to planting, you can add beautiful young sage plants to your garden.
Growing Medium – Soil vs Water
You can root sage cuttings directly in soil or propagate them in water first. Both methods work well.
Soil propagation involves sticking the cuttings in sterile seed starting mix or a light potting soil. Keep the soil moist but not saturated.
Water rooting allows you to visually monitor the rooting process. Roots will grow from the stem into the water. Change water weekly to prevent rot.
I’ve had success with both methods but seem to get a higher success rate by rooting in water first. It’s fun to watch the tiny white roots emerge!
To Hormone or Not to Hormone?
Rooting hormone is an optional step but I highly recommend it, especially if rooting cuttings directly in soil. The hormones speed up the growth of new roots. Look for powders, gels, or liquids formulated for propagating houseplants and herbs. Or make your own natural rooting hormone from willow water or aloe vera gel.
If skipping the hormone, I suggest using the water method rather than soil. The water provides more ideal conditions for the cuttings to form roots without chemical aids.
Caring for Sage Cuttings
To ensure your sage cuttings thrive, provide the following care:
-
Warm temperatures between 65-75°F
-
High ambient humidity. Enclose in mini greenhouse or zipper bag.
-
Bright, indirect light. Avoid direct hot sun.
-
Remove flowers or flower buds to encourage leaf growth.
-
Change water weekly for water-rooted cuttings.
-
Allow soil to dry out between waterings to prevent damping off disease.
Transplanting Rooted Sage Cuttings
Once your cuttings have developed a network of 1-2 inch long white roots, it’s time to transplant them! Here’s how:
-
Pot up in 3-4 inch nursery pots filled with potting mix amended with compost.
-
Water in newly planted cuttings to remove air pockets.
-
Place in partial shade for 7-10 days to harden off.
-
Gradually introduce to full sun over 2 weeks.
-
Pinch back tips to promote bushy growth.
-
Transplant to the garden after hardening off. Space 18-24 inches apart.
Troubleshooting Propagation Problems
Here are some common issues and solutions for propagating sage from cuttings:
Cuttings wilting – Increase humidity, water more frequently. Don’t let soil or water dry out.
No roots forming – Use younger stems, take cuttings in spring/summer, use rooting hormone.
Roots are small/weak – Provide more warmth and brighter (not direct) light.
Stems rotting – Use sterilized scissors, change water weekly, don’t overwater soil.
Leggy growth – Give more light, pinch back tips to encourage bushiness.
Enjoy an Endless Supply of Homegrown Sage
I hope these tips empower you to start growing tasty, robust sage from cuttings. Before you know it, you’ll have the skills to propagate all kinds of plants by cuttings. It’s an extremely useful technique for any gardener!
Growing Sage from Seed
Sage plants from seeds might be your first choice if you want to add them to your garden for the first time or get rid of old, woody ones. You can start sage plants indoors in early spring or plant them directly outside after the risk of frost has passed.
Its best to sow sage seeds thinly, then cover them with 1/8 inch (. 3 cm. ) of fine soil. It may take two to three weeks for sage seeds to sprout, so keep the area damp but not drenched. When the seedlings have two or three sets of true leaves, they are ready to be thinned or moved.
In comparison with other types of herbs, sage grows very slow. It can take up to two years for sage plants to reach maturity. Even under ideal conditions, it takes about 75 days to get harvestable-sized leaves when growing sage from seed.
Propagating Sage from Cuttings
It’s easy to spread plants, and growing sage from cuttings can cut down on the time it takes to grow herbs that can be picked. Soft wood cuttings can be started throughout the growing season. Not having your own sage plants? You might be able to root and grow the fresh sage cuttings you can find at the grocery store.
How to Propagate Sage from a Cutting
How do you grow sage from cuttings?
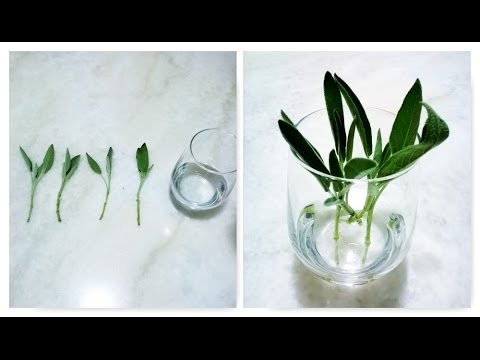
Water method: Place the sage cuttings in a glass or other short, petite container of water. Add a couple inches of water to the bottom of the glass. Use filtered and/or non-chlorinated water if possible. Soil method: Insert the cut stems into a container of seed starting soil or similar light potting medium. Plant the cuttings an inch or two deep.
How do you propagate sage from seed?
If starting sage from seed feels a bit overwhelming, you can easily propagate sage in either water or soil with a cutting. Snip a 4”-6” long cutting from a healthy, well-established sage plant. Remove all the leaves that will be below the water or soil and put the cutting in a jar of water or at least 2” deep into a damp seed-starting mix.
How long does it take Sage to grow from cuttings?
When growing sage from cuttings, it can take another 3 to 4 weeks for the plant to become established and for new growth to appear. Using pencil-thin hardwood stems is an alternative method for propagating sage from cuttings. Generally, hardwood cuttings are taken in the fall or winter when the plant is dormant.
How do you cut a sage plant?
When trimming sage cuttings from an established plant, select newer tender growth towards the tips of the plant rather than older woody growth closer to the base. Use clean scissors or garden snips to cut the stem about 4 to 6 inches long. Be sure the stem has at least one or two leaf nodes (where leaves grow from the stem).
- How to Grow Gorgeous Climbing Roses on a Wooden Fence - March 24, 2026
- Avoid These Plants When Companion Planting with Oregano - March 24, 2026
- 15 Great Trees to Plant Near Your House - March 24, 2026