A mud kitchen is a wonderful way to encourage open-ended outdoor play for kids. Building your own mud kitchen is a satisfying DIY woodworking project that results in an interactive play space kids will love
In this step-by-step guide, we’ll cover everything you need to know to construct a custom mud kitchen for your backyard.
Benefits of a Mud Kitchen
Playing in a mud kitchen helps develop children’s:
-
Creativity and imagination – They can “cook up” endless pretend meals,
-
Dexterity and motor skills – Scooping, pouring, stirring, etc build coordination.
-
Understanding of nature – They explore working with natural elements like soil, water, leaves.
-
Social skills – Kids collaborate, assign roles, and interact with peers.
-
Independence – They direct play scenarios and make their own choices.
A mud kitchen is open-ended play at its best! Now let’s look at how to build one.
Planning Your Mud Kitchen Design
Consider the following when planning:
-
Size – Scale it appropriately for ages of kids. Allow room for multiple kids.
-
Layout – Include “stations” like a stove, sink, prep area. Create flow.
-
Materials – Choose weather-resistant wood like cedar. Avoid treated lumber.
-
Safety – Avoid sharp edges or corners. Use kid-safe paint.
-
Accessories – Include hooks, shelves, bins for kitchen tools and ingredients.
-
Location – Pick a flat spot with dirt access and drainage. Offer shade and sun.
Draft plans to visualize the finished look. Take kids’ input too!
Gather Your Mud Kitchen Building Supplies
You’ll need:
-
Wood boards – Cedar, redwood, or pine work well. Go for 1×4, 1×6, 1×8, or 2×4 sizes.
-
Hardware – Wood screws or nails, corner braces, L brackets, utility hooks
-
Paint – Exterior-grade acrylic paint and primer
-
Container – For sink basin like a plastic tub or old stainless bowl
-
Tools – Saw, drill, screwdrivers, hammer, sandpaper, level, tape measure
Optional extras: chalkboard paint, gardening tools, pots and pans
Safety gear: goggles, ear protection, work gloves, dust mask
Construct the Mud Kitchen Frame
-
Cut wood to length for frame sides and cross supports according to plans.
-
Pre-drill holes to avoid splitting. Attach sides to cross supports with wood screws or nails.
-
Use a level and corner braces to square and stabilize the frame.
-
Add vertical front legs and attach with L brackets. Back legs can be taller.
-
Attach a lower shelf halfway up front legs for storage.
-
Sand edges smooth.
Add the Mud Kitchen Work Surfaces
-
Cut wood to size for counter tops and backsplash. Attach to frame.
-
Create the sink opening if making a through-counter basin. Cut hole precisely.
-
Attach pre-made sink basin or insert tub/bowl from underneath and attach.
-
Attach a faucet if adding running water. Ensure proper drainage.
-
Stain, seal, or paint work surfaces as desired. Allow proper curing time.
Embellish and Accessorize Your Mud Kitchen
Personalize by adding:
-
Chalkboard paint for menu boards, specials, or signs
-
Hooks on sides or backsplash to hang utensils
-
Open shelving or crates to hold play dishes, pots, pans
-
Baskets or bins for kitchen ingredients like leaves, petals, dirt
-
Decor like knobs, tiles, faux food, lights, artwork
Let kids help paint and decorate too! Add play value with:
-
Child-sized apron, chef’s hat, kitchen towels
-
Measuring cups, spoons, bowls, utensils
-
Serving platters, prep boards, pots, pans
-
Play food like plastic veggies, fruits, eggs
Maintaining the Mud Kitchen Over Time
-
Check periodically for splinters, loose hardware, sharp edges
-
Use mild soap and water to clean. Avoid pressure washing.
-
Sand and repaint as needed to refresh look.
-
Move indoors or cover during extreme weather.
-
Store accessories indoors when not in use to prevent damage.
-
Declutter unused items to keep space open for play.
Building a DIY mud kitchen is a great hands-on project for a weekend. Keep safety in mind, take your time, and have fun! Then let the kids’ imagination run wild playing chef. A mud kitchen makes spending time together outside even more enjoyable.
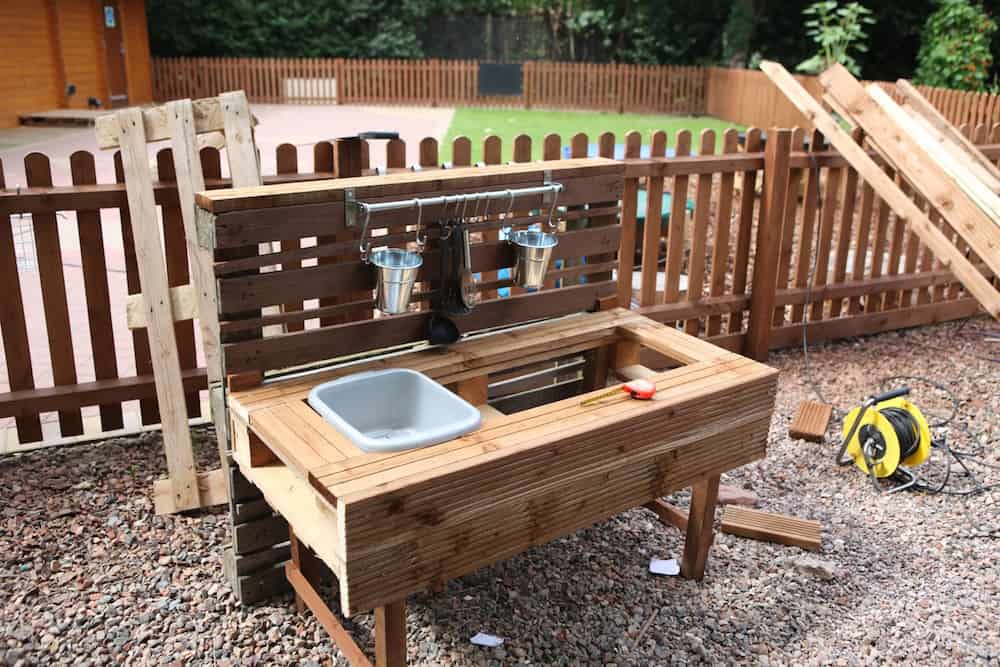
Step 1- Constructing the Base of the Mud Kitchen
Begin by assembling the main structure of the mud kitchen. I build the rectangular table frame first by fastening the wood together with 3” outdoor screws. Use 2 screws on every joint to ensure that the base is stable and securely fastened together. Use a speed square so that all the corners are square.
Step 4 – Add a bottom shelf
The kids can store their mud kitchen tools like pots and pans on the simple shelf I put on the bottom. First, I added the side supports.
How to Build a Mud Kitchen for Kids | Ask This Old House
FAQ
How much does it cost to build a mud kitchen?
How do you make a simple mud kitchen?
What to use for a sink in a mud kitchen?
What are the best DIY mud kitchen ideas?
Mud Kitchen with a recycled kitchen sink 10. These kids built their own DIY mud kitchen 11. Huge DIY mud kitchen makeover 12. Fancy mud kitchen 13. Recycled plastic mud kitchen I hope you enjoyed all the fantastic DIY mud kitchen ideas that I put together for you.
How do you frame a mud kitchen?
First, we will start with the overall framing of the mud kitchen. Cut the 2×2’s and 1x’4 per cut list, we will make two identical (mirrored) legs as illustrated below. Use either dual pocket holes or toenailing method to secure all the joints. After you’ve completed both leg frames, cut the 2×2 and 1×4 horizontal supports to 32 1/2” per cut list.
How do you keep a mud kitchen in the best shape?
If you want to keep your mud kitchen in the best shape, I would recommend keeping it in a garage or shed, or coving it during the winter. 2. Add running water Next, I wanted to add running water for that extra wow factor. We have a play kitchen that we’ve converted into a functional kitchen with running water, and the kids play with it every day.
Can you make a mud kitchen with scrap wood?
This post is all about creating our DIY mud kitchen with inexpensive pallets and scrap wood. To make a mud kitchen, you essentially just need to be able to make a table top that gives your kids a small counter to use as a play space. You can then build it out from there however you please.