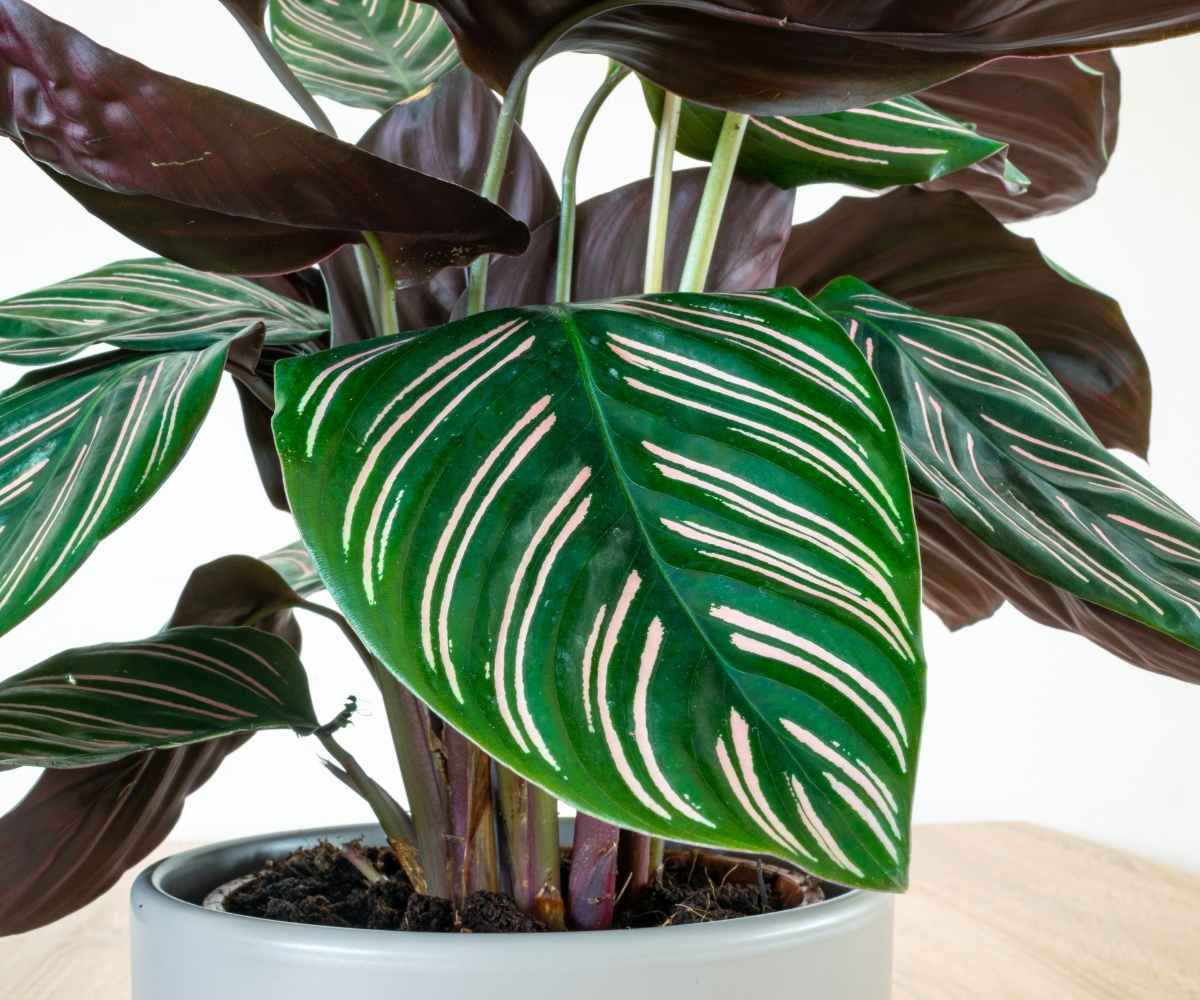
With its striking pink and green striped leaves, Calathea ornata, also known as the pinstripe calathea, makes a dramatic yet easy houseplant Native to the rainforests of Brazil, this prayer plant is accustomed to warm, humid conditions and indirect light. While calathea ornata care can seem tricky at first, following a few key tips helps this exotic tropical thrive indoors.
In this in-depth guide, we’ll cover everything you need to know about growing and caring for calathea ornata, from repotting and watering to handling common problems. With the proper care your pink pinstripe calathea will reward you for years to come with its eye-catching foliage and unique personality.
Calathea Ornata Care At a Glance
Here is a quick summary of calathea ornata’s key care needs:
-
Light: Bright indirect light or partial shade
-
Water: Keep soil lightly moist, water when top inch is dry
-
Soil: Peat-based potting mix
-
Fertilizer: Diluted liquid fertilizer every 4-6 weeks in growing season
-
Temperature: 60-85°F, no colder than 55°F
-
Humidity: 40-60% humidity
Providing the right moisture, humidity, and warmth allows calathea ornata’s tropical nature to thrive indoors. Now let’s look at each care requirement in more detail.
Bright Indirect Light Is Best
In its native rainforest habitat, calathea ornata grows filtered by the shade of larger trees and plants. Indoors, it does best in similar bright, indirect lighting.
Place your calathea where it will receive plenty of gentle, ambient natural light but avoid harsh direct sunlight which can burn the foliage. East or west-facing rooms work perfectly to provide plenty of gentle sunlight.
If keeping your calathea in a low light spot, supplement with a grow light for at least 12 hours daily. Insufficient light leads to smaller leaves and less vibrant pink striping on new growth.
Regular Watering with Proper Soil
Calathea ornata prefers moist (but not soggy) soil at all times. Water whenever the top 1-2 inches of the potting mix becomes dry. During the warmer months, this may be every 5-7 days. Reduce watering frequency in winter.
The soil itself also plays a key role in proper watering. Use a peat-based potting mix that retains some moisture but also drains well to prevent stagnant water around the roots. Adding perlite gives extra drainage.
Always water thoroughly until it drains freely from the pot’s bottom. Empty any accumulated water from the saucer so the pot is not left sitting in it.
Ideal Temperature Range
Warm temperatures between 60-85°F suit calathea ornata best since it originates in the steamy tropics. It will suffer below 55°F. Avoid drafty areas and take care to not expose this tropical plant to sudden temperature drops or cold drafts.
During winter when indoor conditions are cooler and drier, supplement the air around your calathea with a humidifier. Moving it to a warmer spot in the kitchen or bathroom also helps maintain ideal conditions.
Provide Consistent Humidity
Humidity is essential for calathea ornata to mimic its native jungle environment. Maintain average humidity around 40-60% if possible. Use a hygrometer to monitor levels.
Some easy ways to boost moisture in the air include:
- Placing the pot on a pebble tray filled with water
- Grouping plants together to create a humid microclimate
- Regularly misting the leaves with soft water
- Running a humidifier nearby
Without sufficient humidity, the foliage will often start to curl, brown, and dry around the edges – so watch those humidity levels!
Fertilizing for Healthy Growth
During the active growing season from early spring through fall, fertilize calathea ornata every 4-6 weeks. Use a balanced liquid houseplant fertilizer diluted to half strength. This provides a nutrient boost for lush growth and vivid striped coloring.
Stop fertilizing during the winter when plant growth naturally slows. Resume feeding when new growth appears in spring.
Ideal Potting Mix
When repotting calathea ornata, use a quality peat-based potting soil amended with perlite for drainage. A blend made specifically for tropicals is ideal as it will contain nutrients and retain moisture well.
Avoid regular garden soil which does not drain sufficiently and may be too dense. Never plant in 100% peat or coconut coir, as these retain far too much moisture on their own around the roots.
How to Repot Calathea Ornata
Repot calathea ornata every 2-3 years in early spring before growth takes off. Gently remove from the old container and loosen any circled roots. Prune any diseased or dying roots.
Replant in a container just one size larger, no more than 2 inches bigger overall. Too large of a pot holds too much moisture. Fill with the amended peat-based potting mix, firming the soil gently around the roots.
Keep newly repotted plants sheltered and increase watering frequency until new growth is established. Avoid fertilizing immediately after repotting.
Common Problems and Solutions
With proper care, calathea ornata is not difficult to grow indoors, but it may encounter a few issues:
-
Dry leaf edges: Increase humidity and water more frequently.
-
Leaf curling: Add humidity and adjust watering consistency.
-
Leaf spots/fungal disease: Reduce watering, improve airflow, treat with fungicide if needed.
-
Root rot: Allow soil to dry out more between waterings and ensure pot drainage.
-
Pale leaves: Provide brighter light to enhance the pink variegation.
-
Webbing or insects: Wipe leaves with soap and water, apply insecticidal soap if pests persist. Control with sticky traps.
By observing your plant’s needs and making adjustments as required, you can enjoy calathea ornata’s dazzling stripes and choreographed leaf movements for years to come. With the right care, this tropical prayer plant unfurls its colorful character inside your home.
Calathea ornata ‘Pinstripe’ Care Guide
-
LightMedium
This plant enjoys bright to medium indirect light.
- WaterMedium Keep the soil slightly moist and water when the soil reaches a #5 on the moisture meter. Filtered, bottled, or tap water should be left for 24 hours to let the chemicals and water flow out of the holes in the drain. After all the water has been drained, put it back in the cache or decorative pot. Dont let the roots sit in standing water. During the winter, water the plant less often but make sure the area around it stays moist.
- 20%HumidityHigh: Raise the humidity to 200% by adding a pebble tray full of water, grouping plants together, or using a humidifier.
- Temperature: 65 to 75°F Keep your Pinstripe plant away from temperatures below 60°F to protect the leaves.
- Outside, grow in morning light with some shade (4-6 hours) in zones 10 and 11 where the nights are above 45°F. When kept inside, the Zebra Plant does best in windows facing south, east, or west for at least six hours a day. It needs bright to medium indirect light.
- FertilizingMonthly Fertilize monthly during its growing period. To improve the health of the leaves, use a high-nitrogen liquid fertilizer at half strength. Lessen the amount around the plant in the fall and winter, when it is dormant. Flush the soil periodically to eliminate salts from fertilizing.
- Re-potting2 Years: Don’t repot the plant right away after getting it; wait at least 6 to 12 months. Repot in the spring, using a 2″ wider pot. (A pot that is too big could make the soil dry out more slowly, which is not good.) ) Use an indoor potting mix that drains well and has perlite added to help it do so, or use an African violet potting mix. Cover the drainage hole at the bottom of the container with a piece of screen to keep the soil in place and let it drain. Add soil to the bottom to elevate the root ball. Lift the plant and pull the roots away from the planter. To loosen the soil, wedge a clean knife or garden trowel between the pot and the ground. Inspect the root ball. Look for roots that are dead or rotting and cut them off with clean pruners. If the plant’s roots are squished together, cut through them to stop the encircling. Keep the plant about 1″ below the pot’s edge to keep water from spilling out. Put down more soil and tamp it down around the edges to fill them in. Fill up to the soil line but not over. Water thoroughly, leaving the soil damp but not soggy. If settling occurs, add more soil. Mist the new plants and keep them in medium-level light while they’re in plastic bags. Remove the plastic bag when the roots are established. You might see some changes in the leaves as the plant gets used to its new home. Depending on how tightly the roots were tangled, it might get transplant shock. Cut off any leaves that are dying as the plant gets stronger and roots into the ground over time.
- Clean Every Month: Cut off any stems that are dead or damaged to keep the plant’s energy going to the healthy leaves. To get rid of dust, use a watering can to spray the leaves with filtered or rainwater. Get rid of any trash on the ground and add more soil if it needs it.
- Propagation and Division Indoors: Zebra plants should be propagated and divided in early spring, when they wake up from their winter sleep. Carefully brush or wash the soil off after taking it out of the pot. Plant each piece carefully in a new pot with rich indoor potting soil mix or African violet mix. Make sure the pot has drainage holes and enough depth for the roots to grow. Put it somewhere with medium to bright, off-direct sunlight while they root. Put the new plants in clear plastic bags, mist them, and keep them in a medium-level of light. Remove the plastic bag when the roots are established. You might see some changes in the leaves as the plant gets used to its new home. Depending on how tightly the roots were tangled, it might get transplant shock. Cut off any leaves that are dying as the plant gets stronger and roots into the ground over time. Check the soil’s moisture and humidity every day, and mist it to keep it moist while the roots grow. After 6-8 weeks, roots will begin to establish. You can pull on the stem to make sure the roots are firmly attached. At this point, you can take off the clear plastic bag, but keep the humidity around the plant high. Outside, use care to loosen the soil, dig up the roots, and move the plant to a new spot in your garden. Add rich, wet, loamy soil to a spot that gets some morning sun but not all of it. Water with filtered or rain water at soil level.
Follow us @livelyroot & show us your #livelyroot plants
Calathea Ornata: Addy’s Tips for Beginners (Pinstripe Calathea)
- How to Grow Gorgeous Climbing Roses on a Wooden Fence - March 24, 2026
- Avoid These Plants When Companion Planting with Oregano - March 24, 2026
- 15 Great Trees to Plant Near Your House - March 24, 2026