Learn how to draw a great looking Fig with easy, step-by-step drawing instructions, and video tutorial.
Fig trees have such unique shapes, textures, and details that they make for an excellent drawing subject. As someone who loves botanical illustration, I’ve practiced sketching fig trees countless times to capture their natural beauty.
In this step-by-step guide, I’ll walk you through my process for drawing a realistic fig tree I’ll share tips on how to sketch the trunk, branches, leaves, and fruit With a bit of patience and practice, you can master illustrating every part of this lovely tree. Let’s get started!
Gather Reference Photos and Materials
Good reference images are key for drawing any realistic subject Study photos of fig trees from multiple angles to understand their structure Notice how the trunk splits into large diverging branches, Figs have very distinctive lobed leaves that come in many shapes, Try to find reference images that showcase young and mature trees,
As for materials, I recommend:
-
Drawing paper – A thicker paper will allow you to erase and rework elements. Strathmore bristol paper is a great choice.
-
Graphite pencils – Use a range of hardnesses like HB, 2B and 6B. Harder pencils are good for initial sketching.
-
Kneaded eraser – These can be shaped to softly erase fine details.
-
Tortillon – For blending pencil strokes to create smooth gradients.
-
Clear ruler – Helps maintain straight lines and proportions.
Gather your materials and references before starting. Having them nearby saves time versus searching mid-drawing. With the basics covered, let’s start illustrating this beautiful tree!
Sketch the Trunk and Main Branches
I like to begin a fig tree drawing by lightly sketching the trunk and main branches. This forms the foundation of the composition.
-
Use an HB pencil to sketch a vertical, slightly off-center line for the trunk. Add an oval base.
-
Look at reference photos as you sketch larger branching shapes off the trunk. Capture the twisting organic nature of fig branches.
-
Visualize how the branches overlap to create the illusion of depth. Those in front will partially cover those behind.
-
Keep the lines very light. You will reinforce them later after establishing the foliage shapes.
Take it slowly, using straight edges when needed. Map out how the main branches split from the trunk.
Start Adding the Basic Leaf Shapes
With the trunk and branches mapped, lightly sketch a “leaf cloud” representing the basic mass of foliage:
-
Focus on the overall shape rather than each individual leaf. Think abstract blobby shapes.
-
Observe where leaves cluster around branches versus sparse areas with fewer leaves. Capture this variation.
-
Consider how leaves grow in all directions, even downward or back toward the trunk.
-
Allow some branches to show through the leaves to maintain that skeletal feel characteristic of fig trees.
Keep these early foliage shapes very light and loose. You can refine the distinct leaves later. Just get the major masses mapped.
Refine the Trunk and Branches
Now that the basic forms are sketched, it’s time to reinforce the lines and refine details:
-
Go over the main trunk and branches with a 2B pencil, pressing harder to create those dark woody lines.
-
Look closely at the references to capture bark texture and knots along the old trunk. Add broken lines and strokes.
-
Consider which branches are closest, using thicker lines to push them forward. Have lines taper as they recede into the distance.
Take time on these structural elements since they create the fig tree’s unique character. Add tonality too using your kneaded eraser to create rough highlights.
Develop the Leaf Details
With the structure established, shift focus to the foliage. Here’s how to carefully build up the leaves:
-
Lightly sketch the individual leaf shapes, using references as a guide. Fig leaves have smooth rounded lobes.
-
Draw leaves pointing various directions – down, sideways, back, etc. Vary the sizes and spacing as well.
-
Begin shading some of the leaves, imagining how light would interact with their surface. Keep the strokes loose.
-
As you develop the leaves, erase any sketch lines that are no longer needed. Let the drawing emerge slowly.
Adding all the leaves and leaf veins takes patience. But this attention to detail is what creates realism, so go slowly and deliberately.
Add Final Touches and Shading
The finishing touches can elevate your drawing to a polished, professional look:
-
Soften edges by gently blending with a tortillon. Build up shadows gradually by layering.
-
Use an eraser to add highlights and suggest dappled lighting filtering through the leaves.
-
Look for opportunities to enhance realism through details like birds, bugs, or leaves on the ground.
-
Sign your name! Artistry deserves credit.
Stepping back periodically helps you see the overall composition and determine if any areas need refinement. Take time on these finishing steps and you’ll have a lifelike fig tree drawing.
Branch Out Your Skills Drawing Other Tree Varieties
Mastering the fig tree is just the starting point – there are so many tree species to learn to draw! Here are a few other interesting ones to try next:
-
Birch – Striking white bark with dagger-like leaves. Beautiful fall color.
-
Bonsai – Miniature varieties with intricate branching. Wonderful line practice.
-
Willow – Graceful drooping branches and narrow leaves. Fun challenge.
-
Cherry Blossom – Delicate pink flowers complementing twisted branches.
-
Pine – Majestic triangle shapes and heavy needled branches. Evergreen classic.
Study the unique features of each species. Notice how factors like leaf shape, branching patterns, and bark differ. Use references to capture these botanical details in your drawings.
Celebrate the Journey of Artistic Growth
As with any new skill, learning to draw realistic trees takes regular practice over time. I still have so much room to improve my technique. Don’t get discouraged if your early attempts don’t look perfect.
The key is enjoying the journey of gradual artistic growth. Savor those small wins with each new drawing. Over time you build knowledge and confidence. Nurture your creativity, and before long people will be amazed at your gorgeous tree illustrations.
Easy Fig Drawing – Step 6

6. Draw partial oval shapes between the curved lines. These indicate the figs seeds.
Add More Details to Your Fig Picture – Step 8

8. Draw a series of curved lines across the base of the fig, marking the bottom of the stem. Texture the side of the fruit with long curved lines.
How to draw #Fig leaf drawing //easy leaf drawing//Vel’s Art Classes….
FAQ
How do you plan a fig tree?
How do you shape a fig tree?
How to draw a fig tree?
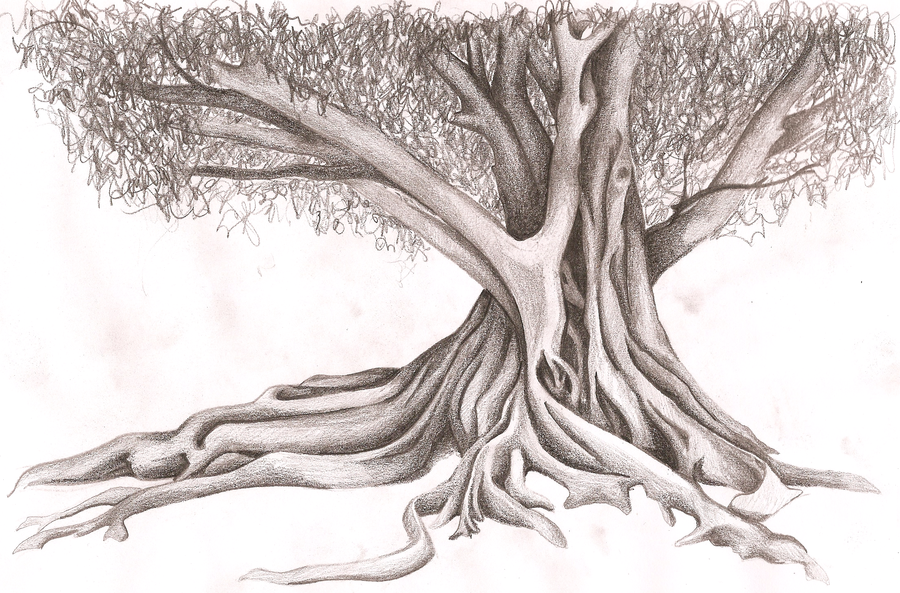
At the bottom you can read some interesting facts about the Fig Tree. Make sure you also check out any of the hundreds of drawing tutorials grouped by category. Step 1: To start, draw the roots. Draw a slanted line going downward. Draw a few more slanted lines, right next to the first one you drew. Step 2: Next, draw the trunk.
Are figs easy to draw?
Figs are a simple fruit to draw. They are roughly teardrop shaped. Our illustration features both a whole fig and one that has been cut open to reveal the pulp inside. For more easy and fun guides, see the How to Draw a Guava or Papaya Drawing tutorials.
How do you make a cartoon fig?
Draw a series of curved lines across the base of the fig, marking the bottom of the stem. Texture the side of the fruit with long curved lines. 9. Draw a curved line across the top of the cut fig, at the base of its stem. Continue to texture the skin of the second fig with long curved lines. Your cartoon fig outline is complete. Color your figs.
How to start a fig tree from cutting?
Starting a fig tree from cutting is a fairly simple and straightforward process. Here is how to do it in the step – by – step guide, my simple method: Step 1: Ideally, choose a dormant season (winter) to propagate the tree. However, if you can’t do it in the dormant season, you can also do it at any other time, with a little bit of lower success.