Daylilies are a popular perennial flower that add vibrant color and texture to gardens. Their trumpet-shaped blooms come in a rainbow of colors and patterns, blooming from early summer well into fall. Daylilies are easy to grow, extremely hardy, and multiply quickly to form impressive clumps. They make excellent border plants, groundcovers, or specimens in perennial beds and borders.
Growing daylilies from roots is simple and rewarding. With proper planting and care, daylily roots will establish rapidly and produce masses of flowers within the first season. Here is a complete guide on how to successfully grow these vibrant perennials from roots.
Getting to Know Daylilies
Daylilies, also known as Hemerocallis, are herbaceous perennials prized for their endless parade of colorful blooms. They are native to Asia and Europe, but have naturalized across North America.
Some key facts about daylilies
-
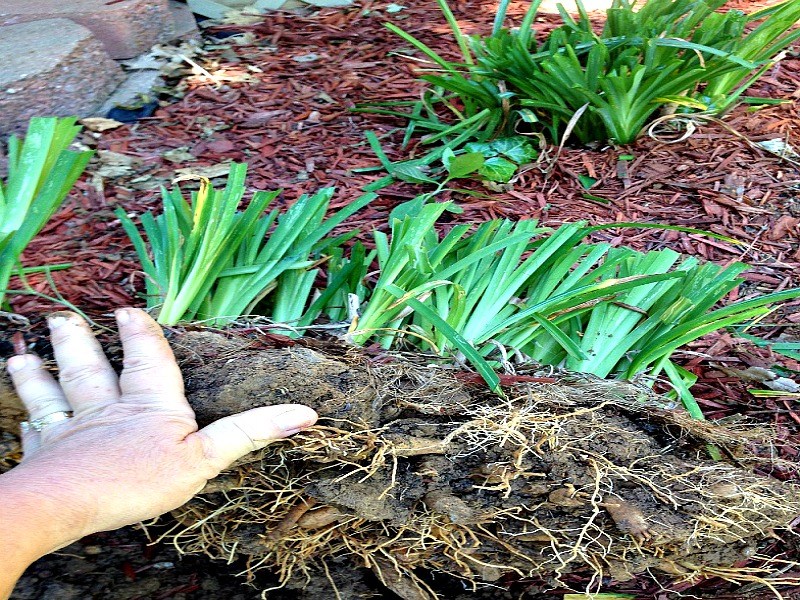
Grow from thick, tuberous roots similar to dahlias or cannas. The roots store food and water for the plants
-
Each daylily flower only blooms for one day, hence their common name. But each scape (flower stalk) produces multiple buds that open in succession for weeks.
-
Flower colors include yellow, orange, pink, red, purple, burgundy, and bi-colors. New hybrids are expanding the color range.
-
Bloom times range from early summer through fall, depending on the variety. Some types rebloom for months.
-
Plants form grassy clumps of arching, strap-shaped leaves. They spread by underground rhizomes to form dense colonies.
-
Extremely tough, heat and drought tolerant plants. They require minimal care and thrive on neglect once established.
-
Deer and rabbit resistant since daylily leaves and flowers are toxic if eaten.
When to Plant Daylily Roots
Daylilies can be planted in spring or fall in most climates. However, spring planting tends to be more successful since the roots have the entire growing season to establish before winter dormancy.
In northern gardens:
-
Plant roots in early to mid spring once the threat of hard frosts has passed.
-
Fall planting is riskier and often results in winterkill. But established plants can be divided in autumn.
In southern gardens:
-
Plant in early spring or late fall after temperatures cool down.
-
Avoid summer planting during hot, humid weather, which causes rot.
Where to Plant Daylily Roots
Choose a planting site with:
-
Full sun – Minimum of 6 hours of direct sunlight per day. Morning sun is ideal.
-
Well-draining soil – Daylilies tolerate many soil types but need good drainage. Quickly die in soggy soil.
-
Space to expand – Allow at least 2-3 feet between plants. Daylilies multiply quickly into large clumps.
How to Plant Daylily Roots
-
Prepare the planting beds by loosening soil and mixing in compost or manure. This gives roots room to spread and improves drainage.
-
Dig holes twice as wide as the root mass and 6-8 inches deep. Space holes 2-3 feet apart.
-
Place the roots in the holes with the growing eyes or sprouts facing upward. The tops of the roots should sit 1 inch below soil level.
-
Backfill soil and firm lightly around the roots. Water thoroughly after planting.
-
Fertilize 2-3 weeks after planting with a balanced organic fertilizer. This encourages strong root development.

Space daylily roots 2-3 feet apart when planting in beds and borders.
Caring for Daylilies
Here are some important care tips for newly planted daylily roots:
- Water regularly to keep soil evenly moist, especially during the first year. Established plants are quite drought tolerant.
- Mulch around plants with 2-3 inches of organic matter like shredded bark or leaves. This retains moisture and suppresses weeds.
- Fertilize with a balanced organic fertilizer or compost in early spring and midsummer.
- Divide congested clumps every 3-5 years in autumn. Replant the divisions to refresh beds.
- Remove spent flowers to encourage continuous blooming. Cut back foliage after frost.
- Protect from heavy frost and freezing winter temperatures by mulching over the root zone.
When Daylilies Bloom
One of the best qualities of daylilies is their incredibly long bloom season. By selecting early, mid, and late season varieties, you can enjoy continuous color from early summer through fall frost.
Here are the general bloom times for daylily varieties:
- Early Bloomers – late spring through early summer (May – June)
- Midseason Bloomers – early summer to midsummer (June – July)
- Late Bloomers – midsummer through early fall (July – September)
- Reblooming Types – early summer with a second flush in late summer/fall
Stagger planting time for a longer bloom period. Plant both early and late blooming types together in the same beds.
Troubleshooting Issues with Daylilies
Daylilies are not susceptible to many pests and diseases when grown in suitable conditions. But here are a few potential problems to watch for:
- Foliar disease – Leaf streaking or spotting caused by fungal issues. Improve airflow and avoid wetting foliage.
- Root rot – Caused by overwatering or poorly draining soil. Allow soil to dry between waterings.
- Aphids – Minuscule sucking insects that congregate on leaves and buds. Knock off with jets of water or spray insecticidal soap.
- Slugs and snails – Chew holes in foliage and flowers. Hand pick at night or use iron phosphate baits.
- Spider mites – Tiny red spiders on undersides of leaves. Spray off with water or apply neem oil.
The Best Daylily Varieties to Grow
With over 80,000 registered cultivars, choosing the right daylily varieties can be overwhelming! Here are some outstanding types for beginners to try:
Early Season Bloomers
- Custard Candy – Fragrant 4″ double blooms in creamy yellow.
- Catherine Woodbury – Ruffled 6″ blooms in rosy pink with yellow throats.
- My Sister Rainey – 6″ lilac-purple blooms with intricately ruffled edges.
Midseason Bloomers
- Primal Scream – Vibrant 7″ blooms in tangerine and red with green throats.
- Pardon Me – Extremely floriferous with hundreds of 3″ cherry red blooms on short scapes.
- Ruby Spider – Long-blooming with 6″ rich ruby blooms and spidery petals.
Late Season Bloomers
- Bela Lugosi – Spooky, fragrant 6″ purple-black blooms with lime green throats.
- Burgundy Returns – Reblooms with 6″ wine-colored flowers.
- Moonlit Masquerade – Fragrant 6″ lemon yellow blooms that open in the evening.
Growing Daylilies in Containers
Daylilies adapt remarkably well when grown in containers and planters. Their fleshy, water-holding roots allow plants to thrive with less frequent irrigation.
Follow these tips for growing daylilies as container plants:
- Use containers at least 12-18 inches wide and deep.
- Fill with a commercial potting mix for drainage.
- Plant 1-2 small divisions per pot and allow room to expand.
- For extended bloom, combine early and late blooming varieties.
- Situate containers in full sun with daily watering and fertilizer.
- Move containers to a sheltered area or overwinter indoors in very cold climates.
The Joy and Easy Care of Daylilies
Daylilies are some of the most versatile, carefree perennials for gardens across North America. Their grassy foliage provides structure and their colorful blooms last for months of the season. Once established, they require very minimal maintenance or intervention to thrive. Plant a collection of different daylily varieties and root divisions today to enjoy waves of color for years to come!
When to Plant Daylily Roots
In the north, spring planting is advised. If you plant daylilies in colder places in the fall, they often die because they don’t have time to grow new roots and start to anchor before winter. Some experienced gardeners in the north will fall plant, but they think about how hardy the plant is and do things like mulching to protect it. In the south, the best times to plant are early spring or very late fall. Keep in mind that daylilies planted between July and September are likely to rot if the weather is hot and humid (i.e. e. over 90 degrees).
Where to Plant Daylily Roots
In cooler climates in the north, daylilies need full sun. In warmer climates in the south, they can handle light shade as long as they get at least six hours of full sunlight every day. Prior to planting, loosening the soil to allow oxygen into the soil is recommended.
Daylily Growing Guide! How to Plant, Grow and Divide Daylilies // Bare Root Daylilies
Can daylilies grow in soil?
Despite thriving in all soil, daylilies would rather being planted in one that’s fertile and loamy. Just make sure the soil is moist: sandy or clay soil may be too dry. Adding compost can help it retain moisture. Also ensure that the site is well draining to prevent root rot. Water regularly in the first growing season.
How do you plant daylilies?
The crown of the plant (where roots and leaves meet) should be buried about 1 inch deep.2.**Prepare the Soil**: Fill in the soil, lightly packing it down around the plant.3.**Water**: Water the soil until
How do you divide daylilies?
Divide daylily clumps in early spring as new growth is emerging, or after plants have finished flowering in late summer. Pull the dense, fleshy clumps apart, or use a sharp knife to cut the root system into pieces. Replant divisions in newly amended soil. When to plant daylilies?
How do you replant a daylily?
Make sure each section has a healthy clump of roots, and check that there are no weeds nestled in the roots, and then replant immediately. While it’s possible to buy daylily seed packets, if you already have the plants growing in your garden, you can harvest the seeds directly from them.
- How to Grow Gorgeous Climbing Roses on a Wooden Fence - March 24, 2026
- Avoid These Plants When Companion Planting with Oregano - March 24, 2026
- 15 Great Trees to Plant Near Your House - March 24, 2026