The stone-like succulents lithops make intriguing houseplants, just don’t be tempted to water in winter. Words Jane Perrone, illustration Patrick Morgan.
At a flower show, Brian Fearn showed off a dish with 40 different living stones. One visitor thought it was real and put her purse on top of the plants. It didn’t bother Brian, who started Abbey Brook Cactus Nursery in the Peak District. He’s been growing Lithops for decades and knows how tough they are. “You can walk on these plants and not know they’re there,” he explains.
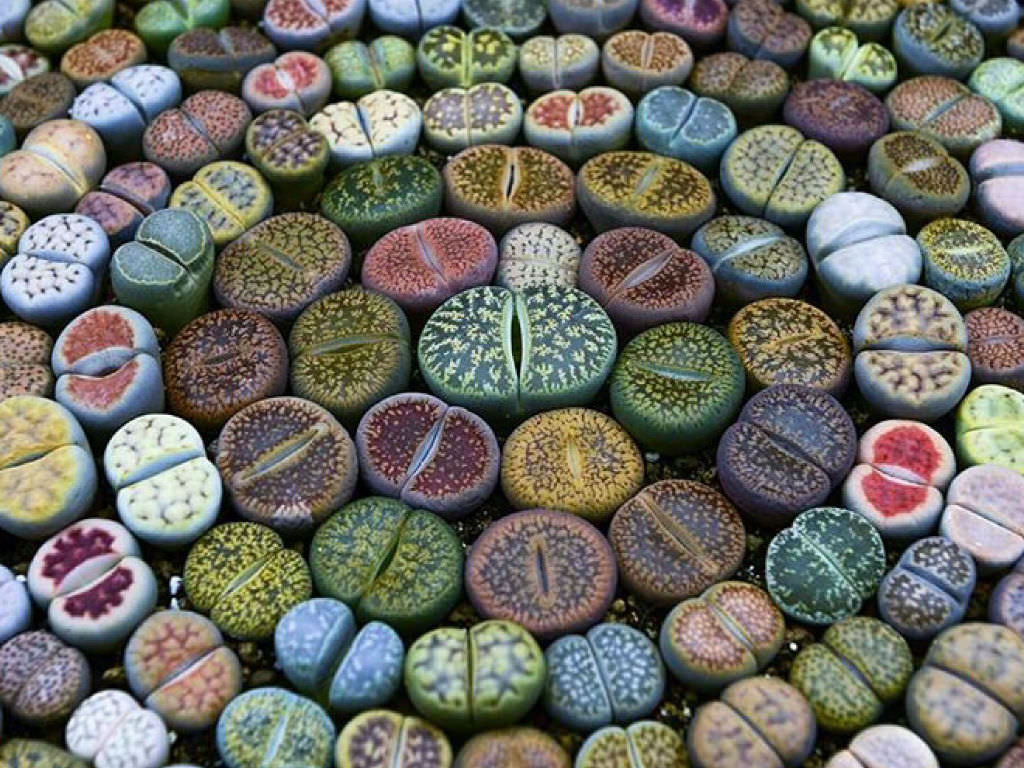
The name Lithops comes from two Ancient Greek words: lithos, meaning stone, and ops, face. In dry parts of southern Africa, they grow. Hungry animals that graze on grass mistake them for a bunch of pebbles on the ground, not a possible meal. They can live almost completely hidden by dust until one year when a short flush of white or yellow daisy-like flowers makes them stand out. People love these tough succulents for their unique looks, but growers often find that their stones get mushy. This is usually because they get too much water or too little light. No matter what species it is, Lithops has the same basic shape: a pair of succulent leaves fused together to look like buttocks. The plant’s growing point is hidden by a split in the middle of the leaves. Every year, a new pair of leaves grows from this groove; the plants are so thrifty that the new leaves take all the water and nutrients from the old leaves, leaving behind a dry husk.
When it comes to colour and pattern, though, every species is different. Abbey Brook’s living stones come in a dish like the one mentioned above. It has pea-sized stones that are the palest dove gray and are spotted with lilac, big leaves that are cinnamon-colored and spotted with black, and jade-green stones that are etched with lime-green veins. These marks are made up of layers of clear cells called leaf windows. These windows control how much light Lithops get for photosynthesis and keep them from getting too hot. In the wild, you would never find these plants together because each species has evolved to perfectly match the color of the ground it grows in. For example, Lithops olivacea, which is olive green, loves to grow in quartz outcrops, while Lithops ruschiorum, which is found in its native Namibia, often grows on feldspar outcrops, perfectly matching the buff and pink colors of the rocks. Brian recommends that people who are just starting out start with species from the Eastern Cape that get more rain, like Lithops fulviceps or Lithops aucampiae, because they can handle more accidents with watering.
Lithops, also known as “living stones”, are fascinating succulent plants native to southern Africa. Their unique growth form and beautiful colors make them highly desirable in collections. Lithops are commonly propagated from seed. Growing lithops from seed can be rewarding, but does require some patience and attention to detail.
Follow this comprehensive guide to successfully grow lithops from seed, from sowing to transplanting seedlings.
When to Sow Lithops Seeds
Lithops seeds can be sown at various times of the year, but some periods tend to produce better results.
- Spring (March-April) and autumn (August-September) are ideal sowing times in most climates. Temperatures are moderate and humidity is higher.
- Target a sowing time when daytime temperatures will be 65-75°F (18-24°C) and nighttime temps 50-60°F (10-16°C).
- Fresh seeds often germinate erratically. Allow seeds to dry 6+ months after harvest before sowing for best viability.
- Sow seeds during a spell of rainy weather High humidity supports germination
Creating an Ideal Lithops Sowing Medium
Lithops seeds need a well-draining sowing medium that retains some moisture. Aim for a porous mix with these qualities:
- Use fine particles like sand or perlite to prevent seedlings from getting stranded in large pores.
- Incorporate organic matter like sifted compost for moisture retention.
- Aim for a mix that is 70-80% mineral and 20-30% organic materials.
- Mix should wet easily but not become waterlogged.
Some examples of suitable sowing mixes:
- 5 parts sand : 3 parts perlite : 2 parts vermiculite : 1 part compost
- 5 parts plaster sand : 1 part compost
- 4 parts coconut coir : 3 parts pumice : 3 parts zeolite
Sterilizing the Medium and Containers
Sterilizing the sowing medium helps prevent issues with fungus and algae during germination.
- Moisten mix and microwave in batches for 1-2 minutes. Allow to cool fully before sowing.
- Wash sowing containers in a 10% bleach solution. Rinse very well.
- Alternatively, use new, clean containers that have never held plants before.
Sowing Techniques for Even Distribution
- Sow seeds very shallowly on the soil surface. Do not cover.
- Tap packet lightly to distribute seeds evenly. Move hand over surface while sowing.
- Optionally mix seeds with sand before sowing. This helps separate and spread them.
- Lightly water in with spray bottle after sowing. Keep surface moist but not saturated.
Providing Humidity and Bottom Heat
Maintaining high humidity and moderate temperatures prompts the best germination rates.
- Cover pots with glass or plastic after sowing to contain humidity.
- Place pots in trays with water, allowing absorption from the bottom. Keep water 1/2 inch below pot rims.
- Maintain 75°F (24°C) soil temperature. Use a heat mat if needed.
- Partially uncover pots once seeds start sprouting to allow ventilation.
Avoiding Problems in Germinating Seedlings
- Watch for fungal issues like damping off due to overly wet conditions. Allow pots to partially dry out between waterings.
- Prevent seedlings from toppling over by covering seeds with a thin sprinkling of sand particles after sowing.
- Avoid direct sun on covered seedlings. Move under bright shade or indoor lighting.
Care of Young Lithops Seedlings
Lithops seedlings need attentive care to flourish that first year.
- Allow fresh seeds 2-4 weeks for initial sprouting. Germination is often sporadic.
- Begin light fertilization 2 weeks after sprouting emerges. Use quarter strength balanced liquid fertilizer.
- Gradually acclimate uncovered seedlings to outdoor conditions after 1 month. Avoid hot afternoon sun.
- Water thoroughly when surface is partly dry. Avoid foliage staying wet for prolonged periods.
- Watch for signs of fungal issues. Treat with hydrogen peroxide if damping off occurs.
Transplanting Lithops Seedlings
Seedlings can be transplanted after establishing roots and leaves.
- Wait 8-12 months before transplanting. Growth taproot over 5 mm indicates readiness.
- Carefully separate seedlings with roots intact. Transplant into 50/50 mix of sowing soil and inorganic grit.
- Plant seedlings singly or in small groups spaced 2 inches apart in containers or open beds.
- Hold off transplanting if any fungal problems occurred. Allow extra time to strengthen.
- Water transplants sparingly until established. Increase sun exposure gradually.
Ongoing Care of Lithops Seedlings
The first 2-3 years are a critical establishment phase for lithops seedlings. Exercise patience and care.
- Allow plants to cycle through natural growth stages. Don’t overwater while splitting or renewing leaves.
- Increase sun exposure slowly over time, until plants can tolerate full sun for multiple hours.
- Feed with balanced fertilizer at 1/4 to 1/2 strength during active growth phases. Avoid high nitrogen.
- Monitor for pests like mealybugs that can attack young plants. Isolate and treat any infestations.
- Hold off repotting into permanent arrangements until plants reach mature sizes after 2-3 years minimum.
Starting lithops from seed requires time and diligence, but watching the tiny sprouts grow into flowering plants is incredibly rewarding. Follow these tips to start your lithops seedlings off right.
How to care for Lithops
In all Lithops habitats, the soil is loose and low in humus. That’s why Brian uses a 50/50 mix of horticultural sand or grit and houseplant compost in his potting mix, with an extra layer of grit on top to make sure water doesn’t pool around the plant. Lithops love as much sun and heat as you can give them in the summer. You don’t have to be too careful when you water them—Brian’s Lithops get watered from above once a week. If Lithops are grown indoors, the riskiest time is from the end of September to April. During this time, growers must stop watering the plants, move them to a room with a temperature of 4–7oC, and let them go into dormancy. The old leaves will shrivel, but the plants will burst back into life come spring.
How to Grow Lithops from Seed – How and When to Plant Lithops seeds.(includes other Mesembs)
How to grow Lithops seeds?
Follow these steps to grow lithops seeds: 1. Prepare a pot of soil with a cactus mix and potting mix. The soil should be airy, light, and well-draining. You can also add some pebbles to help with drainage. 2. Sprinkle the seeds over the soil. Cover the soil surface with a fine layer of perlite, and keep this layer moist using a mister.
How do you grow Lithops?
Prepare the soil. Lithops seeds need to be sown in a well-draining soil mix. You can use a commercial succulent soil mix or make your own by mixing equal parts of sand, perlite, and peat moss. 3. Sow the seeds. Lithops seeds are very small, so it is important to sow them thinly.
How long does it take Lithops to germinate?
Lithops seeds typically germinate within 2-4 weeks. Once the seedlings have emerged, you can begin to water them more regularly. With a little care, you can easily grow lithops from seed. These beautiful plants will add a unique touch to your home or garden. Sow the seeds on top of a well-draining soil mix.
When should you plant Lithops seeds?
The best time to plant Lithops seeds is in the spring or early summer. Lithops seeds need to be sown in a well-draining soil mix. The seeds should be lightly covered with soil and kept moist until they germinate. Lithops seedlings should be kept in a bright, sunny location and watered regularly.
- How to Grow Gorgeous Climbing Roses on a Wooden Fence - March 24, 2026
- Avoid These Plants When Companion Planting with Oregano - March 24, 2026
- 15 Great Trees to Plant Near Your House - March 24, 2026