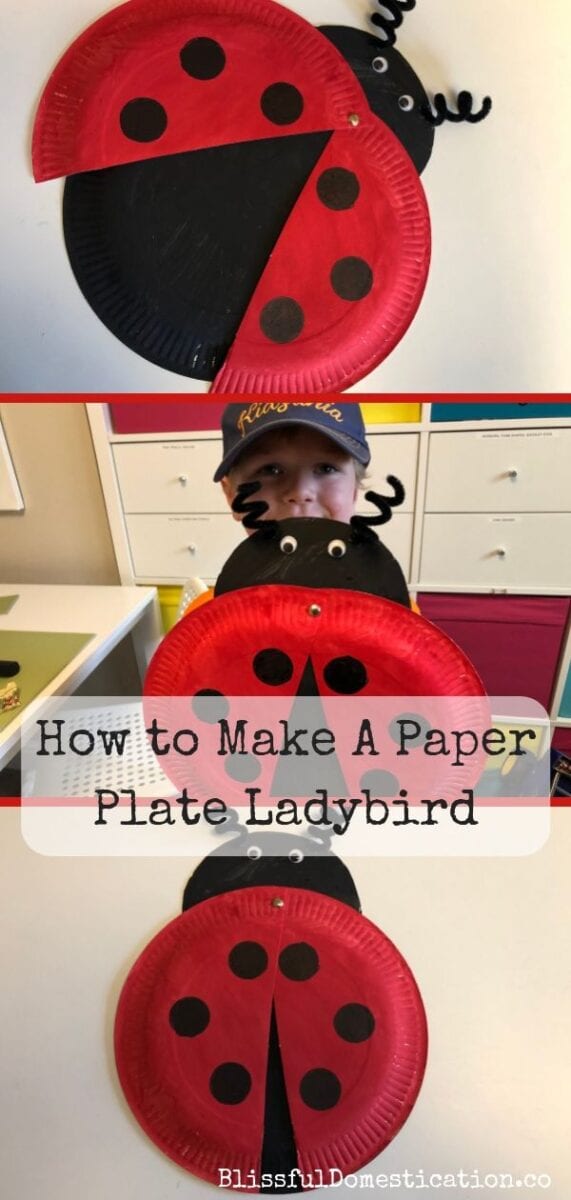
With Summer nearly here, we have been looking towards our garden for inspiration for our craft projects. I want you to do 50 crafts before you turn 10. As part of my challenge, we have been making a lot of different animal crafts out of paper plates. Oliver still loves the Bumble Bee we made out of paper plates from a few years ago, so we made a Paper Plate Ladybird this time.
The beauty of paper plate crafts, is they require very little in the way of materials. Let’s face it, most of us still have a few extra paper plates from the last kids’ party. With a little paint, you can make anything. well almost.
So, if you want to know how we made our Paper Plate Ladybird, keep reading or save this page for later!
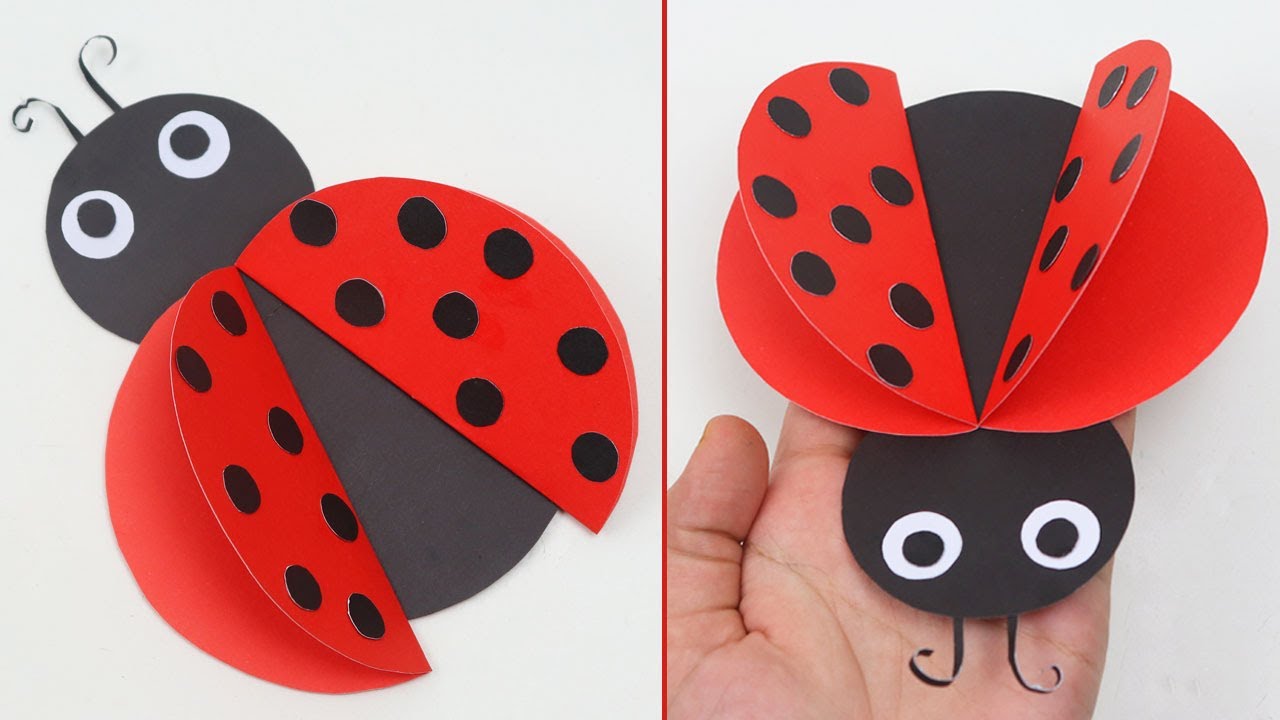
Ladybugs, also called ladybirds, are familiar and beloved insects that brighten up spring and summer days. Their round, bright red bodies dotted with black spots make them so recognizable. Ladybugs are fun to spot crawling on leaves and flowers in the garden. Their unique appearance also makes them a popular subject for kids’ crafts and activities.
Making a simple ladybug craft is a great rainy day project to do with your children With just a few common household supplies, you can create a cute ladybug that really looks like the real thing Keep reading for a complete step-by-step tutorial on how to make an adorable 3D paper ladybug that your kids will love playing with.
Supplies Needed
To make a cute ladybug craft, you will need:
- Red construction paper or cardstock
- Black construction paper or cardstock
- Googly eyes or black circles cut from paper
- Glue (white school glue or craft glue)
- Scissors
- Black marker
- Optional: wiggly eyes, pipe cleaners, glitter
The key supplies are just paper, scissors, glue and googly eyes or paper circles But feel free to get creative with additional decorations! Gather all your materials together before starting the project.
Step 1: Cut Out the Body From Red Paper
Take a sheet of red construction paper or cardstock. Cut out a large oval shape that will form the ladybug’s body.
Make your oval about 4 inches long and 3 inches wide, but the size can vary depending on the final size you want for your ladybug. Cut carefully along the outline.
Set the red oval aside when finished cutting it out. This will be the base for your ladybug.
Step 2: Cut Out Spots From Black Paper
Now take a sheet of black construction paper or cardstock. Cut out circles of different sizes to represent the spots on the ladybug.
Aim for circles between 1/4 inch to 1/2 inch across Cut out 6 to 10 spots total Make some bigger and some smaller for variety,
Cut carefully around each circle. Set aside the finished black spots when done.
Step 3: Arrange the Spots on the Ladybug’s Body
Take the red oval ladybug body and arrange the black spots on top in a ladybug pattern.
Space the spots out evenly over the body. Vary the sizes and turn some so they look like ovals rather than circles.
When you have the spots arranged how you want them, carefully lift them off and set them aside for gluing in the next step.
Step 4: Glue the Spots in Place
Working with one spot at a time, add a dot of glue to the back and press it gently onto the red oval body in the desired position.
Continue gluing on each of the black spots, using just a small amount of glue. Take care when pressing them on so they remain circles and don’t get distorted.
If the spots slide around, let the glue dry a bit before moving on. Apply very light pressure as you add the spots.
Step 5: Add the Face
To make the ladybug’s head, you’ll need two googly eyes or circles cut from black paper. Glue them on the narrower top portion of the red oval, spaced close together.
You can also draw on a face with a black marker instead of using googly eyes. Make two oval eyes connected with a curved line to form a sweet ladybug smile.
For antennas, take two small strips of black paper and glue or tape them on, pointing up from the head area. Or use short pieces of pipe cleaner for curly antennas.
Step 6: Finish Decorating (Optional)
Here are some ideas for optional decorative touches to finish your ladybug:
-
Add white glue designs on the back wings for details. Let dry completely.
-
Sprinkle glitter over the wet glue before drying for a sparkly effect.
-
Glue on wiggly eyes instead of flat paper circles for fun texture.
-
Use a marker to draw lines on the back to divide the wings.
-
Attach a string or pipe cleaner loop to hang your ladybug up.
-
Give your ladybug a name! Write it on the back or underneath with marker.
Use your creativity to add any other decorations you think would look cool. Then set the ladybug aside and allow the glue to dry fully before playing.
Ladybug Craft Variations
Once you get the basics down, you can try these fun variations on the ladybug craft:
-
Make a giant poster-sized ladybug by tracing around a plate on red paper for the body.
-
Craft it from red foam or felt instead of paper for a textured effect.
-
For a zig-zag edge, cut the wings out with patterned scissors.
-
Stick on pom poms for textured spots instead of paper circles.
-
Create a fuzzy ladybug using felt or fuzzy fabric for the body.
-
Make a folded ladybug with cardstock and only decorate the top wing.
-
Use printable ladybug templates or stencils for perfect circular bodies.
-
Stack two body ovals and glue together for a 3D effect.
-
Punch holes around the edges and add a yarn antennae.
The options are endless for putting your own spin on the classic paper ladybug! Craft multiples in different sizes and colors.
Ladybug Craft Projects and Activities
Once your ladybug is complete, here are some fun ideas for using it:
-
Act out story adventures with your ladybugs
-
Make a ladybug habitat from sticks, leaves, rocks in a shoebox
-
Play ladybug counting games
-
Use them for sorting activities by size, color, etc.
-
Create printed fact cards and sort which ladybug matches each bug fact
-
Set up a ladybug picnic or tea party with favorite toys
-
Make an observation journal to record ladybug sightings outside
-
Read books and sing songs about ladybugs for storytime
-
Help teach kids to be gentle and care for their paper pets
-
Create a ladybug finger puppet with a clip on the back
Ladybugs lend themselves to all sorts of imaginary play and learning activities for toddlers and young children. Those bright colors and cute spots appeal to kids of all ages, so they make perfect playtime companions.
Ways to Take Your Ladybug Craft Outdoors
Here are some ways to use your finished ladybug crafts for outdoor play and learning:
-
Tie yarn to ladybugs and take them for walks around the yard and garden. Watch where they crawl!
-
Make leaf or stick pens to keep your ladybugs in outside. Search for real ladybugs to join them.
-
Place them on flower petals or leaves. Photograph them interacting with nature.
-
Hide them around the yard and hold a ladybug hunt, giving clues where to search next.
-
Use magnifying glasses to compare paper ladybugs with live ones found in your garden.
-
Look under leaf litter and rocks to find places ladybugs might hide in nature.
-
Dig up some dirt and pretend your ladybugs are exploring. Talk about what real bugs need to live.
-
Observe how ladybugs move. Do your paper ones walk the same way?
Let those imaginations soar outdoors as you observe real ladybugs in nature!
Ladybug Science Lessons
Making and playing with paper ladybugs provides lots of learning opportunities about these special insects:
-
Read about the ladybug life cycle and make models of each stage. Act it out!
-
Learn about what ladybugs eat like aphids. Make pretend aphid snacks from play dough.
-
Study the different body parts of a ladybug like head, thorax, wings, legs, antennae.
-
Find out why spots and red color help protect ladybugs in nature.
-
Conduct sink or float tests with your ladybugs to explore density.
-
Observe how wings open and close. Fold paper models to demonstrate.
-
Learn how ladybugs help gardens by eating harmful pests without damaging plants.
-
Research different ladybug species and the variety of spots, like nine spots or thirteen spots.
The hands-on learning possibilities with your homemade ladybug friends are nearly endless! The simple process of creating them helps build fine motor, counting, spatial, and creativity skills too.
Top Ladybug Craft Tips
Follow these tips for making the best paper ladybugs:
-
Use bright, vivid red paper for an eye-catching ladybug. Construction paper works better than thinner paper.
-
Cut black spots from textured black craft foam instead of plain paper for a more dimensional effect.
-
Start with bigger oval bodies for younger kids’ first ladybugs to make decorating easier.
-
Draw on antennae and faces with marker instead of gluing for less messy projects.
-
Laminate finished ladybugs between contact paper to make them reusable and wipeable.
-
Remind kids to cut carefully and only do steps requiring scissors with adult help.
-
Start with just 3-5 spots for younger preschoolers. Older kids can handle up to 10 spots more easily.
-
Allow plenty of time for the glue to dry fully before playing with the finished ladybug.
Following these tips will ensure you end up with cute ladybugs that your kids will treasure. The best part is displaying their finished creations to show pride in their work!
Ladybug Craft Inspiration
Check out these photos and videos of handmade ladybugs for more inspiration on your own projects:
[Photo examples of paper ladybugs made from construction paper in red and pink with black spots]
[ Embedding suggested YouTube video tutorial showing process of making a simple ladybug paper craft: https://www.youtube.com/watch?v=n4kapDjVidQ ]
[Embedding suggested YouTube video showing a folding paper ladybug craft using cardstock: https://m.youtube.com/watch?v=xL17YO9eNJc ]
With just a bit of red paper, some black spots, and googly eyes, you can make darling ladybug friends! This easy kid craft project helps build creativity and fine motor skills. Keep them engaged with ladybug adventures, learning activities, and nature exploration outdoors. Let those imaginations and ladybugs soar!
What You Will Need
- 3 paper plates
- Black and red poster paint
- Paintbrushes
- Scissors
- Glue
- Hole punch
- Split pin
- Black marker/felt pen
- Pair of googley eyes
- 1 black pipe cleaner
Pin How to Make a Paper Plate Ladybird for Later!


How to make a ladybird lodge | Natural History Museum
How do you make a ladybug?
Click here to see our favorite kids’ craft supplies. Download the ladybug template, print, and cut out the pieces you need. Paint a paper plate in 1-2 thin coats of red paper and let it dry completely. Place the ladybug’s body template on the dry paper plate, trace it with the pencil, and cut it out. Arrange the spots along the ladybug’s body.
How do you make a ladybug with a paper plate?
Paint a paper plate in 1-2 thin coats of red paper and let it dry completely. Place the ladybug’s body template on the dry paper plate, trace it with the pencil, and cut it out. Arrange the spots along the ladybug’s body. Next, create the ladybug’s head by gluing the mouth to the middle and bottom of the head.
Can kids make a paper Ladybug craft?
This Paper Ladybug Craft by Mombrite comes with a printable template to make the craft easy for kids of all ages. Kids can either color in the pieces, or if you’re in a time crunch, you can print the pieces on red and black paper and then let the kids assemble their bugs.
What can you make with ladybugs?
I’ve even included some in my other roundup, Colorful Kids Crafts! In this collection of ladybug craft ideas, you will find ladybugs made from paper, paper plates, CDs, plastic lids and even egg cartons! The edible ladybug projects listed below include fun snacks, desserts, and even breakfast. Psst – here’s our latest – Ladybug Tic Tac Toe!