A wire trellis is a classic garden accent that adds beautiful vertical interest to any outdoor space. Wire trellises are commonly used as a support structure for vining plants, letting them climb up the wires in an attractive crisscross pattern. But beyond function, a wire trellis makes a chic decorative statement on its own, bringing eye-catching style to walls, fences, or other structures.
The best part about wire trellises is that they are surprisingly easy to make yourself With some simple materials, basic tools, and a bit of time, you can construct a custom wire trellis exactly suited to your space Follow this step-by-step guide to create your own charming DIY wire trellis for any area of your garden.
Plan and Map Out Your Wire Trellis Design
The first step is deciding on the size, shape, and layout of your trellis. Measure the area where you want to install it and sketch out some options on paper. Consider the height and width, as well as the pattern the wires will create. Will it be a classic diamonds or crisscross pattern? Make sure to measure and mark where you’ll need to attach the wire ends.
Mapping it out carefully will ensure your trellis is scaled appropriately for the space and achieves the look you want, It also allows you to calculate materials needed before purchasing supplies,
Gather Your Materials and Tools
Constructing a wire trellis requires just a few simple components
-
Trellis wire – Galvanized steel wire rope is ideal, in 1/8″ or 1/16” thickness. Determine how much you need based on your planned size.
-
Wire rope clips or ferrules – To attach wire ends to anchors and join wire sections.
-
Eye screws or hooks – Screw these into your mounting surface to thread and anchor the wire ends.
-
Turnbuckles (optional) – Used to tighten wire ropes for tautness. Helpful if trellis will be up long-term.
You’ll also need basic tools like wire cutters, pliers, a hammer, level, tape measure, and drill. Masonry drill bits are required if installing into brick, concrete, or stone.
Install Your Anchor Points
Once your design is planned, it’s time to prep your installation surface and install the anchor points for threading your wire through. If drilling into wood, just screw eye screws directly into the surface wherever your planned wire ends will go.
For masonry surfaces like brick or concrete, first drill holes using a masonry bit, then insert plastic wall anchors. Tap anchors gently into each hole before screwing in eye screws. Make sure anchors are set well and screws are secured tightly.
Use a level to ensure all anchor points are precisely aligned horizontally. This is critical for achieving an evenly spaced, professional look.
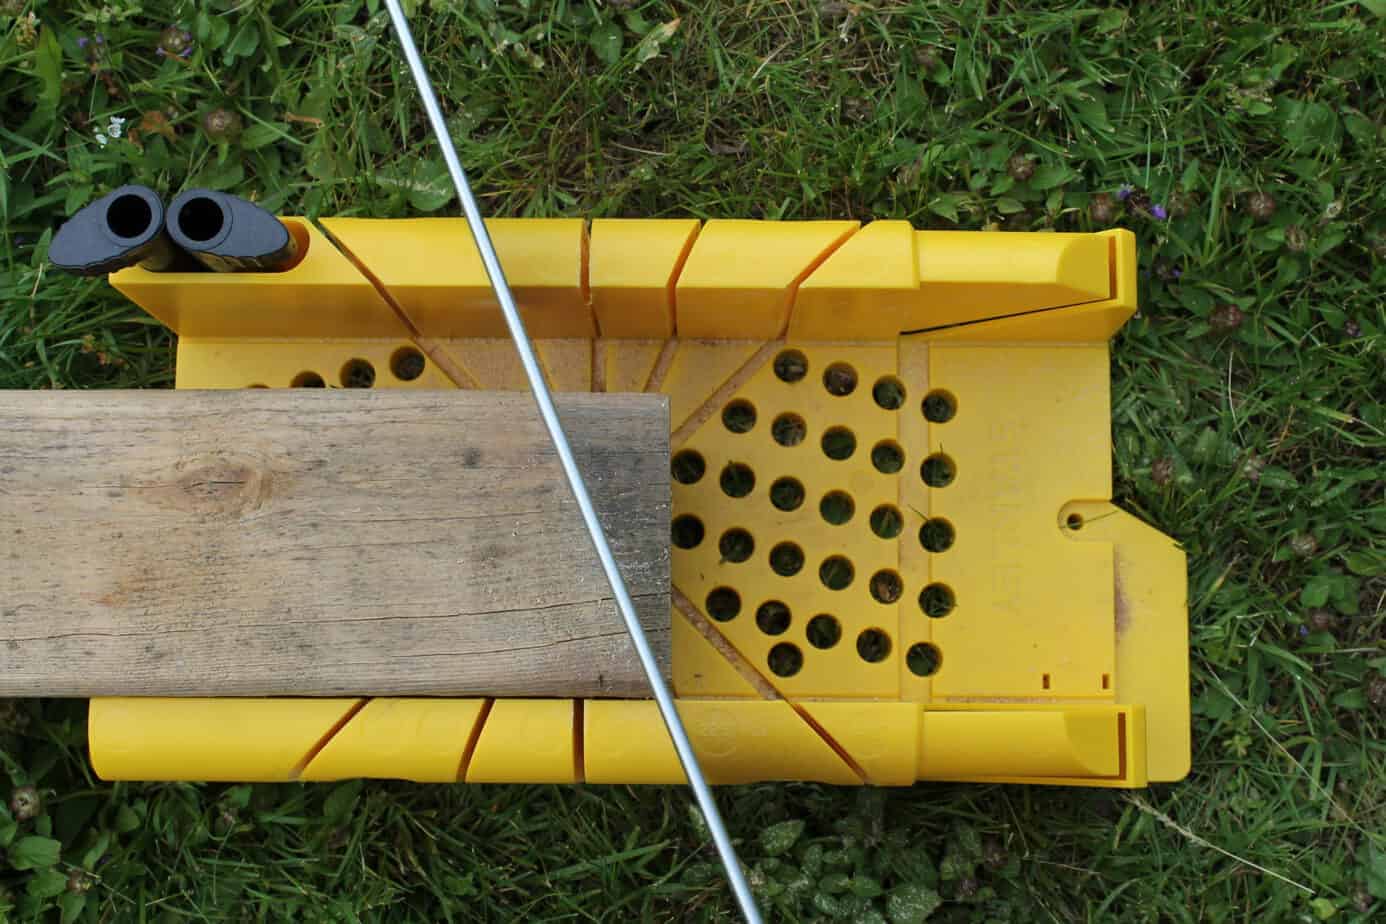
Cut and Attach Your Wire Sections
Measure and cut pieces of wire rope to span between each set of anchor points, using wire cutters. At the ends, use wire rope clips or metal ferrules to create small loops. Attach these loops onto your installed eye screws and anchors.
Unwind and stretch out your wire pieces before cutting to prevent kinking. Wear thick gloves when handling wire to avoid painful slivers.
Tip: Leave a little extra slack rather than cutting wire sections too short. You can always pull tighter.
Thread and Tension Your Wires
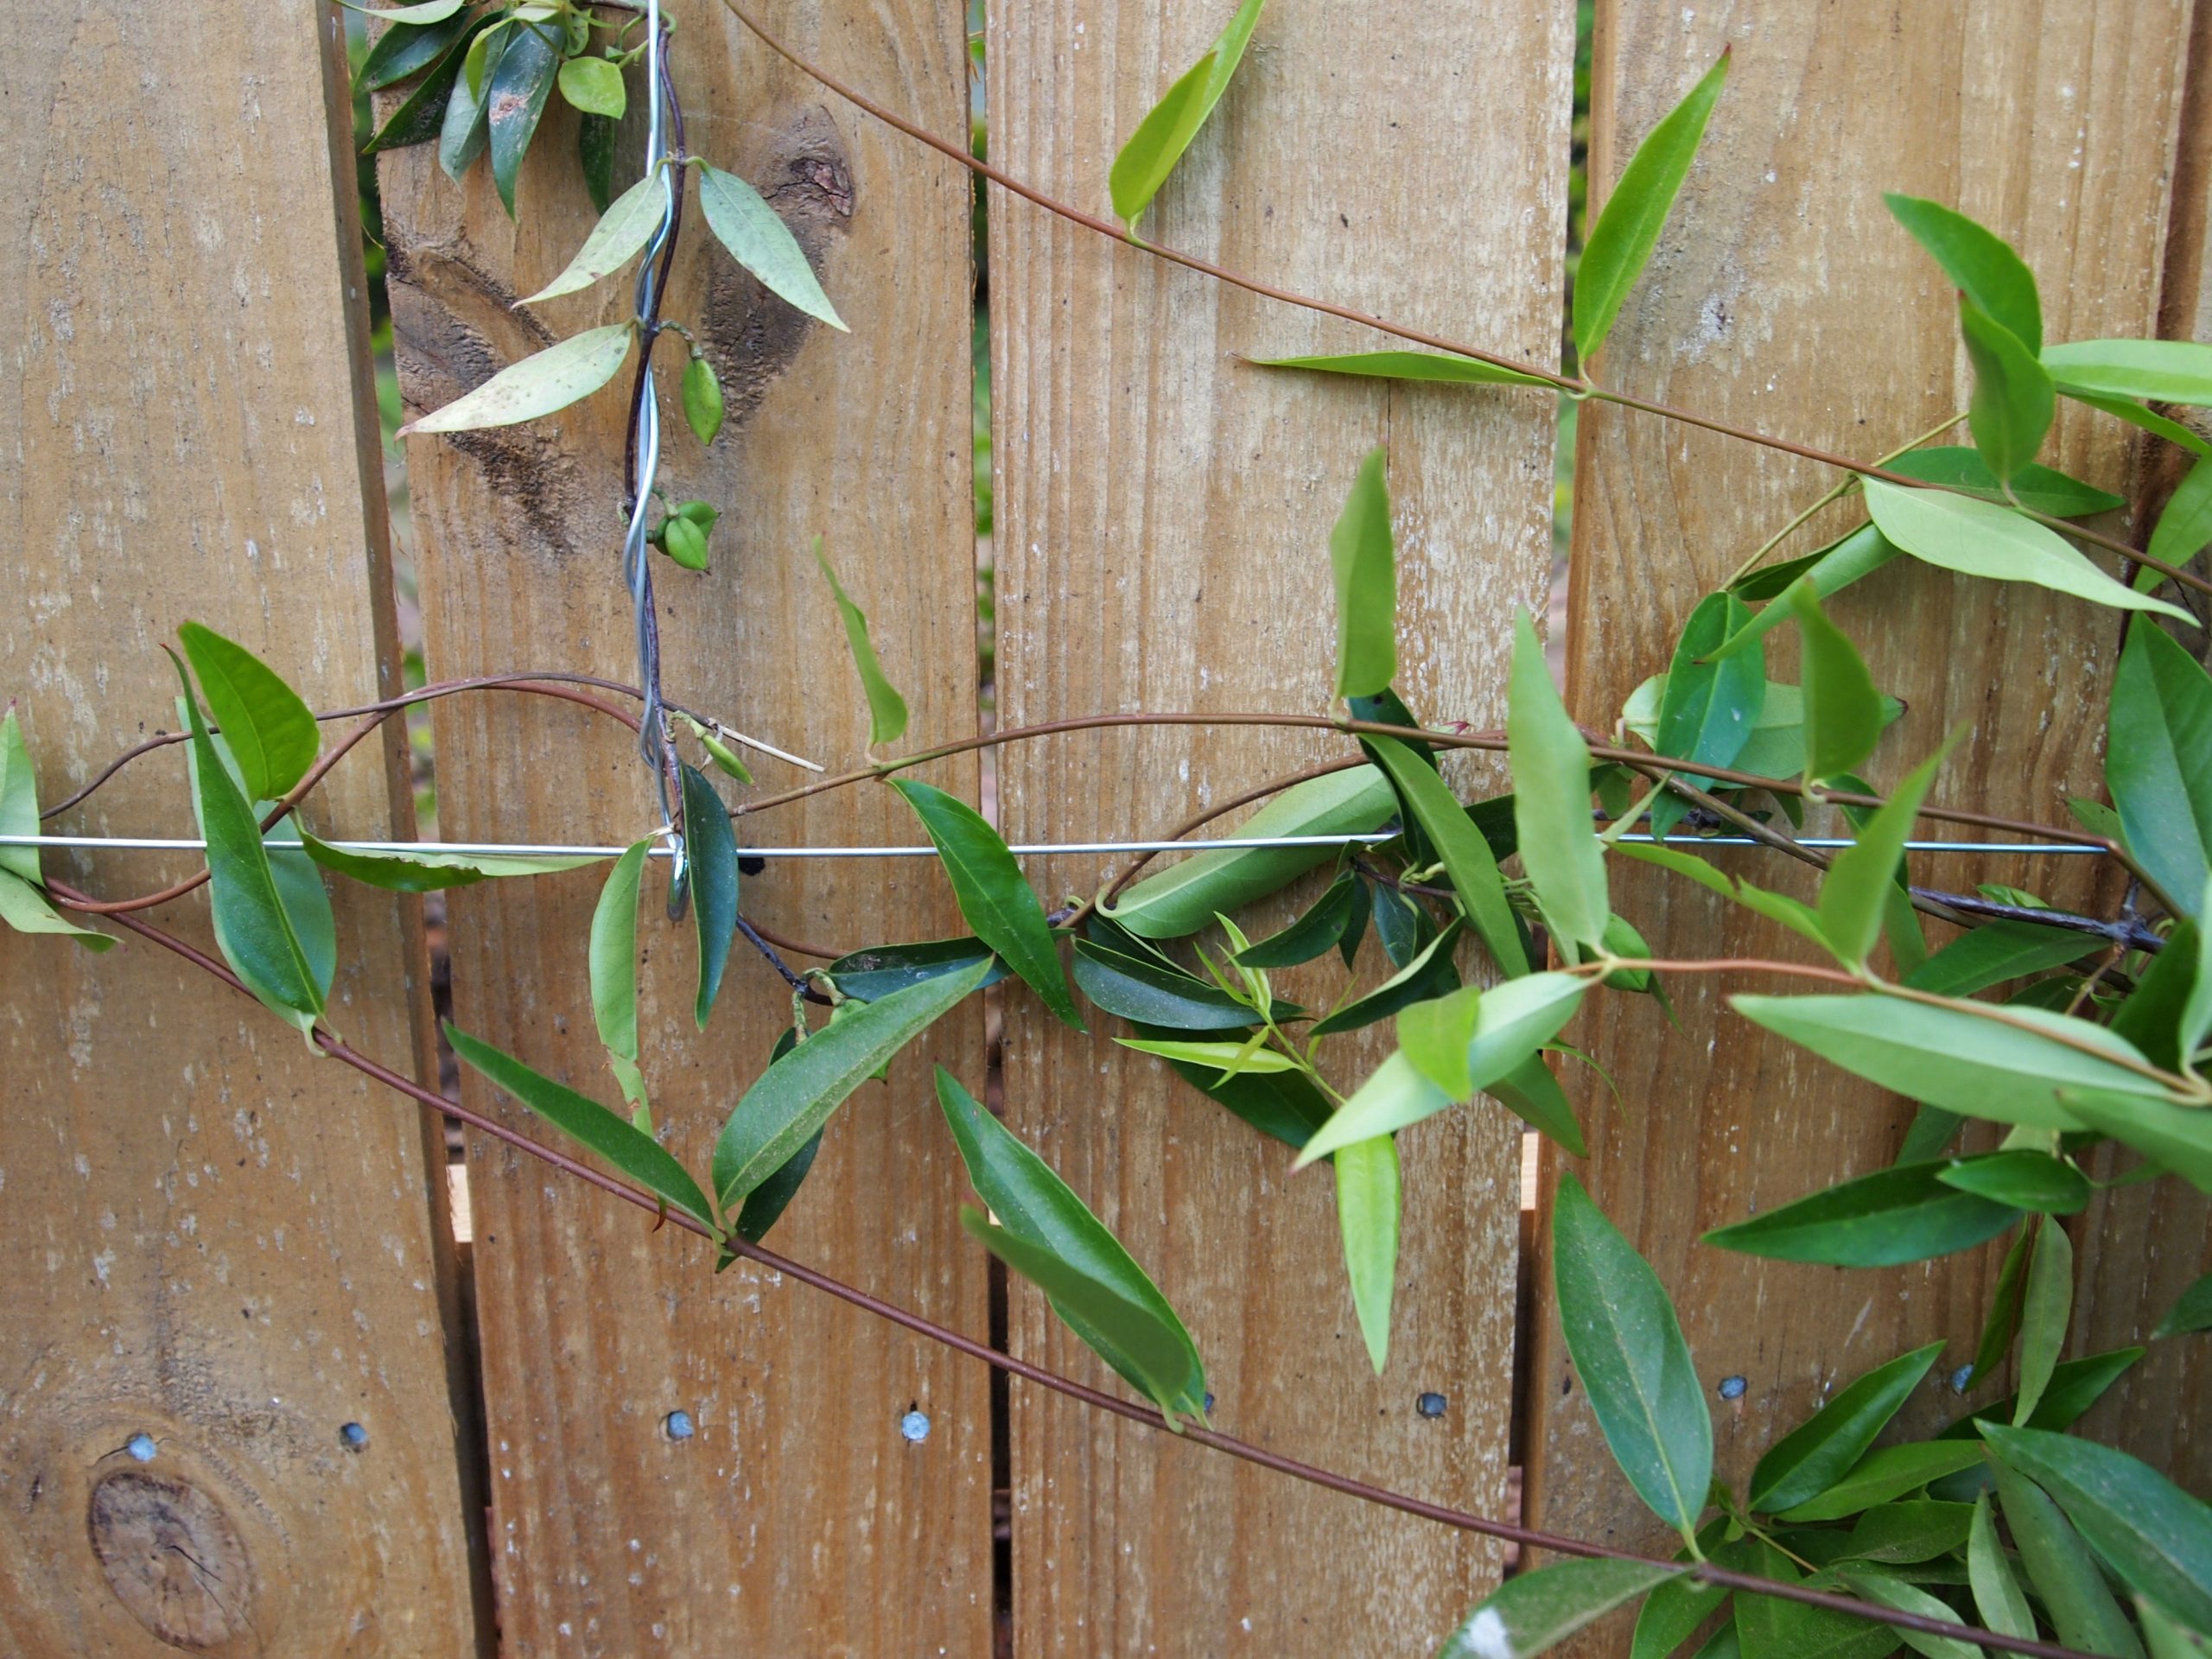
Once secured at one end, thread your wire through all the anchor points following your planned pattern. Create criss-crosses, diamonds, or another geometric design by routing each wire strategically.
Use pliers to twist wire ends into loops and attach to anchors. For long term durability, install turnbuckles at one end of each wire. Tighten turnbuckles once attached to pull wires taut.
Step back periodically to ensure your pattern is forming correctly as you go. Having a helper here can be useful.
Consider Adding aComplementary Vining Plant
While not essential, pairing your wire trellis with a climbing vine or flower adds beautiful visual appeal. The plant’s winding stems and greenery completely complement the linear wires. Choose an appropriate vine for your climate and light conditions.
Evergreen vines like jasmine work year-round. Flowering plants like clematis or passionflower put on a stunning seasonal show. Plant at the base and train vines up and across your new wire trellis.
Enjoy Your Handcrafted Wire Trellis!
With some careful planning and a weekend of work, you can construct your own custom wire trellis to enhance your outdoor space. Take time to adjust wire tension and make fixes until you’re fully satisfied. Your do-it-yourself wire trellis will add striking architecture and interest to any garden setting.
Tips for Installing a Wire Trellis
-
For longevity, use galvanized or stainless steel wire that won’t rust over time.
-
Wear thick gloves when handling wire to prevent scratches and cuts.
-
When looping wire through anchors, wrap twice for added stability and strength.
-
Periodically check tension and tighten wires as needed over time.
-
Consider spraying wire with clear sealer to prevent UV damage.
-
Use strong wall anchors suited for your mounting surface (brick, wood, etc).
-
Add decorative accents like finials to wire ends for extra flair.
-
Ensure anchors used can support the tension load of tight wires.
-
Research your vine choice to pick optimal species for your climate.
-
Plant young vines at wire trellis base and train stems up onto it.
-
Add bamboo stakes to aid new vines in attaching securely to wire.
With a DIY wire trellis sprucing up your garden, you’ll be inspired anew every time you gaze at its charming geometric design. Show off your creativity and craftsmanship by constructing your own wire trellis using simple techniques and readily available materials.
Do Grapes Require A Trellis?
Traditionally in Europe, grapes vines were coppiced instead of trellised. This means that the vine wasn’t grown on a trellis so that the grapes could grow up it. Instead, every few years the whole plant was cut back to the main stem so that new shoots could grow from the base of the plant.

The end result looks like a small bush growing 3 or 4 feet above the ground. Coppicing made sure that every year, new shoots would grow from the main stem and produce a good harvest because grapevines only bear fruit on first-year shoots. Because the root system was already fully developed, these new shoots would grow remarkably quickly.
If you grow a grape vine up a trellis, you can expose the plant to more sunlight and airflow, which will make it healthier and more balanced. You will still need to prune the vine back to its main stems.
Grapes were first trellised to help keep them from getting diseases, since trellising lets more air flow and sun reach the plants. This method of growing grapes is also more controlled allowing for the production of more fruit.
Building Your Own Wire Trellis
How to build a trellis? What kind of trellis should you build? It depends on what you want to do in your garden! For example, I’m going to use my trellis as a privacy screen along the property line and as a place for my grapes to grow and give me lots of fruit.
I think it’s great to grow your own food because it’s free and only takes a little work at the beginning. You can use a piece of lattice to make a trellis, an arbour-style gate, or even a fence line to help train your grapes. Since I don’t have a fence along the property line yet, I chose a more traditional wire trellis.
For this DIY wire trellis project I used:
- It took me 22 degrees to cut one end of two 4x4x8 fence posts.
- A single 2x4x10 – for the top “plate”
- About 50 feet of galvanized steel wire, the kind that’s used to make chain link fences.
- 4 turnbuckles
- 4 J-hooks
- and 4 eye screws
- 3 bags crushed pothole gravel
I also bought a few bags of crushed gravel which went into the post holes. This helps water drain away from the wooden posts which helps reduce rotting. The gravel has the added benefit of creating a more compact base for the posts to stand in.
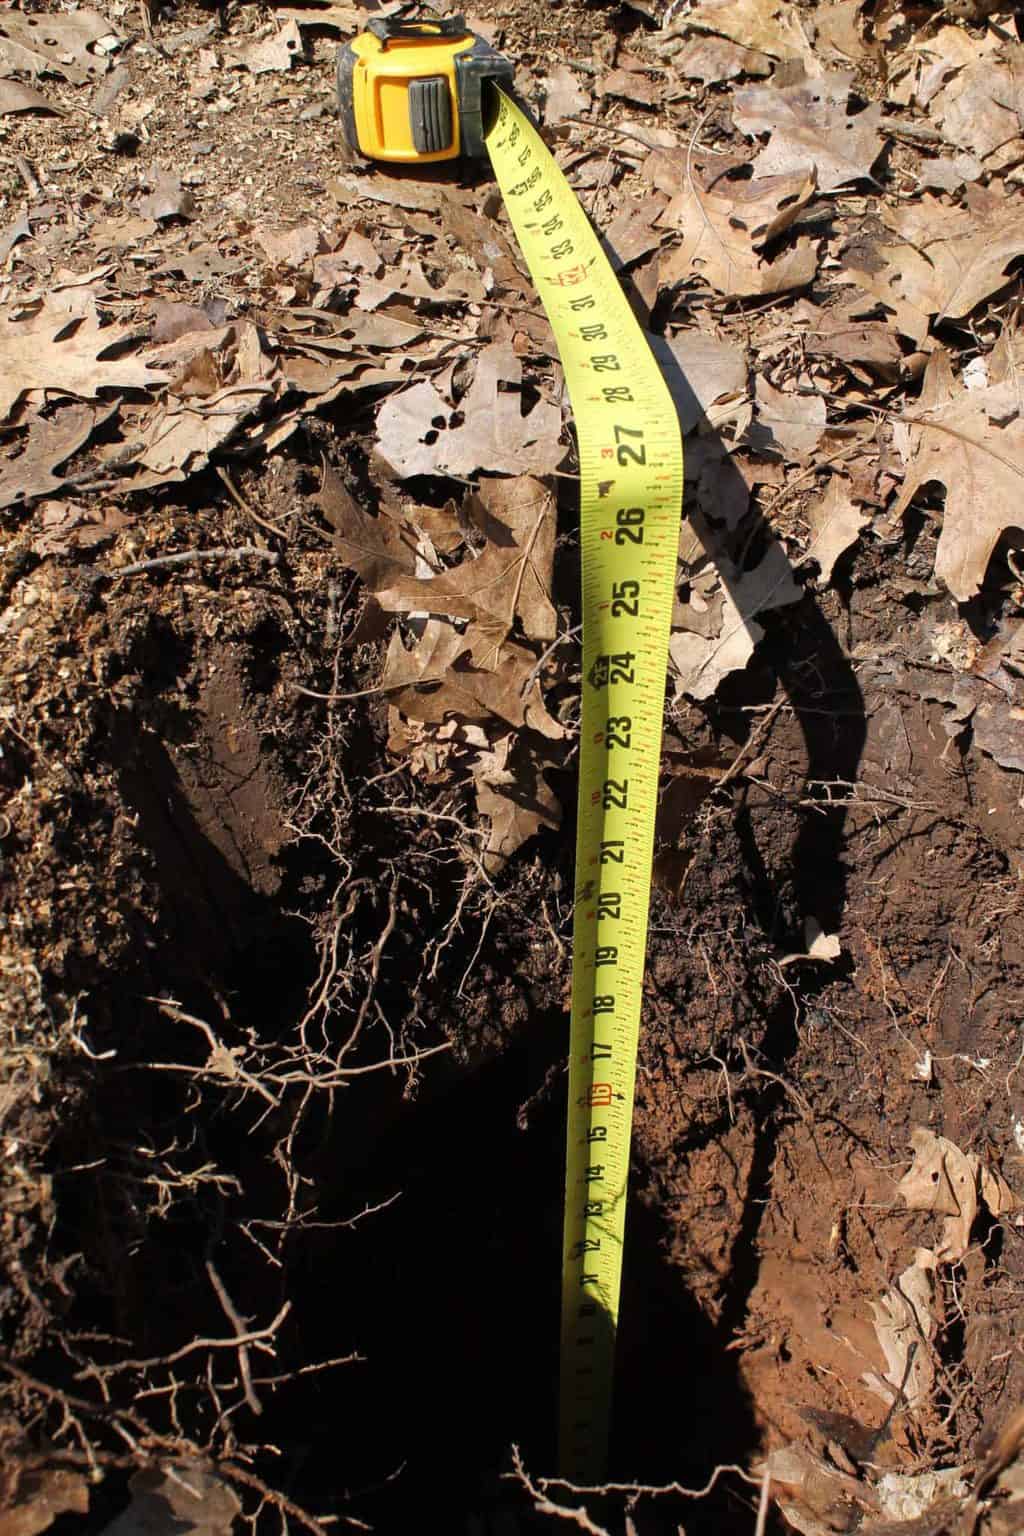
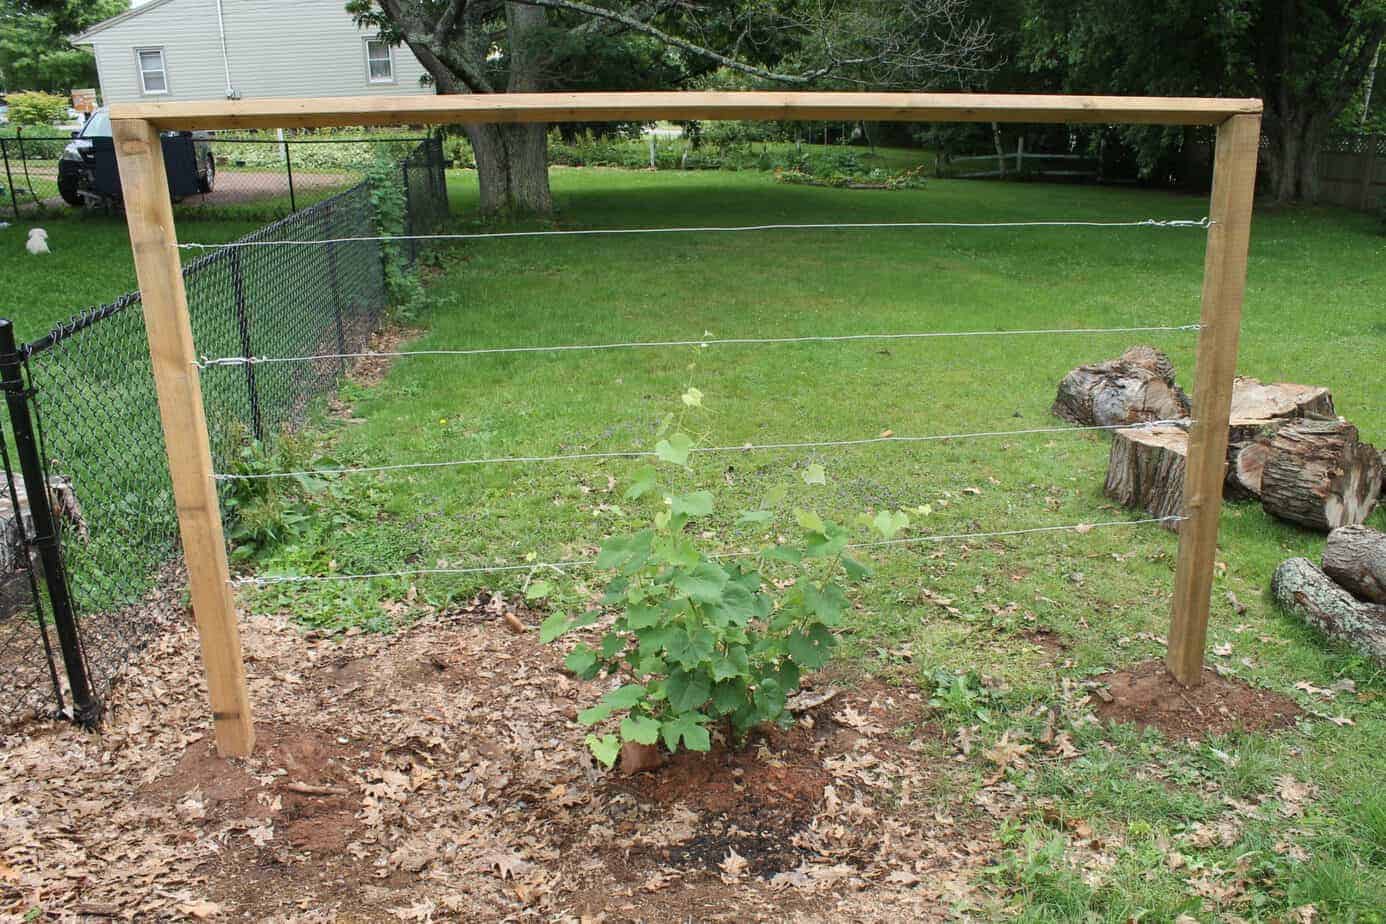
1. I started by digging two 2ft deep post holes for my fence posts 10ft apart. Since I did not have access to any heavy machinery, I dug these by hand. Let me warn you—digging just two holes took about an hour! I made the holes about 12 inches in diameter, which was big enough for a spade but still small enough to make sure the posts would have a safe place to stand. Since I wanted a 6ft high trellis I dug the post holes to a depth of about 2. 25 feet. The extra depth will be explained shortly!.
After putting in the posts for the wire trellis, I looked around my yard for some flat rocks, which I was lucky to find in plenty. There is about an inch of crushed gravel on top of these rocks. They will be the base for the post that will go in the hole. It lets water drain away and gives the building a strong base for the freeze-thaw cycle that happens every year.
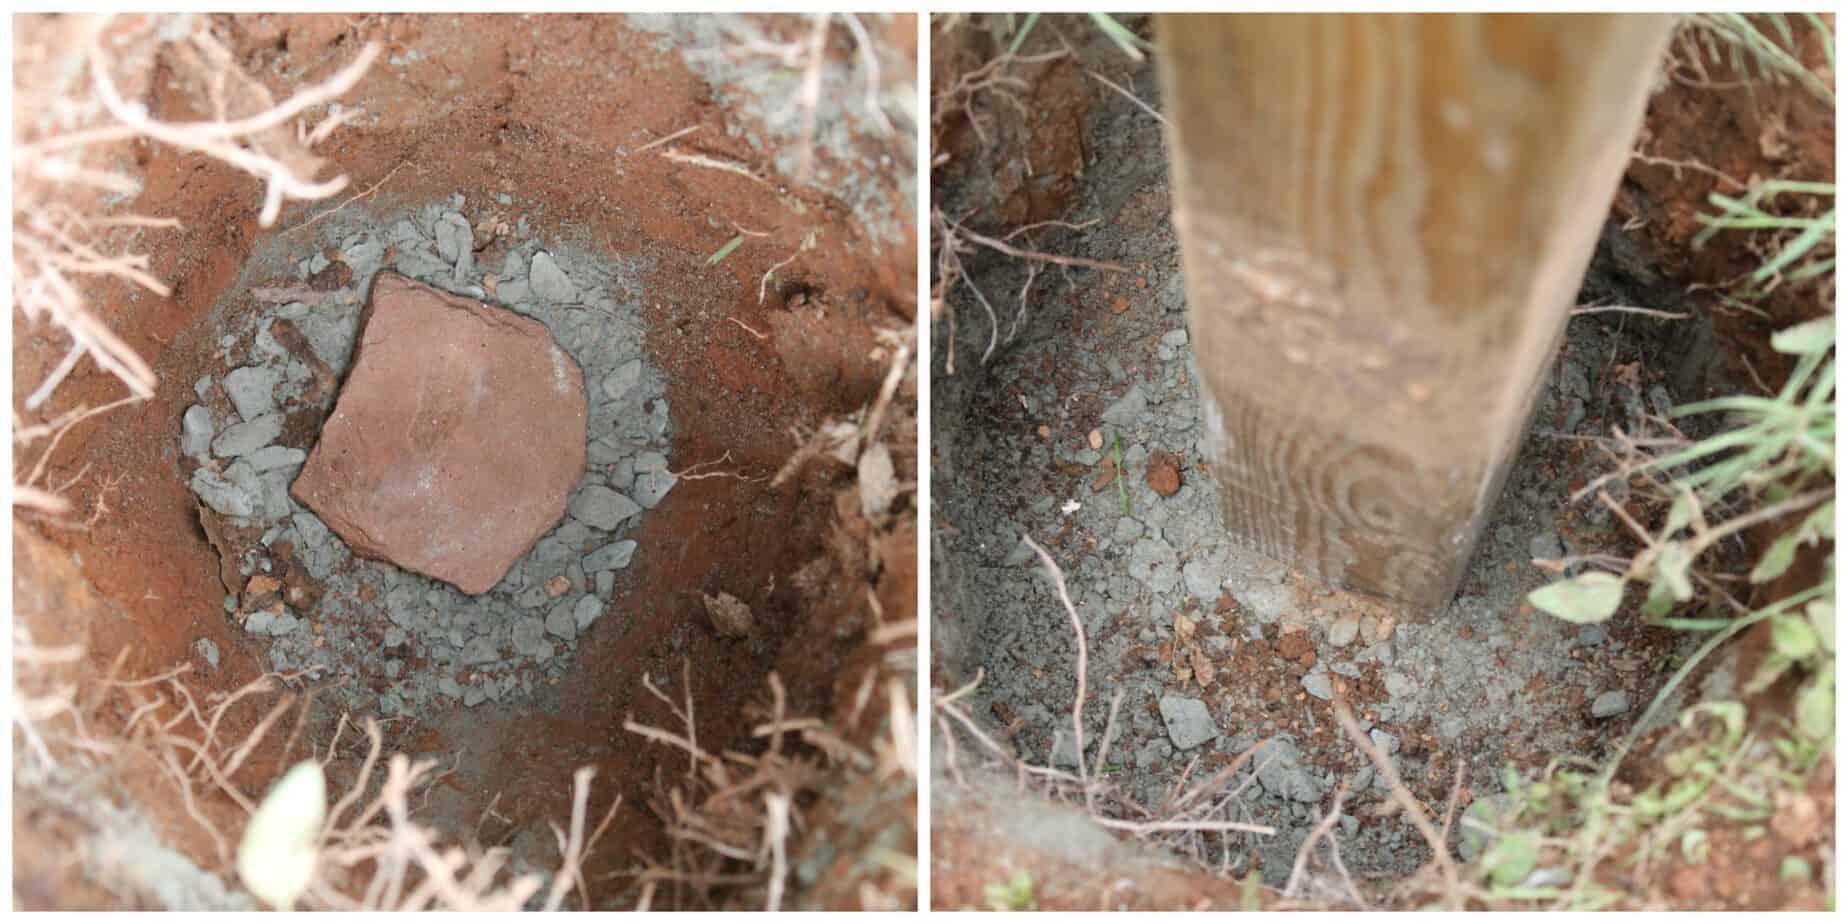
2. I put the fence posts in the holes and filled them up with crushed gravel about three quarters of the way. I used a scrap piece of 2×4 to press down on the gravel and make a really nice, tight base. I could tell the post was already starting to feel quite secure and had minimal movement.
Right now is the time to use a level to make sure your fence posts are straight! Once you fill in the rest of the hole with extra dirt and pack it down, your fence post is pretty much set in place and can’t be moved without digging up the whole thing.
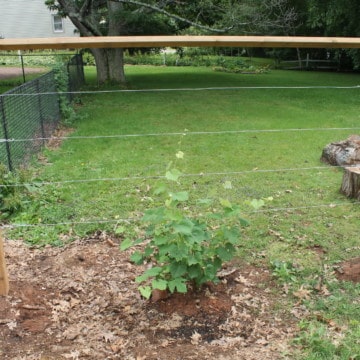
3. I screwed the 2x4x10 to the top of the posts once they were deeply set in the ground and level. The entire frame almost instantly became rock solid and there was hardly any wiggle left at all. As I had mentioned previously, I installed the top bar at a 22-degree angle. This makes it possible for water to run off the top bar of the trellis, which keeps the wood from molding.
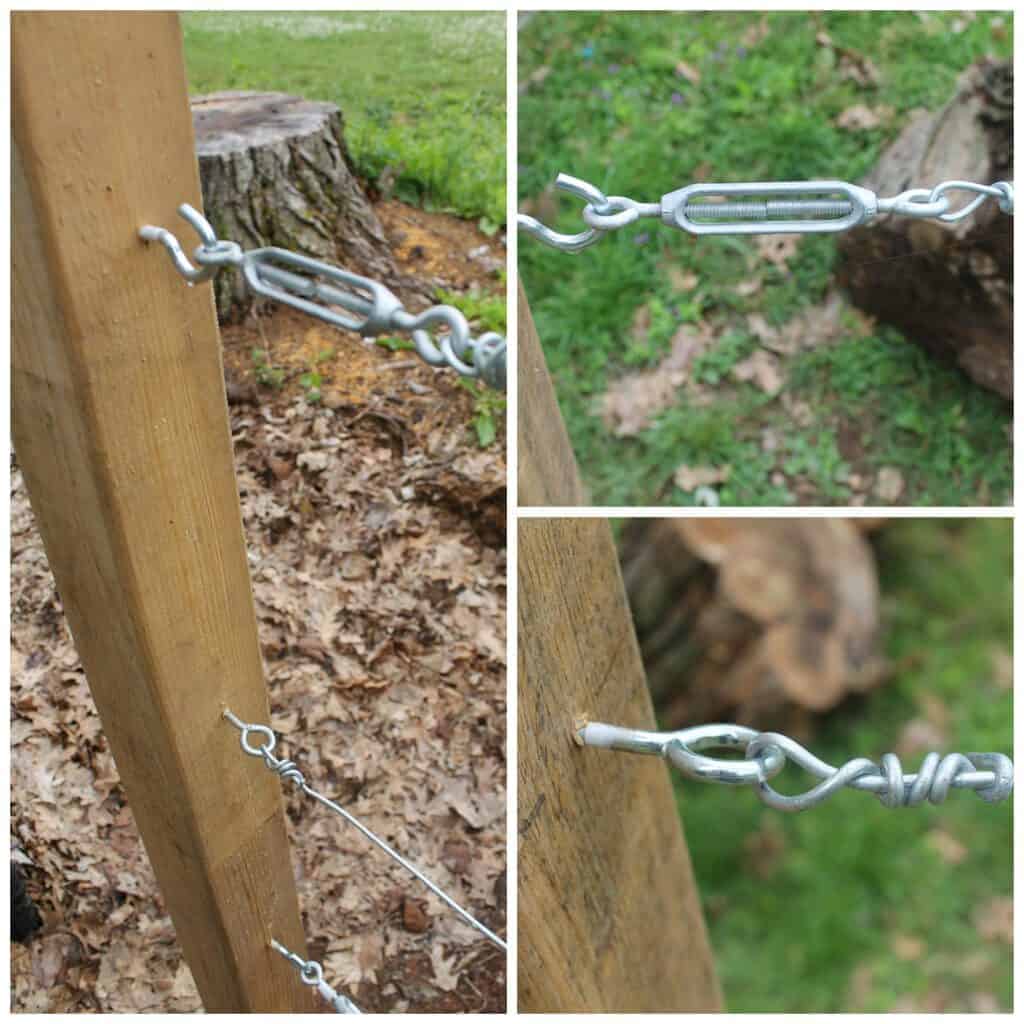
4. On the inside of the frame, drill pilot holes every foot along the end posts. This is the next step. I screwed the J Hook and the Eye Screw into these holes that had already been drilled. This gives me a solid anchor to which I can attach my steel wire on one side.
The J-hook allows me to attach the adjustable turnbuckles on the other side of the frame. So, if the ground moves or the vine gets too heavy and the wire starts to sag, I can tighten it as needed. I switched which side of the turnbuckle I put in place so that the force of the wires on the frame posts would be spread out evenly.
After putting the wires in place and tightening them with the turnbuckles, all that was left to do was dig a hole for my grapevine and move it. This may have been the easiest part.
You can find more DIY gardening tips and tricks in the Gardening section of the blog. I’ll be writing about my experiences growing my own food for different recipes from time to time. For example, I grew garlic for this Basil
Did you learn anything from this guide? For more DIY gardening tips & from scratch recipes follow me on Instagram & Pinterest.
How To Install DIY Wire Trellis For Climbing Plants Like Clematis, Roses and Honeysuckle
FAQ
Can you make a trellis with wire?
What kind of wire to use for a trellis?
How do you make a wire support for climbing plants?
Can You DIY a wire trellis?
A wire trellis is a great way to add vertical interest to your garden and provide support for climbing plants. It is also a relatively easy project to DIY, even if you don’t have a lot of experience with woodworking. In this tutorial, we will show you how to build a simple wire trellis that you can use in your own garden.
How do you build a trellis?
Begin by cutting two 5-foot by 4-foot sections of wire mesh. These will form the main body of your trellis panels. To create sturdy frames for the wire, construct two 5-inch by 4-inch frames using the 1×3 cedar boards. Using the staple gun, secure the wire section around each frame. Ensure the wire is taut and securely held in place.
How do you wire a 2×4 trellis?
Cut the 2x4s to the desired length. Drill holes in the 2x4s for the wire. Thread the wire through the holes. Secure the wire in place with screws. Drive the stakes into the ground at the desired locations. Tie the string between the stakes. Plant your climbing plants near the trellis. Tie the plants to the trellis as they grow.
How do you install a climbing trellis?
Secure the wire in place with screws. Drive the stakes into the ground at the desired locations. Tie the string between the stakes. Plant your climbing plants near the trellis. Tie the plants to the trellis as they grow. A wire trellis is a great way to add vertical interest to your garden and provide support for climbing plants.

Follow me on YouTube
- How Long Do Rose Bushes Live? A Guide to Rose Bush Longevity - April 14, 2026
- How to Plant Wisteria from Seed – A Complete Guide - April 14, 2026
- How Long Does Viburnum Bloom? A Guide to This Spring Flowering Shrub - April 10, 2026