As a hobby gardener who loves to cook, I’m always looking for new ways to incorporate edibles into my backyard. This year, I’ve decided to try growing shallots for the first time by planting them in the fall. Known for their mild, sweet onion flavor, shallots are a tasty addition to many recipes.
In this article, I’ll provide tips on how to successfully plant and grow shallots in the fall garden. With proper care, you can enjoy a fine harvest of these gourmet alliums come next spring.
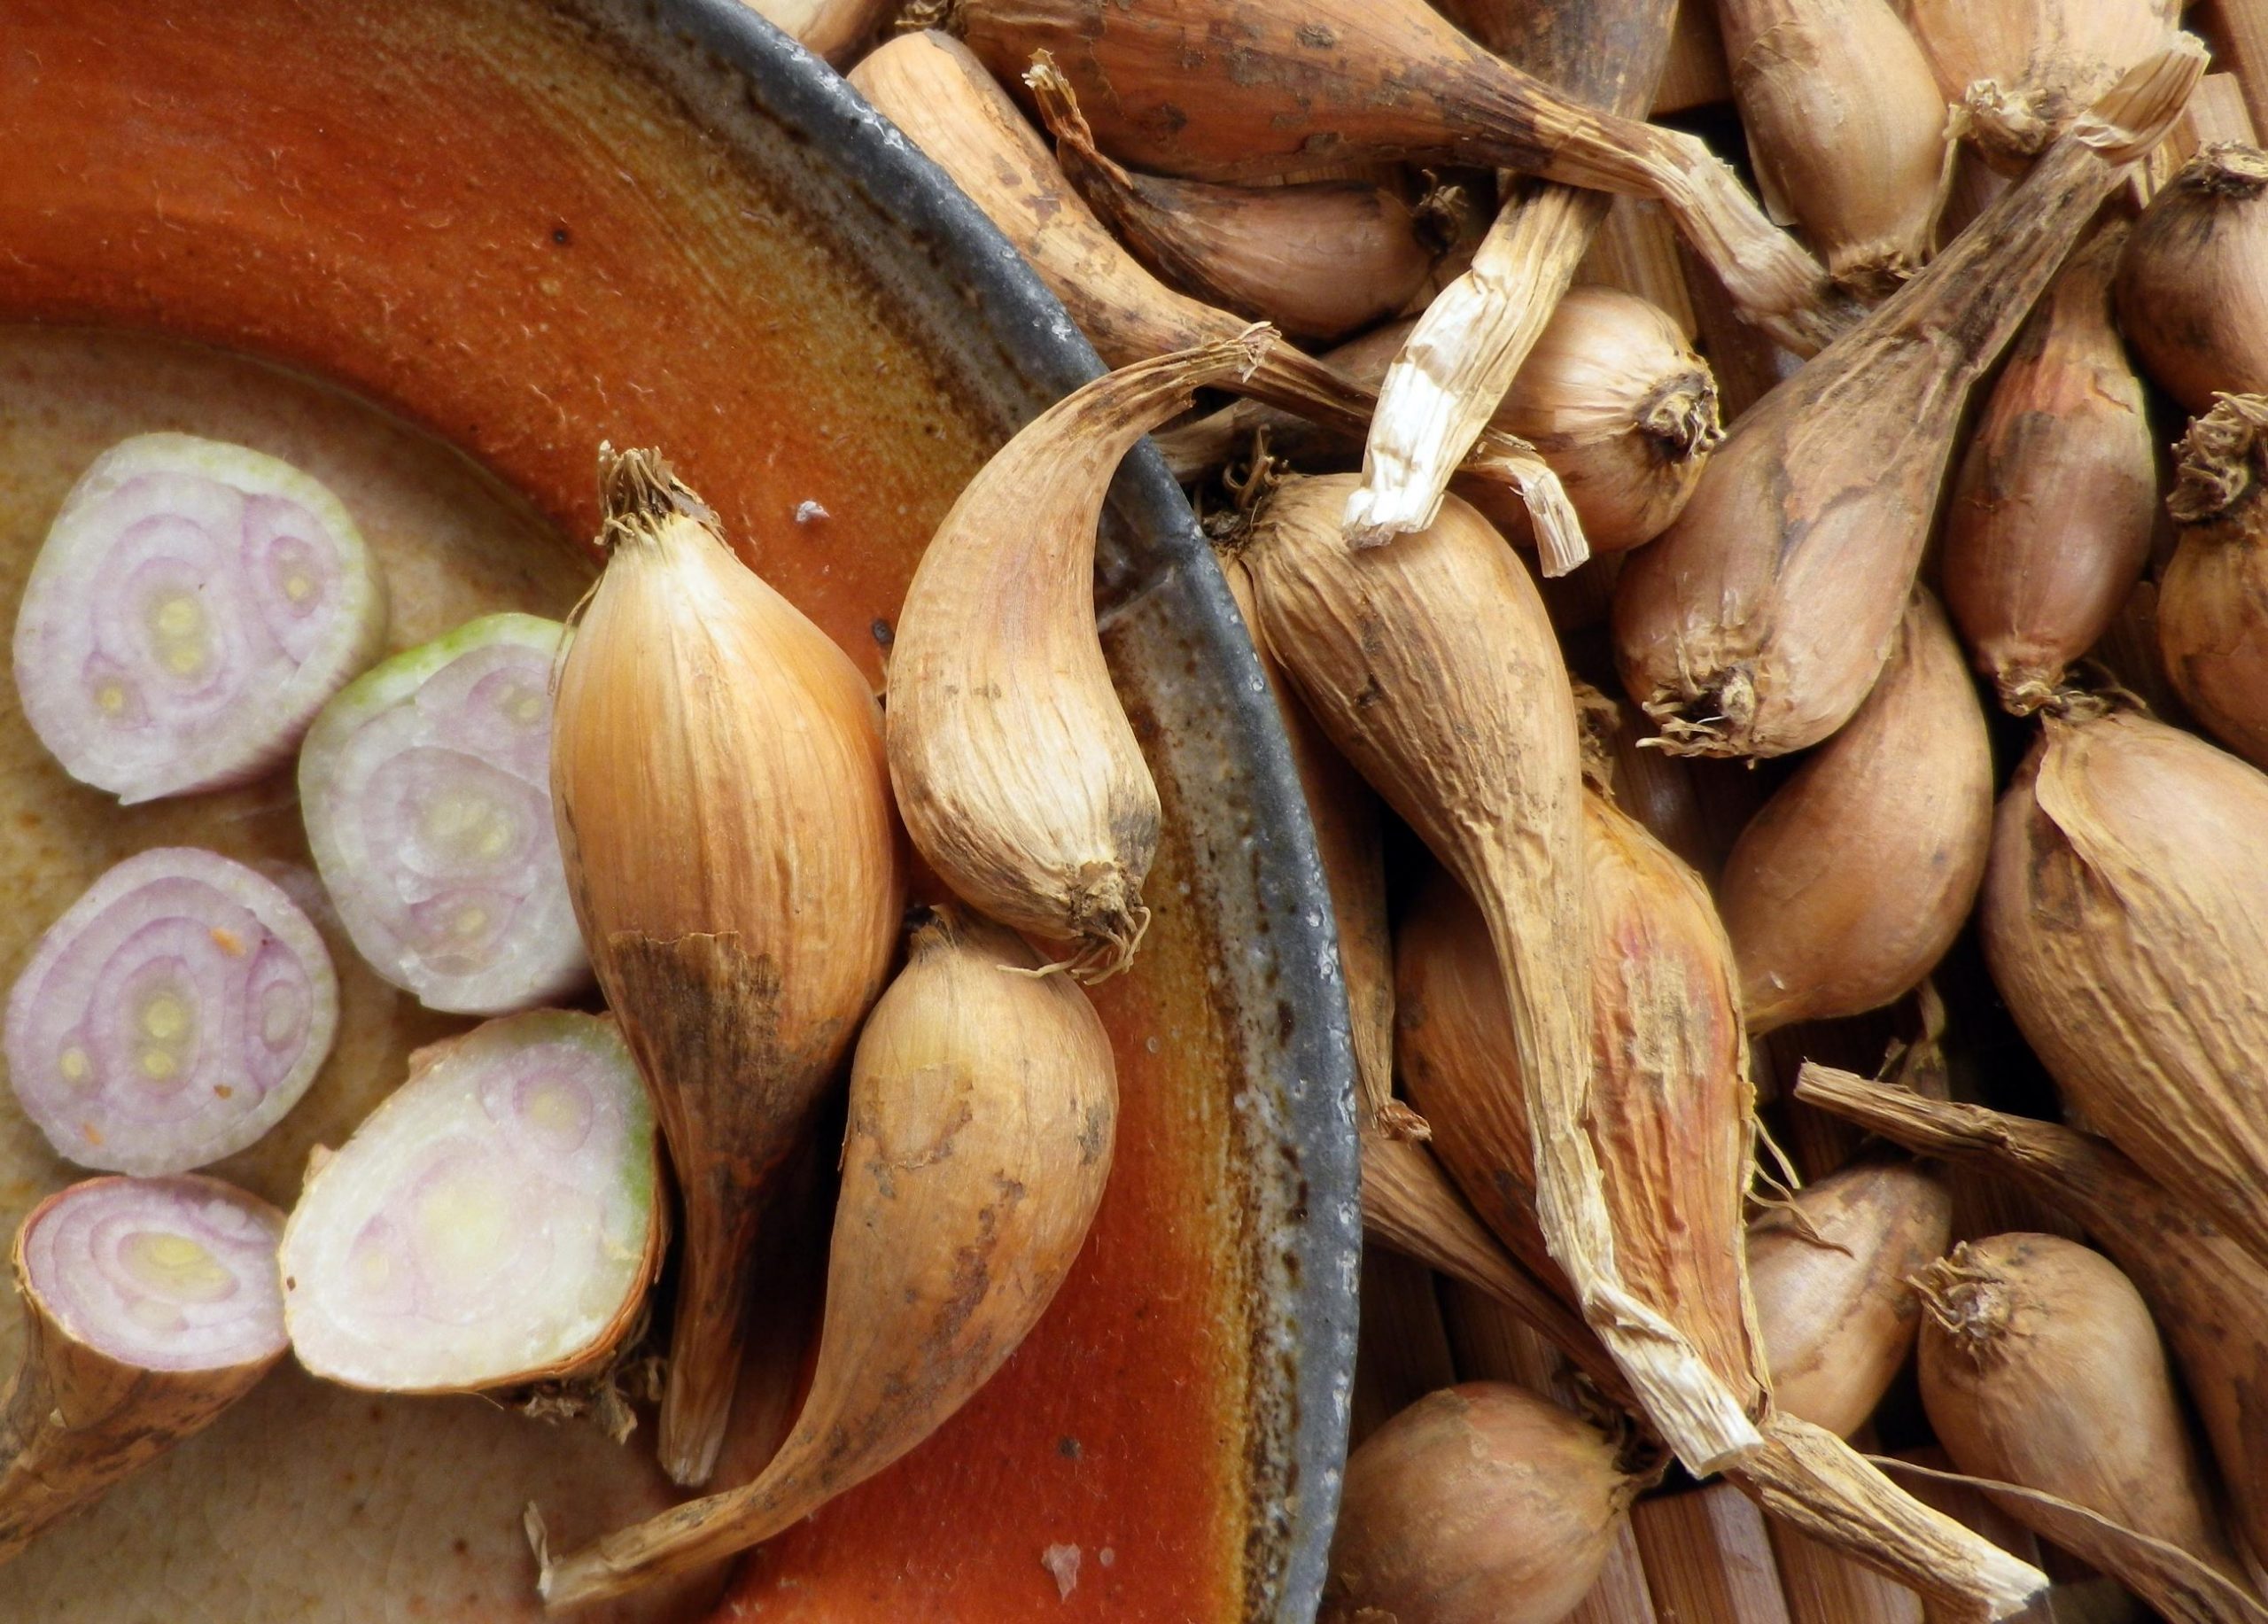
Shallots (Allium cepa var aggregatum) are closely related to onions but have a more delicate taste and texture when cooked Their flavor is sweet and mildly oniony without the bitterness or heat sometimes found in onions,
Unlike regular bulbing onions shallots grow in clusters, with each bulb containing multiple cloves covered in thin papery skin. The bulbs range in size from that of a cherry tomato to a small plum.
Shallots are a staple ingredient in many European and Asian cuisines. Their mellow flavor is perfect for sauces soups, braises roasts, and more.
When to Plant Shallots
Shallots can be planted in either spring or fall. But a fall planting will yield larger bulbs with better flavor.
For best results, plant shallots in the fall about 4-6 weeks before your first expected frost. This gives them time to establish roots before winter dormancy.
Shallots can be grown as far north as USDA zone 5. In zones 6-9, fall planting is ideal. Gardeners in zones 9-11 should opt for shorter day length varieties suited to their climate.
Avoid planting too early, as shallot bulbs may sprout before winter if the ground hasn’t cooled sufficiently. Wait until daytime highs are in the 60s F.
Selecting Shallot Bulbs
When buying shallot sets for planting, choose plump, firm bulbs with no sprouting or signs of mold, mushiness, or damage. Good-quality sets will have some loose, papery skin.
Popular varieties for home gardens include:
- French Grey/Griselle – The “true” shallot revered by gourmet cooks
- Yellow Moon – Mild, golden yellow bulbs
- Red Sun – Rose-colored bulbs with excellent storage
- Golden Gourmet – Large, vigorous bulbs
Purchase sets from a reputable source and avoid non-certified supermarket packs that may harbor diseases.
Preparing the Planting Area
Shallots need loose, fertile soil with good drainage and plenty of organic matter. Here are some tips for preparing your planting beds:
-
Loosen soil to a depth of 12 inches. Break up any clumps.
-
Mix in 1-2 inches of aged compost or well-rotted manure.
-
Ensure the pH is around 6.5-7.0. Shallots prefer neutral to slightly acidic conditions.
-
Plant in raised beds or on ridges to improve drainage if needed.
Also consider:
-
Solar exposure – Shallots grow best in full sun (6+ hours per day).
-
Crop rotation – Avoid planting shallots in the same spot as onions or garlic.
When and How to Plant Shallot Sets
Aim to plant shallot bulbs 4-6 weeks before your first expected autumn frost. This gives roots time to establish before winter dormancy.
Follow these steps for planting shallot sets:
-
Separate bulbs into individual cloves. Keep skins intact.
-
Push each clove gently into the soil with the pointed end up.
-
Space holes 4-6 inches apart in rows 12 inches apart.
-
Cover with 1-2 inches of soil so just the tip shows.
-
Firm soil lightly and water thoroughly after planting.
-
Consider mulching after the ground freezes to insulate plants.
-
For larger yields, double rows 6-8 inches apart.
Planting deeper can reduce bulb size. Leaving tips exposed prevents soil from entering and rotting bulbs.
Closely spaced plants will develop smaller bulbs, so don’t overcrowd.
Caring for Shallots Over Winter
Shallots require very little maintenance through winter:
-
Water occasionally during dry spells if bulbs start sprouting.
-
Apply mulch like leaves or straw after soil cools to prevent frost heave.
-
Remove mulch in early spring if desired to allow shoots to emerge.
-
Weed around plants to prevent competition for nutrients.
In late winter, apply 1-2 inches of finished compost or well-rotted manure around plants to feed spring growth.
Harvesting Shallot Bulbs
Shallots planted in fall are typically ready for harvest in early-mid summer. Here’s what to look for when harvest time nears:
- Foliage starts yellowing and falling over
- Neck of bulbs begin softening
- Sample bulbs taste sweet and mild
To harvest:
- Loosen soil with a digging fork and lift bulbs gently.
- Allow plants to dry upside down for 1-2 weeks protected from rain and sun.
- Cut tops to 1 inch once dried and store bulbs in a cool, dry spot.
Properly cured shallots will keep for up to 6 months. Refrigerate only for short term storage.
And remember to save your largest, firmest bulbs for replanting in autumn!
Enjoying Your Shallot Harvest
Homegrown shallots are a real delicacy. Here are some tasty ways to enjoy your harvest:
-
Saute with olive oil and use in omelets, pasta, vinaigrettes, etc.
-
Roast whole bulbs drizzled with oil until caramelized and tender.
-
Add minced shallots to compound butter for seafood or steak.
-
Pickle in vinegar for a tangy sandwich topping or charcuterie accompaniment.
-
Stuff whole bulbs with cheese and bake until meltingly tender.
-
Use in place of onions for a mellower flavor in soups, braises, and stews.
With proper planting and care, shallots are an easy and rewarding fall crop. Just follow this guide for planting shallot sets each autumn. Soon you’ll be savoring their sweet oniony goodness from your own backyard.
THE SHALLOTS DISCUSSED IN THIS NEWSLETTER AREAVAILABLE ON OUR WEBSITE AT THE FOLLOWING LINK:https://harvesting-history.com/product-category/roots-sets/shallots/
This newsletter contains information that was discussed in our August 24, 2019 newsletter. But if you’re like me, I didn’t pay much attention to shallots in August, so I’m going to repeat and add to what was in that newsletter.
Shallots are thought to have come from the area between Palestine and Israel, specifically from Ashkelon, a port city that is now part of Israel. It’s interesting that the word “scallion,” which we use for bunching onions, comes from the word “Ashkelon.” The scientific name for the shallot is Allium cepa, which is also the name of a group of plants that look like onions and include onions, walking onions, and multiplier onions. Shouldots used to be known as “multiplier onions,” but now that name is only used for a certain type of onion. Shallots were first brought to the United States in the 1600s and have been a part of American food ever since.
The shallots sets Harvesting History sells are ‘currently’ called Dutch Red Shallots – Aristo. I put currently in quotes because this shallot has a long naming history. William Woys Weaver, a famous plant historian, wrote a wonderful and interesting book called 100 Vegetables and Where They Came From. In it, he says that the Dutch Red Shallot was originally called a banana shallot and was native to Spain. In paintings from the 1600s, banana shallots are shown as part of a still life grouping. However, the shallot was likely known and used as early as that time.
While the banana shallot is thought to have come from Spain, it was the French who really fell in love with it and used it in a huge variety of dishes, from soups to desserts.
When you buy onion sets, each “set” is a baby onion that will grow into a single mature onion. But when you buy shallots, each “set” can be a nearly mature single shallot that will grow into 4-6 mature shallots. From a single sack of 6 shallots you should expect to get 25-40 shallots.
Shallots benefit greatly from being planted in soil that has been amended with Rock Phosphate and Potash. You can add the nutrients to the soil before or after planting the shallot sets. I usually dust the soil after I have planted the shallot sets.
Shallots should be planted about 2 inches deep. As a general rule, you should plant garlic, onions, elephant garlic, and shallots a “set” deep, which means the depth of one onion set, shallot set, etc. However, I have found that planting at this depth is too shallow. With about 2 inches of soil on top of the set, it is much less likely to come loose during the wet and cold winter months. Mulching with straw also helps prevent the sets from being spit out of the soil.
Shallots should be planted late in the fall. In Hardiness Zones 1-3, shallots should be planted in late September or early October. In Hardiness Zones 4–7, you should plant shallots between late October and early November, or even early December if the weather is nice. When you plant the shallot sets in the fall, you want them to grow enough roots to hold them firmly in the soil and keep them there through the winter frost heaves that happen because of the freeze-thaw cycles. In Hardiness Zones 7-9, shallot sets should not be planted before December.
Plant your sets at least 6 inches apart in rows 12 inches apart. There may be some green growth on the shallot sets in the fall, but it will die back when they are hit by several frosts.
If you have ashes from a fireplace or wood stove that you can use in the winter, sprinkle them on top of the soil where the shallots are planted. They love this. In late winter, before shoots appear, dust your shallot garden with some lime. This will sweeten your shallots.
In the spring, each set of shallots will start to grow a cluster of shallots and a group of small green leaves that look like onions. They’re pretty, and if you don’t have much room in your garden, they can make a lovely border. In the spring, don’t add any more fertilizer, and don’t water the shallots once they’ve started to break the soil’s surface.
Shallots are very vocal, and they let you know when they are ready to be picked. This is one of the many things I love about them. Their top growth turns mostly brown and falls over. “Get Us Out of Here!” they yell as they fully emerge from the ground and spread out over the surface of the ground in a dramatic way. When this happens, it is time to harvest. The shallot clusters are very, very easy to pick. All you need is a trowel and your hand to pull off the top growth of the cluster.
Once all the shallots have been removed from the soil, they need to be dried. Pick a dry place that has good air circulation and that is out of the direct sunlight. The place does not have to be dark. Arrange the shallots in a single layer and knock off as much soil as possible. Depending on the outsideweather, it will take 2-3 weeks for the shallots to cure.
Once the shallots are dry, you can store them. The most useful advice in this newsletter is at the end.
Shallots deteriorate very rapidly lasting no more than 1-2 months UNLESS you store them in the refrigerator. If stored in the refrigerator, shallots last forever (well, not really, but for more than a year, anyway). I lost a lot of crops to rot before I learned this lesson, so I’m going to share it with all of you. Stored shallots last so much longer than onions or garlic. It is truly amazinShallots are such a great vegetable to grow in your gardens and so very versatile. They can replace onions in any dish, and they make heavenly, crispy fried shallots. They outlast all the other root vegetables which makes them much more economical. I hope you will try shallots this year. Once you do, they will become a permanent part of your garden repertoire.
How to Grow Shallots – Planting To Harvest
FAQ
What month is best to plant shallots?
How many shallots will grow from one bulb?
Do you split shallots before planting?
Can shallots stay in the ground over winter?
Do shallots grow in the fall?
Shallots are prized in the kitchen for their mild flavor and smooth texture. Learn how to plant shallots (in late fall or early spring) with our growing guide. Shallots are members of the Allium genus, just like onions, leeks, and garlic. The bulbs grow in a manner more similar to onions but look closer to garlic, growing in clusters.
How do you grow shallots?
Shallots are most commonly grown from cloves. Place each clove in the soil with the thick end pointing down and the top just above the soil line. Plant them around 6 to 8 inches apart in rows, and space each row around 12 to 18 inches apart. These plants do not need a support structure to grow on.
When should I plant shallot bulbs?
Shallot bulbs can be planted in the late fall or early spring. Only where winters are extreme should a fall planting be avoided. In the early spring, plant sets or sow seeds from 2 to 4 weeks before your average last spring frost date.
Should I plant shallots in the spring?
By planting in the spring, you will still get shallots, but they will be smaller and not quite as flavorful as the fall-planted ones. In warm gardens further south, they will not get the day length they need to produce big bulbs unless you can find short day shallots, which will start producing bulbs with only 10 to 12 hours of daylight.
- How to Grow Gorgeous Climbing Roses on a Wooden Fence - March 24, 2026
- Avoid These Plants When Companion Planting with Oregano - March 24, 2026
- 15 Great Trees to Plant Near Your House - March 24, 2026