Whether you have collected air plants for a long time or are just starting out, one of your precious plants will get sick at some point, no matter how well you take care of it. So what do you do? Let it die and get a new plant, right? No, you can try to bring it back to life first.
Give It A Good Soak: If you haven’t been taking care of your air plant and it looks dry, limp, or green, it may be thirsty. First, take a look at your plant. The plant should be soaked for a few hours or even overnight if the leaves are mostly green with some browning or if they are rolled inward. Use quality water like filtered, spring, or clean well water. Aquarium or pond water works well too as the plants will like the added nutrients. It is best to avoid artificially softened water or tap water that is high in chlorine/chloramine. If you do use tap water, let it sit for a few hours so the chemicals can break down before you use it to water your air plants.
After a long soak, shake off any extra water from the leaves of the plant and let it dry upside down on a towel or rack in a well-ventilated area for at least 4 hours. This will make sure the plant is completely dry before you put it back in its place.
If your air plant still has leaves that are curling or looks a little limp after a few days, you can give it another soak, this time for a few hours. This should help perk up your plant. If its base is mushy or doesnt seem to be reviving, the tilly might be dead after all. Hold the base of the plant and gently move the middle leaves around. This will help you find a dead plant. These leaves should be easy to pull off (the bottoms of them should be black) or the plant should fall apart. In this case, check out our Beginner’s Choice Collection and try again!.
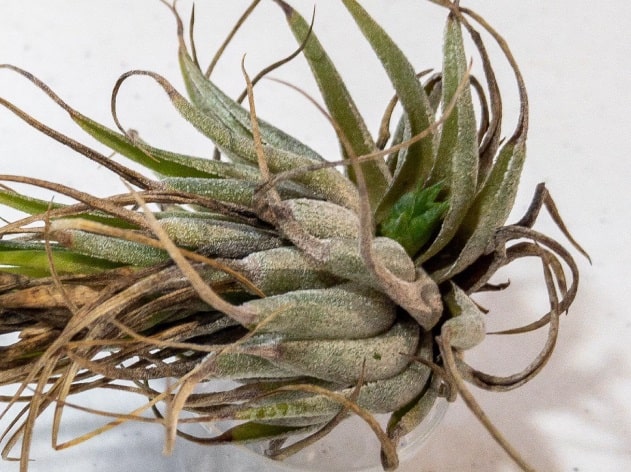
Check For Rot: Your sick air plant might also have a few brown or dead leaves. It is ok to gently remove these dead leaves, but be careful not to remove too many. Use our “Pruning Your Air Plants” guide to safely tend to your Tillandsia. If your plant breaks apart when you prune or trim it, it’s probably already dead and can’t be saved. Root rot is usually to blame in this case, which can happen when plants get too much water, don’t dry out properly, or don’t get enough light or air flow. Read our blog post “What’s Wrong With My Air Plant: Rot” to learn more about rot and how to keep it from happening.
Keep Fungus Away: If you see white spots or brown spots on the leaves of your plant, it might be too much or too little watering, or it could have a fungal problem. To keep the fungus from spreading to other plants, keep your air plant away from other plants that might have it and try treating it with a natural fungicide.
Putting a little cinnamon or neam oil on the spots has been shown to help stop or slow the growth of fungi. Remember that the leaves of air plants naturally have white, fuzzy trichomes. Do not mistake these for mold or fungus!
Attack Pests: Mealy bugs and scale are the main pests that can harm air plants when they are kept inside. If an air plant has mealy bugs, the leaves will have a waxy, cotton-like substance on them. Scale insects, on the other hand, usually stick to the bottoms of the leaves and have small bumps that look like shells. If your Tillandsia has bugs, keep it away from other plants and soak it in water with a few drops of insecticidal soap or neem oil. Gently remove any remaining pests or eggs from the plant’s leaves and base with a soft cloth or cotton swab. Then, give the plant a good rinse with clean water to get rid of any insecticide residue. Be sure to provide the plant with excellent airflow, bright indirect light, and proper watering during recovery. Over the next few weeks, monitor closely and repeat treatments if you continue to see signs of pests.
Air plants, also known as tillandsia, are unique tropical epiphytes that don’t need soil to grow. Their minimal care needs make them popular indoor plants. But sometimes even the easiest houseplants can get neglected and dry out. Don’t give up on your parched air plant just yet! With the right techniques, you can often revive a dried out tillandsia. Follow this complete guide to rehydrate, troubleshoot, and nurse your air plant back to health.
Assess the Damage
Start by taking a close look at your plant to evaluate its condition. Are the leaves dried out and rolled inwards? Do they lack their usual plumpness and appear thin or deflated? These are signs your air plant desperately needs water. If the base has shriveled or the center leaves pull out easily, rot may have set in from severe dehydration. But don’t throw it out until you try reviving it! Even badly dried plants can recover with proper care.
The Rehydration Process
Soaking is the first step in reviving a parched air plant. Submerge the entire plant in room temperature filtered or rain water. Let it soak for 2-3 hours to fully rehydrate. Using tap water is okay but allow it to sit out overnight first so the chlorine and fluoride can dissipate. If the plant is very dried out, you can soak it for up to 8 hours, changing the water halfway through. Just don’t leave it soaking for more than 8 hours or it may start to rot.
After soaking, gently shake off excess droplets and place the plant upside down on a towel. Let it air dry for at least 4-6 hours before returning it to its display spot. Proper drying prevents bacterial or fungal growth. Repeat the soaking process every 2-3 days until your air plant perks up. Misting the leaves between waterings will provide a humidity boost.
Getting the Conditions Right
Once reconstituted, it’s vital to promote recovery by optimizing growing conditions. Air plants prefer bright filtered light. An east or south-facing window is ideal. Avoid direct sun which can scorch the stressed plant. Daytime temperatures of 65-80°F suit most tillandsia species. Cooler at night is fine. High humidity between 50-80% is also critical. Group plants together or use a pebble tray to raise ambient humidity.
Ensure the plant has good air circulation. Stagnant air encourages rot and disease. Gently blow on the plant daily or use a small fan to keep air moving. Airflow is especially important if high humidity is difficult to maintain indoors. Watch for signs of new growth like fresh roots or pups sprouting at the base. This shows your rehabilitation efforts are working!
Troubleshooting Problems
Sometimes an air plant won’t bounce back even after watering. Root or stem rot may have taken hold while it was dried out. Check for black, mushy areas at the base. Trim any dead roots or leaves with sterile scissors or pruning shears. Dust sulfur powder on the cuts to prevent infection. Reduce watering frequency to allow it to further dry out and stop the spread of rot.
If you notice any fuzz or white patches, fungus could be to blame. Dab on cinnamon powder or neem oil solution to inhibit further fungal growth. Isolate affected plants to keep the infection from spreading. With diligent care and optimal conditions, the plant should eventually outgrow the fungus.
Mealybugs or scale insects may also attack distressed plants. Treat with a mild insecticidal soap following label directions. Rinse thoroughly afterwards. Repeat every 3-5 days until pests are gone. Keep a close watch to quickly spot and treat any recurring infestations.
Providing Aftercare
Once your air plant seems back to normal, continue giving it attentive care. Soak it whenever the leaves start to curl inward, typically every 1-2 weeks. Mist occasionally between waterings and fertilize monthly with a diluted orchid fertilizer. Ensure it receives adequate sunlight, warmth and humidity at all times.
Closely monitor the plant for signs of renewed drying or distress. At the first hint of any trouble, repeat the soaking and drying process. With extra TLC during this recovery period, your revived air plant can thrive once again! Proper care after rehabilitation is the key to a long and healthy life.
Don’t give up too soon on a dried out, neglected air plant. Even severely parched tillandsia often respond surprisingly well to water therapy and care. Follow these air plant revival techniques and be patient. There’s a good chance you’ll soon have a happy, healthy houseplant again. With a bit of time and effort, you can bring your air plant back from the brink.
For more tips on how to keep air plants healthy, check out our Air Plant Care Page, browse through our informative Care Blogs, and follow us on Facebook and Instagram!
Sign Up and get free Air Plant
BEST TIPS | HOW TO SAVE YOUR UNDERWATERED AND OVERWATERED AIR PLANTS | TILLANDSIA CARE GUIDE
How do you revive a sick air plant?
Wait a week and check how your plant is looking. If the plant still looks grim pop your air plant in the water for another swim. Sometimes it takes a few trips to the spa to really revive a sick air plant. I know the feeling! After the first big soak you can remove the plant from its bowl of water after a half hour.
How do you keep air plants from circling a drain?
Water your air plant. The best way to water air plants that are circling the drain is to soak them root to tip. To do this, fill a bowl or dish with clean water. Tap water often has chemicals in it like chlorine or fluoride that can cause damage, so filtered or distilled water is best.
How do you rehydrate an air plant?
Submerge the plant and wait. For a Tillandsia that’s really dried out soak the plant overnight. This will give your air plant lots of time to rehydrate. Remove the air plant from the water and allow it to dry completely. Upside down is best to ensure any excess water drains away. Too much water trapped in the leafy base of the plant can cause rot.
How do you revive an air plant with curling brown leaves?
To revive an air plant with curling brown leaf ends, submerge the air plant in lukewarm water for 10 minutes to allow the leaves to absorb the water they need. Keep the air plant out of direct sunlight to help the brown leaf ends recover, and water the air plant at least twice per week.
- How to Grow Gorgeous Climbing Roses on a Wooden Fence - March 24, 2026
- Avoid These Plants When Companion Planting with Oregano - March 24, 2026
- 15 Great Trees to Plant Near Your House - March 24, 2026