As an avid gardener keeping my pruning tools in top shape is a top priority. Dull blades make pruning tasks much harder and can damage plants. That’s why I never head out to prune without ensuring my bypass pruner blades are honed to a razor-sharp edge.
In this article, I’ll provide a complete guide to sharpening bypass pruners properly We’ll look at why sharp blades matter, techniques and tools to sharpen effectively, and maintenance tips to extend the life of your pruners Let’s get started and get those pruners piercingly sharp!
Why Properly Sharpened Bypass Pruner Blades Matter
It’s tempting to just use your bypass pruners until they become too dull to cut anymore. But walking around your garden snipping away with a dull blade can cause significant issues:
-
Ragged Cuts – The blades will mash and tear rather than making clean, smooth cuts. Ragged cuts take longer to heal, leaving plants prone to disease.
-
Increased Injury Risk – More hand strength and pressure is required with dull blades. This can lead to hand strains and slips that cut into stems you didn’t intend to prune.
-
Damage to Plants – Squeezing and crushing stems instead of cutting introduces trauma. Dull blades essentially bruise and injure plants, which drains their energy and vigor.
-
Inaccurate Cuts – Lack of blade precision makes it hard to prune off the exact amount of growth intended.
Regular sharpening eliminates these problems, making pruning easier, safer, and healthier for you and your plants.
How to Sharpen Bypass Pruner Blades
Now that we’ve covered why sharp pruners matter, let’s get into the specific techniques and tools needed to put an incredibly sharp edge on your bypass blades:
Supplies Needed
- Coarse sharpening stone
- Fine sharpening stone
- Flat mill file
- Protractor gauge
- Gardening gloves
- Lubricating oil
- Clean cloths
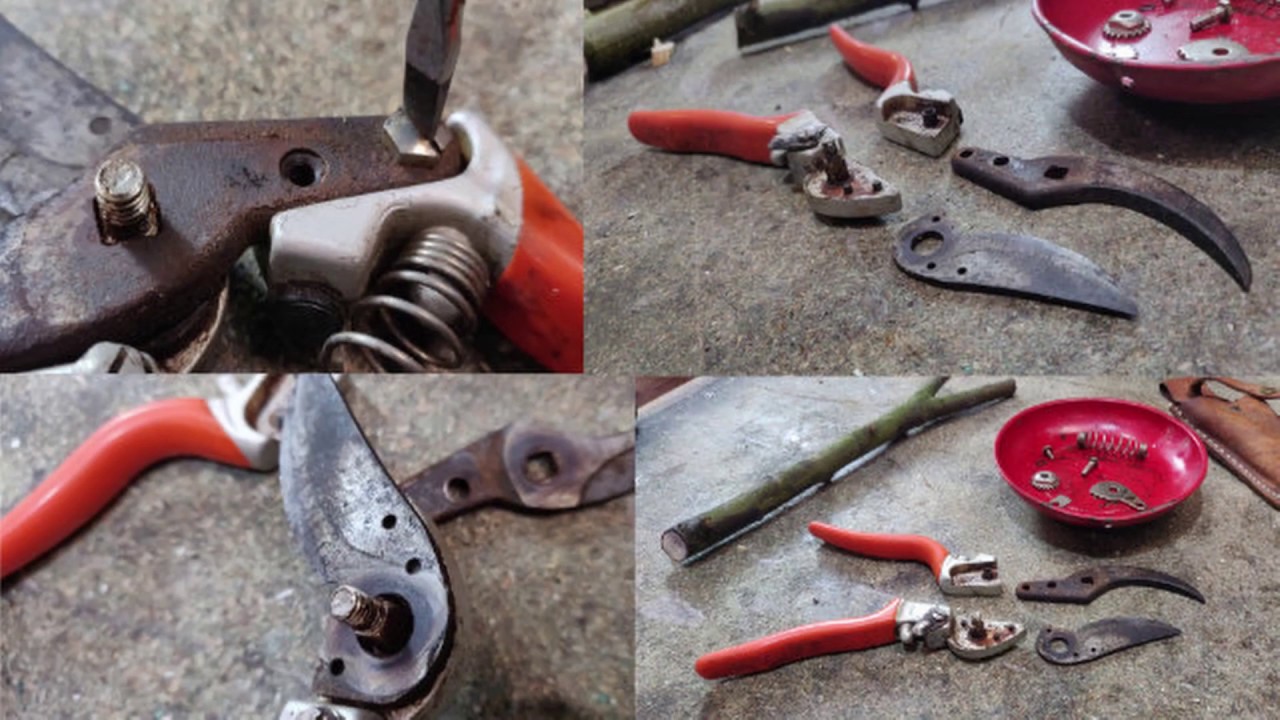
Step 1 – Disassemble the Blades
Bypass pruners are made up of a top blade that glides over a bottom blade to make cuts. Start by unscrewing the pivot bolt that connects these two blades. This allows sharpening each individually.
Step 2 – Clean the Blades
Wipe away dirt, debris, sap, and rust from both blades using a cloth dipped in diluted vinegar. Rinse and dry completely.
Step 3 – File Down Nicks
Examine the cutting edges and file down any nicks or dents using even, smooth strokes. Nicks prevent clean cuts and should be removed.
Step 4 – Confirm Blade Angles
Most quality bypass pruner blades have beveled cutting edges ground to 25-30 degrees. Use a protractor gauge to check and match the bevel angle.
Step 5 – Sharpen the Beveled Edge
Start with the beveled side of the top blade. Hold this edge against a coarse sharpening stone at the proper bevel angle. Draw the edge back over the stone using even, smooth strokes. Sharpen the beveled edge of the bottom blade the same way.
Step 6 – Refine the Cutting Edge
Switch to the fine sharpening stone. Refine and polish the beveled edges of both blades with lighter, smoother strokes to achieve a razor-sharp cutting edge.
Step 7 – Sharpen the Flat Sides
Turn the blades over to expose the flat backside. Draw these flat surfaces over the fine stone to sharpen and true the cutting alignment.
Step 8 – Clean and Lubricate
Wipe both blades down removing all sharpening residue. Apply a thin lubricating oil to prevent rust and improve glide between the blades.
Step 9 – Reassemble the Pruners
Screw the top and bottom blades back together, adjust alignment if needed, and test the cut on scrap material before pruning plants.
Maintaining and Extending Bypass Pruner Life
To maximize the lifetime of your pruners and edge between sharpenings, be sure to:
-
Clean blades after each use with mild soap and water.
-
Always store pruners in an open position to prevent spring compression fatigue.
-
Lubricate pivot points every few months with penetrating oil.
-
Never use pruners to cut thicker branches than recommended.
-
Touch up edges frequently with a few quick file strokes to maintain sharpness.
-
Wipe off sap or residue during pruning to prevent buildup.
-
Avoid exposing pruners to excessive moisture that promotes rust.
With repeated use, the cutting edges will eventually become too worn to sharpen. At that point, replacement blades or an entire new set of bypass pruners will be needed. But keeping your tools well-maintained and edges expertly sharpened will give you many years of peak pruning performance.
Getting Help Sharpening Pruners
If you don’t feel fully equipped to sharpen bypass pruner blades at home, many options for professional sharpening services exist:
-
Local Hardware Stores – Check with hardware stores and chains like Home Depot, which often offer blade sharpening for a small fee.
-
Nurseries and Garden Centers – Some nurseries sharpen tools and blades as an extra service for customers.
-
Landscapers – Many professional landscapers routinely sharpen equipment and may do it for homeowners.
-
Sharpening Services – Specialized mobile sharpening companies in many areas will pick up, sharpen and return tools for reasonable rates.
-
Mail-In Services – You can also use national mail-in sharpening services but will pay more in shipping costs.
While a bit of an investment, getting professional sharpening for heavily used pruners each year helps restore top performance. And touch up edges yourself between pro sharpenings.
Know When It’s Time to Replace Pruner Blades
As bypass pruner blades undergo repeated sharpening over time, the metal will slowly wear away and the blade edges will angle inward.
Signs it’s time to replace your pruner blades include:
- Inability to sharpen to a clean, sharp edge
- Cutting edges that don’t fully meet when closed
- Blades angled too far inward from repeated sharpening
- Visible cracks or damage to the blade surface
On high-end pruners, you can purchase replacement blades and easily swap them out to restore cutting ability. For pruners without replaceable blades, you will need to invest in an entirely new set when blades reach the end of their lifespan.
Sharpening Bypass Pruners Doesn’t Have to Be Difficult
While it takes a little practice and care to master, there’s really nothing difficult about putting an incredibly sharp edge on bypass pruners. The right tools combined with proper technique make the process straightforward. And you’ll be rewarded with tools that make pruning a pleasure rather than a chore.
Follow my tips to keep your pruners honed, clean, lubricated and rust-free. Consider getting professional sharpening annually to restore optimal performance. And change out worn blades to keep your pruners slicing through branches effortlessly for many seasons to come. Happy sharpening!
Fine Gardening Project Guides

As a self-proclaimed tree nerd and certified arborist, I always make sure my pruning tools are in good shape. For hand pruners, this means keeping them sharp. A good pair of hand pruners makes cuts that are cleaner and heal faster. This makes the plant healthier and better able to fight off disease, bugs, and natural stresses with strength and vigor.
I find the best way to sharpen pruners is with diamond files. I prefer them to whetstones because they are easy to use, even for a novice. You’ll need three levels of coarseness (known as grits): coarse, fine, and extrafine. The files are inexpensive and will last longer than your pruners.
Well-used but well-maintained pruners should only need sharpening every six weeks. For gardeners who spend barely four hours a week pruning, one good sharpening a year may be adequate.
It takes only about 10 minutes to sharpen hand pruners in relatively good condition. The more regularly you maintain your pruners, the faster the sharpening chore goes. And keep in mind that learning how to sharpen hand pruners is not rocket science. It just takes a little patience and practice.
- Kitchen scouring pads
- Soap and warm water
- Clean rag and towel
- Gloves
- #3 (semicoarse) steel wool
- #0 (fine) steel wool
- Diamond files (coarse, fine, and extrafine)
- Dry or silicone-based lubricant (such as White Lightning)
- Twigs for testing your progress
Get the angle and motion right
Begin with the coarsest file, and progress to the finest for the best edge. Before you use any of the files, pat them with a moist cloth. The water will keep the file from getting clogged up with the small pieces of metal you’re taking off the blade.
Hold the coarse file at the same angle as the beveled cutting edge (photo A). The angle should be between 10 and 20 degrees. Using moderate pressure, start at the inside of the blade and move the file toward the tip in a curve that matches the shape of the blade (photo B).
This motion is easy, safe, and sharpens the entire blade evenly. If you take good care of your pruners, 10 to 20 passes with the diamond sharpener should be enough. If you don’t, you may need 40 to 50 passes.
Switch to finer grits to further sharpen the beveled edge. First use the fine file, then the extrafine file. Make the same number of passes with each as you did with the coarse file.
Run the extrafine file over the back of the blade a few times to get rid of any burrs (photo C).
Sharpen Pruners (Bypass Pruners & Loppers)
FAQ
How to sharpen Fiskars Bypass pruners?
Can bypass loppers be sharpened?
How do you sharpen a pruner?
Dip pruners in a bucket of clean water. Wipe dry with a rag to prevent the blade from rusting. Go over the blades with steel wool. Make sure the pruners are clean before sharpening. Sharpen the blades like you would a kitchen knife. On the bevel edge side, rub the blade in one direction on a sharpening stone. Turn over to the flat side.
How do you clean a bypass Pruner?
To clean the blades, Jenn used a combination of steel wool and Simple Green Concentrated All-Purpose Cleaner. Ask This Old House Landscape Contractor Jenn Nawada explains what should be done to maintain a set of bypass pruners and why it matters.
How often should you sharpen your pruners?
Reassemble the pruners, and tighten the gear. If you use your pruners regularly, then you’ll need to sharpen them on a regular basis too. And always remember to clean dirt, debris, and sap off your pruners after every use. This will help extend their life and allow you to go longer between sharpenings.
How do you sharpen a diamond stone Pruner?
Slowly drag the blade at an angle across the diamond stone several times until it feels as sharp as you’d like it to be. Reassemble the pruners, and tighten the gear. If you use your pruners regularly, then you’ll need to sharpen them on a regular basis too.
- How to Grow Gorgeous Climbing Roses on a Wooden Fence - March 24, 2026
- Avoid These Plants When Companion Planting with Oregano - March 24, 2026
- 15 Great Trees to Plant Near Your House - March 24, 2026