Its tricky to know when to harvest garlic (Allium sativum). If you pick the bulbs too early, the cloves will be small and not store well. If you leave them in the ground for too long, the cloves will burst out of their skins, making them more likely to get sick and reducing their storage time.
Growing this relative of the onion takes patience. It takes about eight months after planting before you can enjoy the fruits of your labor. You can have fresh garlic all winter if youve grown, harvested, and stored it properly. This is one of the best garden vegetables for long-term storage.
As a gardener, I always find the garlic harvest to be one of the most exciting and rewarding times of the year After months of careful tending, the culmination of the garlic growing season is finally here. But when is garlic truly ready to be harvested? While it may seem straightforward, timing the garlic harvest properly ensures you reap the benefits of your labor with beautiful, fully-matured garlic bulbs ideal for eating and storage
In this article, we’ll explore what signs to look for when determining when your garlic is ready to pick With the help of some illuminating example pictures, you’ll learn to recognize the perfect moment to harvest and capture pictures of your own garlic at its peak
Evaluating Garlic Leaves
The first thing to inspect when gauging garlic’s readiness for harvest are the leaves. As the bulbs swell underground, the lower leaves will start to brown and wither. This indicates the plant is redirecting energy toward bulb growth rather than foliage.
Keep a close eye on the lower third of the leaves. If more than 50% appear brown or dry, the garlic is getting close. The upper leaves may still look healthy and green at this point. But once lower leaves are mostly brown, expect harvest time to come within 2-3 weeks.
Checking Garlic Bulb Size
Leaf condition points you in the right direction, but confirming bulb size is the definitive way to know if garlic is mature and ready for harvest.
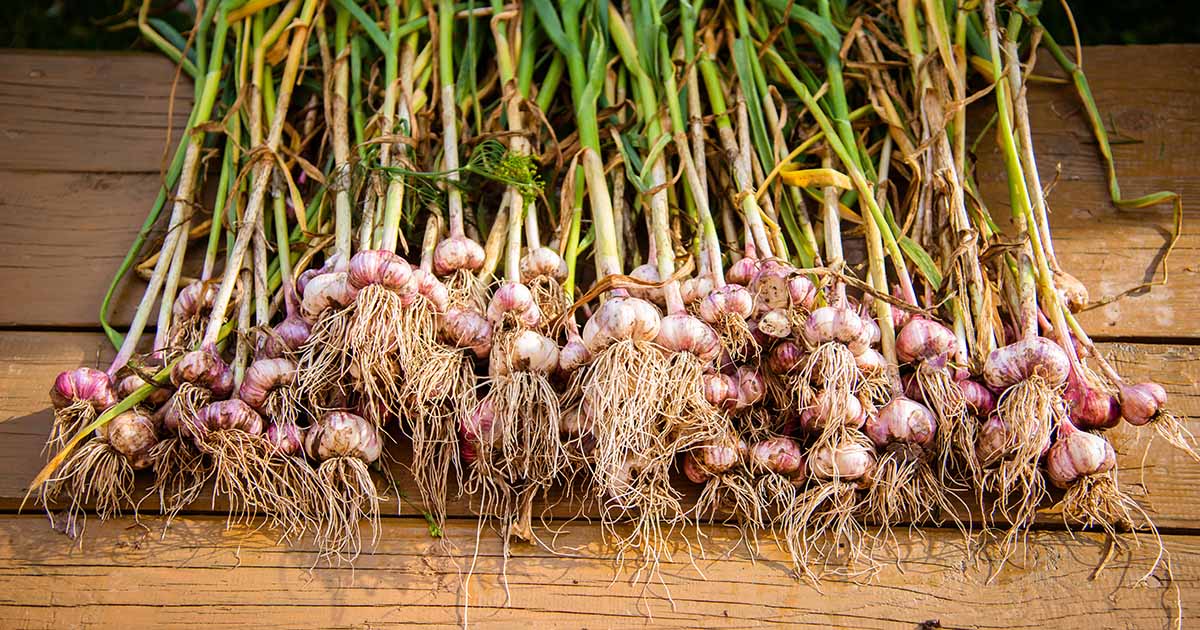
Carefully dig up 1-2 sample bulbs from the soil to get a sense of current bulb size and growth. Mature garlic bulbs will feel solid and substantial in your hand. The papery skin surrounding each clove segment will appear fully filled out and rounded.
Compare the bulb diameters to your thumb or index finger as a gauge. For many hardneck garlic varieties, an ideal minimum size at harvest is about 1.5-2 inches across. Larger, milder softneck varieties may achieve 2-3 inch diameters when fully grown.
If bulbs seem small or cloves feel underdeveloped, rebury them and wait 1-2 more weeks until achieving proper size. Taking sample bulbs ensures the rest won’t be disturbed or damaged in the process.
Examining Garlic Skin
The papery sheath covering each garlic bulb offers more visual cues signaling maturity. As plants direct energy to the bulbs, the skin takes on a drier, more layered texture. It lightens from green-tinged to pure white or light brown.
At peak harvest time, the skins will appear quite dry and crackly, with 5-8 layers of papery covering surrounding the cloves. If peeled back, fresh cloves inside will feel plump and solid. Skins that still seem moist, flexible or under-developed warrant a bit more patience as bulbs finish maturing.
Capturing Images of Harvest-Ready Garlic
Once you determine garlic plants exhibit signs of mature bulbs and leaves as described above, it’s time to capture some pictures of garlic ready for harvest! Here are a few tips for taking visually appealing photos:
-
Focus on the detailed textures of the leaves, stalks and skin to showcase ripeness. Use macro mode or get very close to fill the frame with intriguing details.
-
Arrange a few entire bulbs together in a basket or on weathered boards to elevate the scene. Keep some skin peeled back to reveal the cloves within.
-
Photograph garlic against natural backdrops like weathered wood, burlap sacks, galvanized metal or the lush garden itself to complement the organic nature of homegrown garlic.
-
Shoot in soft morning or evening light for an illuminating glow around the garlic bulbs and leaves. Avoid harsh midday shadows.
-
Get creative with unique perspectives. Shoot overhead, from ground level, or place bulbs on steps or stacked crates to add visual interest.
Handling the Harvest
Once satisfied your garlic is ready for its harvest close-up, it’s time to get picking! Here are some tips for a successful garlic harvest:
-
Use a digging fork to loosen soil and carefully lift bulbs. Brush off excess dirt but don’t wash them yet.
-
Leave the stalks and roots intact for now. Cut back stalks to about 2” above the bulb a few days later once they’ve dried further.
-
Gather stems together and secure with a rubber band to create hanging bundles. Hang in a warm, dry, well-ventilated space out of direct sunlight.
-
Allow to cure for 2-4 weeks. Once skins feel papery dry and outer leaves rustle, it’s fully cured and ready for storage.
-
Clean off any remaining dirt and roots. Store in mesh sacks or bags in a cool, dark place. Properly cured garlic can last up to 8 months.
Relishing the Rewards
As you gather your mature garlic harvest and admire those photographic keepsakes, relish in the rewards of your dedication and care. There’s nothing quite like savoring homegrown garlic’s robust aroma and rich flavor. From garden to kitchen to picture frame, embrace all the joy, pride and satisfaction this special crop offers.
When to Harvest Garlic
Because you can’t see when most root vegetables are ready to be picked, like garlic, it can be hard to tell when it’s time to harvest them. Most gardeners plant garlic in the fall and wait for the plants to sprout the following spring. But if you planted garlic in the early spring, the harvest will come in late summer.
Timing is quite important when it comes to harvesting and storing garlic. Here are tips on how to know when to harvest garlic:
- In June or July, when the leaves start to dry out and turn yellow, it’s almost time to harvest.
- When the bottom two leaves begin to turn brown, garlic is usually ready to be picked. To be sure, you need to dig up some bulbs and watch how they grow.
- It’s time to pick the garlic if the cloves fill up the skins.
- Garlic with a hardneck grows best in places where winters are harsh and cold.
- Softneck varieties grow best in moderate climates. Some climates may be ideal for both types of garlic. Both types are usually picked at the same time, but the exact time depends on whether you grow hardneck or softneck garlic.
- Some hardneck varieties are ready to be picked when only 20% of their leaves are brown and the rest are still green.
- Not all garlic varieties mature at the same time. You could have early-season (spring harvest) or late-season (summer harvest) types. For instance, artichoke garlic (soft neck) is usually ready to be picked first, then rocambole garlic (hard neck). After that there are other types, such as porcelains (hardneck), purple stripes (hardneck), and silverskins (softneck).
- If you see that the top leaves are turning yellow or brown with yellow tips, that doesn’t mean it’s time to harvest. One common reason is that the soil doesn’t have enough nitrogen, which you need to fix before planting your next crop.
- Mature garlic plant
:max_bytes(150000):strip_icc()/harvesting-garlic-1402402-04-49339798210548e1be4680789b18a832.jpg)
The Spruce / Randi Rhoades
How to Harvest Garlic
- Get the Garlic Ready to Eat: Stop watering the garlic plant when the leaves start to fall off. You can’t do anything about this if it rains on the plant, but try your best. The garlic in the ground will get better after a dry spell. The Spruce / Randi Rhoades .
- Figure Out the Best Time to Harvest Garlic: It’s an art to choose the best time to harvest garlic. Remember these tips: the plant is ready when five or six green leaves are left after three or four dead ones. If you wait too long, the cloves will start to separate from the bulbs in the ground. The Spruce / Randi Rhoades .
- Get the Bulbs Out of the Ground: Garlic bulbs aren’t as easy to get out of the ground as onion bulbs. You may have planted a small clove, but now the bulb is fully grown and several inches deep, with strong roots. So always dig up your garlic. If possible, wait for the soil to dry before digging. Don’t pull it out of the ground; the stalks could break off and fall off the bulbs. For digging up garlic, a garden fork works better than a shovel most of the time, but either one will do. It’s important not to cut through the garlic bulbs when you dig them up. To separate the bulbs from the soil, shake off the rest of the dirt by hand. Tip: If you cut a bulb when you dig it up, think of a good way to use it. You can use a sliced bulb right away, but you can’t store it. The Spruce / Randi Rhoades .
- Cure the Garlic: Before putting garlic away for later use, it needs to be cured or dried. Follow these steps and tips to cure and dry garlic: First, brush off any soil that is still on the bulbs. Do not wash them off or get the bulbs wet. While the bulbs are drying, leave the stalks and roots on them. You can either tie eight to ten garlic stems together with twine and hang them bulb-side down in a cool, dark place, like a basement, or lay the garlic flat on a raised screen in a single layer. However you choose to store the garlic, Allow the bulbs to cure for three to four weeks. Sunlight can change the taste of fresh garlic, so keep the bulbs out of the sun. After the tops and roots have dried, cut them off. Then, clean the garlic by peeling off the papery skin. Be careful not to expose any of the cloves. If you have grown softneck varieties, you can leave the stalks on and braid the garlic instead. The Spruce / Randi Rhoades .
- To store bulbs, do the following: Keep your garlic in a dark, cool (32 to 40 degrees Fahrenheit) place where it will still get some air flow. A good way to store garlic is to braid it and hang it up. Hang garlic in the kitchen, but not where it will get light. You can also store garlic in a mesh bag. The Spruce / Randi Rhoades .
Don’t want to miss out on our best gardening tips, troubleshooting hacks, and more? Sign up for our free gardening newsletter today!
When to Harvest Garlic + a unique tip for curing and storage
When to harvest garlic?
Here are tips on how to know when to harvest garlic: When the leaves begin to turn yellow and dry, usually in June or July, harvest time is near. In general, garlic is ready for harvesting when the lower two leaves start to brown. The only way to be sure about this is to dig up a few bulbs to check their progress.
How do you know if Garlic is ready to harvest?
If the bulb looks substantial, the wrappers tight, and the cloves plump and well-formed, it’s ready to be harvested. Carefully loosen the soil around your bulbs with a trowel and gently pull the garlic out from the base of its stem, at its neck. Brush off any excess dirt that falls off easily. Should you wash garlic after harvesting?
What should a garlic bulb look like before harvesting?
A garlic bulb ready for harvest must be moderate to large in size and should have firm and tight papery wrapping. The individual cloves should be well-visible. If this is not the case, use soil to cover the bulb again, evidently, it requires more time to mature.
When is garlic Ripe & Ready?
Garlic is also one of those things where timing is everything, and the harvest period can span from May to August, depending on the date of planting, the weather conditions, and the type of garlic grown. It can’t be picked too early or too late, but since the bulbs are all underground, how can you really tell when your garlic is ripe and ready?
- The Moderate Growth Rate of the Stunning Edith Bogue Magnolia - April 10, 2026
- Cultivating Vibrant Dahlias in Garden Beds – A Complete Growing Guide - April 10, 2026
- Mediterranean Pink Heath in Summer – Tips for Care and Maximizing Bloom - April 9, 2026