For those who are patient, asparagus is one of those perennial vegetables that is so rewarding once you know how to grow them. It’s delicious and usually one of the first crops to be picked in the spring.
As far as nutrition, it’s packed with vitamin C, B vitamins, iron, and calcium. That being said, store-bought asparagus will never taste as good as asparagus that you pick yourself right from the garden.
If you don’t mind mild temperatures and lots of rain, you can grow asparagus plants almost anywhere. I’m sure you could even grow them in Florida or along the Gulf Coast with some creative problem-solving. .
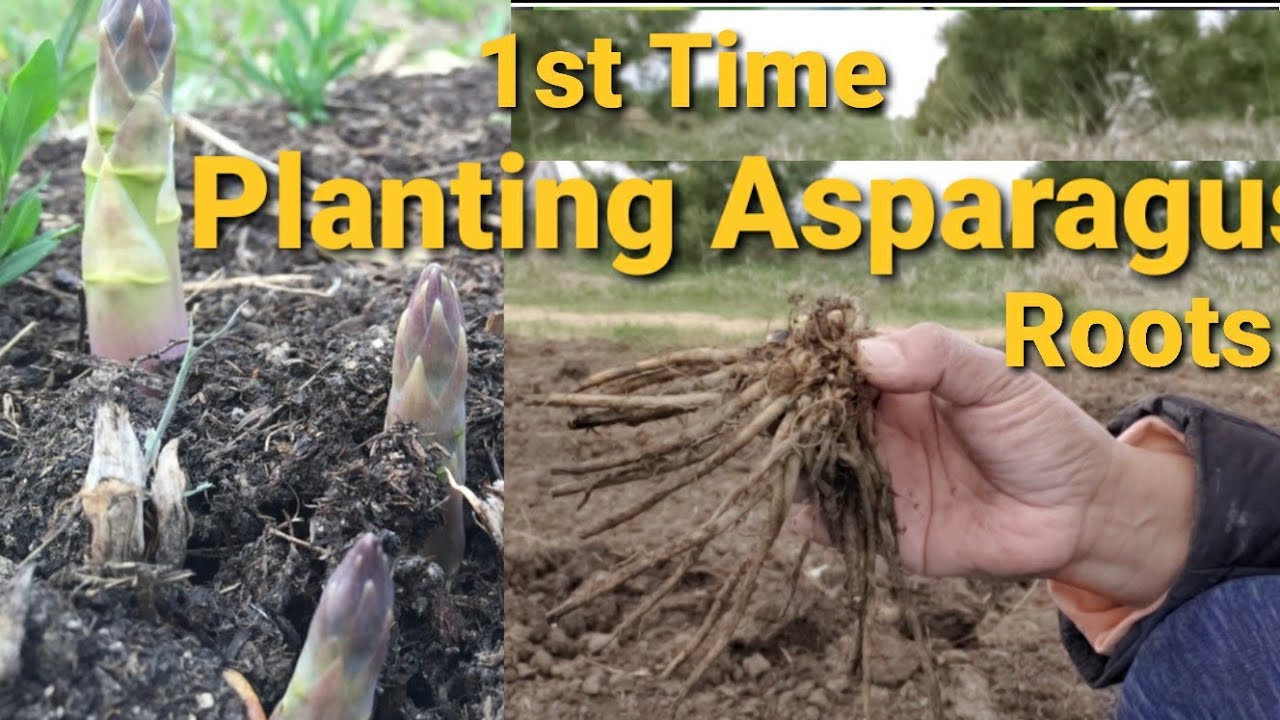
Asparagus is a delicious perennial vegetable that comes back year after year when properly planted and cared for. To give asparagus roots the best start when planting, many gardeners recommend soaking them first. But is this soaking step necessary?
Soaking asparagus roots prior to planting provides hydration and can promote faster establishment While not absolutely required, pre-soaking can benefit the roots and is a beneficial practice, especially in dry conditions
Why Soak Asparagus Roots?
Here are some key reasons why soaking asparagus roots before planting is advantageous:
-
Rehydrates roots – Bare-root asparagus crowns can dry out when exposed to air during shipping and handling Soaking rehydrates them before planting
-
Reduces transplant shock – Pre-soaking helps reduce the stress of transplanting from nursery to garden.
-
Encourages fast growth – Hydrated roots establish quicker and are ready to grow immediately.
-
Supports root development – A good soak promotes faster root formation and growth after planting.
-
Provides nutrients – The water can contain supplemental nutrients from compost or fertilizers.
-
Cleanses roots – Soaking washes away any dry soil or debris stuck on the roots.
How to Soak Asparagus Roots
Soaking asparagus root crowns is simple. Follow these steps:
-
Place bare-root crowns in a tub or bucket. Cover with cool, clean water.
-
Allow crowns to soak for a minimum of 2-4 hours, or optionally overnight.
-
For enhanced benefits, use compost tea or diluted liquid organic fertilizer instead of plain water.
-
Check crowns occasionally and add more water if needed to keep submerged.
-
Before planting, drain and briefly rinse crowns to wash away excess soil or debris.
Planting Pre-Soaked Asparagus Roots
Once soaked, asparagus roots are ready for planting. Follow these tips:
-
Prepare garden beds with well-draining, nutrient rich soil. Asparagus prefers a pH between 6.5-7.0.
-
Dig a trench 6-12 inches deep and 12-18 inches wide. Space trenches 4-5 feet apart.
-
Place soaked crowns over mounds of soil in the trench. Spread roots out horizontally from the crown.
-
Bury crowns 2-4 inches under the soil surface, with the tips facing upward.
-
Backfill trench with soil, cover roots, and water thoroughly after planting.
-
Consider varying depth of crowns to extend the harvest season.
Caring for Asparagus After Planting
Keep these aftercare tips in mind once soaked asparagus roots are planted:
-
Water newly planted crowns regularly to keep soil moist, not soggy. Established plants are drought tolerant.
-
Apply mulch around plants to retain moisture and reduce weeds.
-
Fertilize with compost or organic fertilizer early spring and again midsummer.
-
Allow ferns to grow tall after harvest ends. Cut back in winter before new spears emerge.
-
Avoid harvesting the first year. Only harvest for 2 weeks in year 2, and 4 weeks in year 3.
-
Harvest spears by snapping or cutting at ground level when at least pencil-width.
Soaking asparagus roots provides an extra advantage when planting this perennial favorite. Well hydrated, nourished roots establish quickly and yield an earlier harvest of tasty spring spears. Give your asparagus roots a soak before planting this year!
Growing Asparagus: Quick Care Guide

| Common Name(s) | Asparagus |
| Scientific Name | Asparagus officinalis |
| Days to Harvest | Can harvest in 2-3 years from planting |
| Light | Full sun preferred |
| Water: | 1” water for young plants, drought-tolerant as older plants. Moist soil preferred. |
| Soil | Rich, well-draining soil with high potassium and phosphorous levels |
| Fertilizer | Granular, high potassium/phosphorous |
| Pests | Cutworms, asparagus beetles, asparagus miners, aphids, thrips |
| Diseases | Asparagus rust, Stemphylium purple spot, fusarium root rot |
Asparagus is a monoecious plant, with each plant either male or female. Male plants provide better spear production than female plants. Because of this, many cultivars have been specifically bred to be all-male. Older, heirloom varieties are a mix of male and female plants.
Look at your asparagus plants through a magnifying glass once the flowers are gone if you want to pick plants that are only male. Female plants have pistils with 3 lobes, males are larger and longer than females. Pull out all of the female plants and transplant the males to your permanent bed next spring.
Some of the more unusual heirloom varieties of asparagus are good for people who don’t care as much about yield. The plants that come from these heirlooms are both male and female and very beautiful. If you want to collect seeds, you’ll need some female plants.
- Jersey Giant: High yield, disease resistant, great flavor. Predominantly male plants.
- Jersey Knight: Mostly male plants. Highly resistant to most asparagus diseases. Hardy in freeze areas.
- Jersey Supreme: Earlier producing variation on Jersey Knight. Male plants. Cold-tolerant and disease-resistant.
- Mary Washington: Rust-resistant, produces long, thick, and tender shoots. Heirloom variety.
- UC 157: Highly Fusarium-tolerant, rust-tolerant, heavy producer, commercial variety.
- UC 72 is a Mary Washington-type variety that can handle Fusarium.
- Pacific Purple: Bright purple spears, mild flavor. Beautiful variety.
- Purple Passion: These purple spears are sweeter and softer than some green varieties. They taste great raw.
- AsparaBest: Predominantly male plants, very cold tolerant, heavy producer.
- Precoce D’Argenteuil: Heirloom variety with rose-colored buds. Both male and female plants.

As a perennial, it’s essential that you plan in advance before planting asparagus. After all, you’ll be harvesting this crop for years to come! Asparagus is planted in early spring. As soon as the ground can be worked, that’s the time to plant.
Planting from seeds? Make sure you start your seeds early enough so they can grow into 3-inch plants before the last frost. That way, you can transplant them straight out the minute the ground is workable.
Starting from asparagus crowns is a more popular method, especially because they can be planted immediately. Again, the minute that the ground can be worked, get them in the soil.
It’s important to choose where you’re going to plant your asparagus with extreme care. Because you’ll be picking asparagus for more than 20 years, make sure the spot you pick is ideal. A lot of people choose to grow asparagus in raised beds because they let the plants drain well and make it easy to harvest.
Asparagus plants prefer full sun, although they can tolerate a little bit of shade. It is best to put your asparagus somewhere that will get plenty of sun, since it will come back every year.
Ensure your planned planting site is completely weed-free. Asparagus does not like competition from other weeds. Mulch the area very heavily to help prevent weed growth.
Dig a trench that’s roughly a foot deep and across. Add 2 to 4 inches of compost, manure, or high-quality soil mix to the top of your bed to make it more fertile. Because asparagus plants should be 18 inches apart, it’s helpful to work a shovel full of compost and rock phosphate into the soil every 18 inches to feed the roots.
Some people advise soaking your asparagus crowns in compost tea for about a half hour prior to planting. If you don’t have compost tea on hand, you can use water. It’s important to fully wet the root mass and make it a little more flexible and easy to spread.
At 18-inch intervals, make mounds that are 4 to 6 inches high. Carefully place your asparagus crowns on top of the mounds, making sure that the roots spread out across the top. Ensure the buds, which look like miniature asparagus spears, are pointed upward. Cover the roots and asparagus crowns with 2-3″ of soil and water them in.
As shoots appear, add more soil until you have finished filling in the trench. Mound up above the soil surface too, if you want. This ensures the roots are deep enough that they are well insulated from hot or cold conditions.
For asparagus plants grown from seeds, the steps are the same, but you don’t need to dig as deep of a trench. The root mass will be much smaller and will spread deeper into the soil on its own. People often make a nursery patch for first-year plants to grow in and then move them to their permanent bed later. Regardless, amend your soil to offer good nutrition for your young plants.

In some areas, asparagus grows wild. This is typically in areas that are in cooler climates and receive a lot of rain. What about those of us who don’t live near a natural bounty? Here are some tips to help your asparagus grow well.
Full sun is ideal for asparagus, at least six to eight hours or more per day. It can tolerate partial shade conditions although it may grow a bit more slowly.
Once soil temperatures reach above 50 degrees Fahrenheit, asparagus will put up new shoots. But the best temperature range for production is between 60 and 70 degrees Fahrenheit at night and 75 to 85 degrees Fahrenheit during the day. That’s the best range for asparagus growth—an established plant can often grow three to six inches of spears every day!
Temperatures over 85 or below 55 cause root development to slow and shoot production to fade. Hotter temperatures also cause misshapen shoots and premature fronding. Colder temperatures near or below freezing cause discoloration or plant die-back.
Most asparagus, when established, is surprisingly drought-resistant. However, for best production, water is essential. Asparagus likes moist but not wet conditions. If you stick your finger into the ground and don’t feel any water in the first couple of inches, it needs to be soaked.
Most of the time, an inch of water per week is plenty. In drought conditions, a deep soaking every 10-14 days is recommended. If you’re growing in raised beds, a drip irrigation system is a wise choice. This enables you to keep the soil moist without getting the tops of the plants wet. Avoid watering the fronds or the spears of the plant to reduce risk of fungus-based infections.
Regardless of whether you’re growing in the ground or in raised beds, I recommend heavy mulching. This reduces the likelihood of weed development, and keeps the soil moist.
Well-draining, nutrient-rich soil is absolutely essential for your asparagus. This plant is a reasonably heavy feeder, especially on phosphorous. Before you plant, you should work compost, cow or horse manure that has been composted into the soil and add rock phosphate to raise the amount of phosphorous in the soil. Asparagus likes soil with a pH of 6. 5 to 7. 0.
Fertilization should happen in the late summer or very early fall, and possibly again in the spring. Because this plant needs it, use a fertilizer with more phosphorous and potassium, like a 5-10-10 or an 8-24-24.
In the fall, use a slow-release granular fertilizer. Spread the fertilizer on top of the soil, being careful not to touch the plant or its roots directly. Then, move the mulch back into place. Add a scoop or two of compost to top it off if you’d like. Then replace the mulch material around the plant.
In the springtime, the process is similar. But be careful—you don’t want to put fertilizer right on top of any new spears that are growing from the ground. Generally speaking, springtime fertilization isn’t required, but for older plants it provides an extra boost to growth.
Pruning asparagus happens in stages: during harvest, and then in the fall in preparation for winter. Let’s focus on the fall pruning. As summer ends, you’ll see your asparagus plant turn yellow and then brown. This is normal. The plant is placing its energy into the roots so that it can overwinter.
Once the plant is completely brown, cut off the now-dead growth at the soil’s surface. Compost or dispose of the cuttings. This leaves the area open to new growth in the spring. Deeply mulch your patch to stop weeds from spreading, and check it often over the winter to make sure no weeds have grown. In the spring, it will come back to life!.

Asparagus is propagated from seeds or from root division. Here’s some helpful hints on both processes.
When you plant asparagus seeds, keep in mind that it will take a couple of years for the plant to start making spears that you can eat. The first year, it grows its roots. The second year, it spreads its roots out and works them deeper into the ground, but it won’t produce as many spears.
Sow your seeds early enough that when the last frost comes, you’ll have young plants ready to plant out. Soil temperatures above 50 are ideal for early-stage growth. People who start plants from seeds will often put their first-year plants in a “nursery bed” so their roots can spread out for the first year. In the fall, they will be moved to a new location.
To start your seeds, soak them in water for 24 hours to allow them to hydrate. Then plant them as directed on your seed packet. You can choose to start your asparagus in a seed flat or a pot, but make sure there is enough room for the roots to grow.
You should divide your root mass if you have older plants that are getting too crowded. In general, you’ll know it’s time to divide your plants when they stop producing as much after a few years of harvesting.
Carefully dig up the whole root mass in the fall, after the plant has died back, to divide your roots. You can then cut the root ball into several segments, leaving large masses of root in each segment. You can either plant those root pieces again right away or put them in a mesh or paper bag with sawdust and keep them over the winter. Then plant the root segments in the spring as new asparagus crowns.
Transplanting your asparagus plants requires caution. There are roots that go deep into the ground, even though the crown of the root may be close to the ground. Slowly push the soil away from the plant so you can take it out of the ground whole.
Follow the above instructions on how to plant asparagus crowns in a new bed. The roots should be spread out over a mound of soil and buried a couple of inches deep in new soil. Treat it as though it were a new plant.
If you’ve ever seen all-white spears of asparagus, those have been naturally bleached by soil coverage. Mound soil up overtop of your plants to ensure that spears develop in the absence of light. At the very least, check on your plants twice a day to make sure you catch them in time. Continue mounding soil up to cover your spear until it’s reached a good harvesting height. You can then harvest an all-white asparagus spear!.
Putting hoops over your asparagus rows and covering them with black plastic to keep the light out is another way to bleach the color. Lift the plastic every couple days to harvest your white asparagus from underneath. White asparagus is almost the same as green or purple asparagus, but some people think it tastes less strong because it hasn’t been in the sun as long.
As mentioned above, asparagus hates to fight weeds or grass for space. You shouldn’t put anything else on top of your asparagus plants because it will take away their nutrients. However, there are some plants that do benefit from proximity to asparagus!.
There’s a symbiotic relationship between tomatoes and asparagus. Tomato plants give off solanine, which repels asparagus beetles. In return, asparagus provides a natural chemical that will deter nematodes. These two grow well near each other. Leave enough space for both plant’s roots to spread without meeting.
Basil and parsley are also excellent companions to asparagus, as both also repel asparagus beetles. They also help tomatoes grow, so a bed with all of these plants can be very productive!
Early, short-term spring crops of spinach, lettuce, or even beets can be planted between asparagus rows. Start a new crop of lettuce or spinach in late summer, when the asparagus fronds will be too hot to stand in the sun. Avoid planting alliums such as garlic or onions near your asparagus, as well as tuberous crops like potatoes. Asparagus doesn’t thrive next to these.
Harvesting & Storing Asparagus

When you see asparagus spears coming up, you may be tempted to grab them right away. However, sometimes you should wait for when the time is right. Find out when and how to pick your tasty spears, when to let them grow naturally, and how to store some to use later in the year.
If you grew asparagus from seeds, you shouldn’t pick any in the first year because the plants are still growing roots. Similarly, the second year is for plant development, and you should avoid harvesting spears that year, too. In the third year, you can pick some for two to four weeks. When the new spears are thinner than a pencil, you should stop. For subsequent years, harvest for up to eight weeks.
For asparagus from crowns that have been moved, you should probably wait a year and not harvest until the second year. That second year, harvest for two to four weeks at most. This helps the plant get off to the best start possible, so later on you’ll have more crops to harvest.
To harvest asparagus spears, use a knife (something like this mushroom knife is ideal) and cut the spear off. Some growers prefer to do this just under the surface of the soil. If you do that, avoid cutting other spears that may be forming under the soil’s surface. I prefer to cut just above the soil. You can also simply grasp the spear and bend it to snap it off just above the soil surface.
Ideally, your spears should be 6-9 inches in length at the time of harvest. You can pick them when they’re shorter, but you won’t get as much asparagus. Pick them before the tips start to spread out.
If the spear tip has begun to open up, it means the asparagus has turned woody and will not taste good. You should still harvest those spears during your harvest period, but compost them.
Since asparagus is a rapidly-growing plant, harvest spears every day or two throughout the season. Every time you harvest, pick all the spears that are a good size, and you’ll have a steady crop for up to eight weeks!
If you have a lot of asparagus plants, you might need to store some of it for later use. Fresh asparagus right from the garden is delicious. Let’s go over how to do this in the fridge, the freezer, and on your pantry shelves.
If you need short-term storage, take your fresh asparagus and rubberband it together in a bunch. Place the cut or snapped-off ends into a mason jar with about an inch of water. Put a plastic bag over the top, using another rubberband to secure the bag to the mason jar. Change the water if it begins to go cloudy. Stored this way, your asparagus will last for about a week.
For longer-term storage, lightly blanch your asparagus and freeze it. Bring a large pot of water to a boil, and prepare an ice bath. Cut your asparagus into roughly one-inch segments. Once the water is at a rolling boil, put your asparagus into the pot for one minute.
Sometimes it takes up to a minute and a half, and sometimes it only takes a minute. Cut the asparagus into pieces and put them in the ice bath when the time is up. It should be left in the cold water for at least as long as you boiled it. Then use a colander to drain it and let it dry on its own.
Spread the asparagus out on a sheet pan and cover it with plastic wrap once it’s dry. Place it in the freezer for an hour or so. This initial flash freezing stops the asparagus from sticking together later. Then transfer it into a container or freezer bag for long-term storage. Frozen asparagus will keep for about a year.
Asparagus can be canned for later use, too. But because it has low acid, you will need to use a pressure canner to keep it from going bad or getting dangerous bacteria like botulism.
The benefit to canning asparagus is that you can prepare whole spears. Put a quart-sized jar on its side and make sure it is clean and germ-free. Then, slide spears into the jar so that the wide end is at the bottom. Pack the jar tightly with asparagus spears, then set it upright. You can add a teaspoon of salt to each quart jar if you want to, but it will taste better without it.
Bring water to a boil and then fill the jars. You will need to cover the spears with water all the way to the top, but leave an inch of space at the top of the jar. Pressure-can the jars for 40 minutes at 10 pounds of pressure (or 11 pounds for a dial-gauge canner). Put the lids and rings on top of the jars. Adjust the pressure by the canner’s manufacturer’s recommendations if you live at high altitude.
There are also recipes out there for pickled asparagus. You can use a hot water bath canner instead of a pressure canner to process pickled asparagus because you are making it much more acidic. However, be sure that your recipe is for a canning pickle and not a refrigerator pickle!.
Also, you can dry out your asparagus! Blanch it in boiling water as directed above, then cool it off with ice water to stop the cooking. Once drained, lay your asparagus on dehydrator trays. Set the thicker pieces next to each other on one tray, the medium-thickness pieces next to each other on another, and the thinnest pieces on the third.
Following your dehydrator’s manual, dehydrate the asparagus until it is fully dried and can be snapped easily. Store in an airtight container with a desiccant packet to remove residual moisture. Soak it in water for 15 to 20 minutes before cooking to rehydrate it. You can then add whole dried chunks to soups or stews or grind it up to use as a seasoning in other foods. Dried asparagus can also be a nice crunchy snack!.
Incidentally, freeze-drying also works well for asparagus. Thinner spears seem to work better than thicker ones for this preservation method. Be sure to blanch it first!.

Once you know how to take care of asparagus, it’s not hard to grow, but there are a few things that can go wrong. Let’s go over those now.
There may have been damage from frost if you see that your new shoots are turning brown or becoming soft and withered. Trim those spears off and compost them. To prevent frost damage, mulch your plants with straw or newspaper heavily when frost is predicted.
Nursery-grown asparagus crowns can suffer from transplant shock. To prevent this, try not to purchase your crowns until you’re ready to plant them. Before planting, soak them for a short time in water or compost tea for about 30 minutes. Be very careful not to damage the root mass. Try not to break any roots while spreading them out over the mounded soil.
If you live somewhere where the wind will blow sand around, try putting a wind block over your asparagus spears. The tender shoots can get abraded by windblown sand and will start to bend. Abraded plants may also be at risk of disease transmission.
Similarly, rockier soils can cause your shoots to bend, although it doesn’t impact their edible quality. Making sure your plants have higher-quality, well-draining soil is essential for straight spear development.
Purple asparagus can have lower yields than green asparagus varieties. The only real solution is to either grow more purple asparagus plants or more green ones, especially some of the higher-yielding types.
Everything You Need to Know About Planting Bare Root Asparagus
FAQ
How to prepare asparagus roots for planting?
Do asparagus roots need to be soaked before planting?
Can I soak asparagus crowns overnight?
How do you prepare an asparagus bed for planting?
How do you plant asparagus?
We’ll cover one method for how to plant asparagus here, but if you have another method that works for you, by all means use it – and share with us in the comments! Dig the planting area at least 6- to 12-inches deep and about 12-inches wide. Space individual asparagus plants 12- to 18-inches apart for room to grow.
How do you care for bare root asparagus?
Separate the asparagus crowns from the bundle and soak the bare-root asparagus roots in water* for 15-30 minutes prior to planting so that they are well hydrated going into the ground. *for a jump-start, consider soaking your asparagus in nutrient-rich organic compost- or manure-tea!
How do you care for asparagus?
Select and prepare your asparagus bed with care — this crop will occupy the same spot for 20 years or more. It can tolerate some shade, but full sun produces more vigorous plants and helps minimize disease. Asparagus does best in lighter soils that warm up quickly in spring and drain well; standing water will quickly rot the roots.
How do you plant a crown of asparagus?
Incorporate the soil test recommended amendments to the top six inches of soil. It is best to test and prepare the soil a year prior to planting the asparagus. Crowns should be planted two to four weeks before the last average frost date in your area. After the bed is prepared, dig a trench that is six inches deep and twelve inches wide.
- How to Dig a Garden Bed: A Step-by-Step Guide for Beginners - April 14, 2026
- The Moderate Growth Rate of the Stunning Edith Bogue Magnolia - April 10, 2026
- Cultivating Vibrant Dahlias in Garden Beds – A Complete Growing Guide - April 10, 2026