The right picture shows the colonization stage of mycelium. Depending on the temperature of the environment, this process can take anywhere from 20 to 30 days. Next, we want to identify what is healthy mycelium and what are potential contaminants. Mycelium is easily distinguished by white and stringy (Hyphae), as shown below. Once the substrate is fully colonized, it will need the right environmental cues to start the mushroom-forming process. Appendix 1 for detailed Growing Scheme.
After your mushroom grow bag has fully colonized, by turning dense and white. We want to look for and identify primordial and Pin formations. These will look like the picture below. The mushrooms began to grow as soon as the mushroom block was exposed to fresh air (oxygen). You can see on the left of the picture small white pin looking structures, these are primordial/pins.
Many strains of mushroom can tolerate a wide range of temperatures. It’s possible to successfully fruit them when it’s snowing outside and also in temperatures above 30 degrees Celsius. During very hot summers when temperatures outside reach over 40° C, I’ve been able to grow fruiting mushrooms in pots inside. Mushrooms do well in cold weather, but they grow a little more slowly and often make fewer but bigger mushrooms. In really hot temperatures the mushrooms grow quickly, but you need to be diligent about contaminants.
The main requirement for fruiting mushroom is they need a high humidity environment. This can be achieved using several low-tech methods described below. Unlike other popular gourmet mushrooms (e. g. Unlike oysters, mushrooms can handle high CO2 levels, so you don’t need a lot of air flow along with high humidity. Refer to end of document for Detailed Grow Scheme.
Mushroom cultivation is an exciting hobby that allows you to grow gourmet mushrooms at home. One of the most fascinating parts of the process is watching mushroom spores colonize and transform into mature mushrooms. However, this colonization phase is also one of the most misunderstood aspects for beginners.
In this comprehensive guide, we’ll demystify how long it takes for mushroom spores to colonize, the science behind it, optimal conditions, and tips for a successful colonization.
What Does Colonization Mean?
Colonization refers to the period after you’ve injected your chosen substrate with mushroom spore solution. This kicks off the reproductive cycle of the spores to grow and spread throughout the substrate, forming a dense web of mycelium.
Mycelium is the vegetative structure of mushrooms and other fungi, consisting of fine white filaments called hyphae. The mushroom fruit that we harvest is actually just the “fruiting body” of this underground mycelial network.
Therefore colonization is when the spores germinate and the mycelium expands to consume the substrate. This process must occur before fruiting (pinning and mushroom growth) can take place.
Timeline: How Long Does Colonization Take?
The colonization timeline can vary substantially depending on several factors:
-
Mushroom species – Some species naturally colonize faster than others. For example, oyster mushrooms colonize quicker compared to lion’s mane.
-
Spore type – Spores need to mate before rapid mycelial growth begins. Liquid cultures containing established mycelium skip this step and colonize significantly faster
-
Substrate – Nutrient content, moisture level and pasteurization impact colonization speed
-
Environment – Temperature, humidity, air exchange and contamination risk affect growth.
However, here is a general timeline for what to expect:
-
Spores: 1-4 weeks to see initial mycelial growth. 4-8 weeks for full colonization.
-
Liquid culture: 1-2 weeks for initial growth. 3-5 weeks for full colonization.
With ideal conditions you may see signs of mycelium as early as 5-7 days after inoculation. Full colonization can take anywhere from 3-10 weeks depending on all the factors noted above. Be patient, slow colonization doesn’t necessarily mean something is wrong.
The Science Behind Colonization
To understand colonization speed, it helps to first take a closer look at what’s happening at the microscopic level:
-
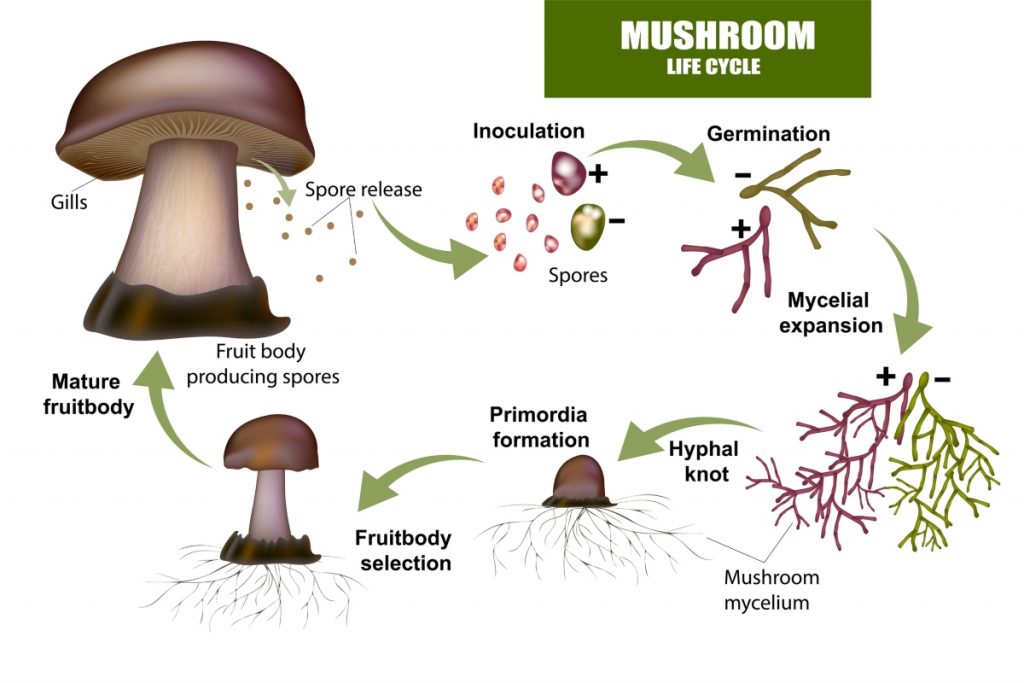
Germination – Once injected into a moist, nutritious substrate the spores rehydrate and germinate, turning from dormant cells into active growing hyphae.
-
Mating – Hyphae from different spores mate via plasmogamy. The cytoplasm from different spores merges together, combining genetic material.
-
Dikaryotic growth – The new dikaryotic hyphae containing two nuclei in each cell elongate rapidly, branching exponentially to form the thick mycelial network.
Liquid cultures skip the germination and mating steps since they already contain established dikaryotic mycelium, ready to proliferate. This explains why they colonize faster than spores.
Ideal Conditions for Rapid Colonization
To speed up the colonization process, you need to create the ideal environment for mycelial growth. Here are the key factors to control:
1. Stable temperature
-
70-80°F (21-27°C) is optimal for most psilocybin species.
-
Oyster and other gourmet varieties do best at slightly cooler 60-75°F (15-24°C).
-
Fluctuating temperatures slow growth as the mycelium adapts.
2. High humidity
-
Mycelium thrives in very humid conditions – above 90% RH.
-
Substrate should feel moist but not saturated.
3. Fresh air exchange
-
Gentle airflow speeds up colonization by providing oxygen.
-
Stagnant air causes increased risk of contamination.
4. Complete darkness
- Light triggers fruiting signals – keep in total darkness during colonization.
5. Nutritional substrate
-
Grains and wood-based substrates are superior for quick colonization.
-
Boost nutrition further by adding gypsum, bran or coffee grounds.
Follow the preparation steps outlined below to create ideal colonization conditions.
Step-by-Step Guide to Colonizing Mushroom Spores
Here is an overview of the full colonization process from start to finish:
1. Prepare substrate
Grains like rye, millet and rice or wood-based substrates like sawdust perform well. For gourmet varieties, supplemented hardwood sawdust is a top choice.
Follow specific pasteurization instructions to kill potential contaminants without impacting nutrients. Keep moisture level around 60-65%.
2. Inject spores
In a SAB, inject spores/LC according to directions, usually 2-10mL per 1L/2.2lbs substrate. Spread liquid evenly throughout the bag or jar.
3. Incubate
Place inoculated containers in a dark area with stable air temperature around 75°F. Ensure high humidity.
4. Wait and check for growth
Be patient! Initial germination and growth is microscopic. Wait at least 1-2 weeks before checking bags. Look for white fungal fuzz.
If using spores expect to wait 3-6 weeks to see significant mycelial colonization. With LC growth will be faster.
5. Support full colonization
At 30-50% colonization break up any uncolonized areas to distribute mycelium. Maintain ideal conditions until bags are fully colonized.
6. Prepare to fruit
Once the entire substrate is covered densely in mycelium, colonization is complete! Move to a fruiting chamber to initiate pinning.
Common Colonization Problems and Solutions
If you notice stalled growth or contaminations during colonization, here are some troubleshooting tips:
-
No growth after 4 weeks – Temperature too low or spores went bad. Try inoculating again with fresh spores/LC.
-
Wet bubble or bacterial blotches – Bacteria is present. Improve pasteurization and sanitize work area. Discard bags.
-
Green or black mold – Trichoderma contamination. Increase FAE. Thoroughly clean grow area. Toss bags.
-
Fruiting early – Light is prematurely triggering pins. Completely block all light sources.
-
Dense middle, loose edges – Inject spores closer to edges and mix up uncolonized areas at 30% growth.
With practice you’ll perfect your technique and start seeing that beautiful white fuzz quickly cover your substrate from edge to edge!
Fruiting After Full Colonization
Once the entire substrate is fully colonized with dense white mycelium, the colonization phase is complete! You can now:
-
Move to a fruiting chamber to provide proper humidity, FAE, light and temperature triggers.
-
Within 1-2 weeks you should see mushroom pins forming, signalling the start of fruiting!
-
Be sure to harvest mushrooms before spores drop to get maximum yields.
Proper, full colonization leads to robust mushroom formation and larger harvests. Avoid fruiting uncolonized blocks – wait until the mycelium is bright white and thick throughout the container.
Understanding the colonization process is key to a successful mushroom grow. While it takes some patience, follow the guidelines outlined here to achieve full colonization on the faster end of the timeline spectrum.
With ideal preparation, temp, humidity and nutrients you can have spores colonizing within just 1-3 weeks!
The colonization journey lays the groundwork for abundant mushroom harvests later on. Master this phase, and you’ll be rewarded with a canopy of mushrooms to enjoy or share with friends.
So get your workspace sanitized, spores prepped and incubation area ready. Your mycelium awaits! Experience the magic of mushroom spore colonization and watch your substrates transform before your eyes.
Fruiting in a Bag
What you’ll need:
· Small bucket or aluminum container

A plastic bag is a simple technique of fruiting mushrooms.
The plastic bag will serve as your fruiting chamber. Cut open the top of the bag and either roll the bag on itself leaving ~1-2 inches. Place water in the foil container and cover with the mushroom block with the plastic bag. Throughout the day mist the inside of the plastic bag so visible droplets of water are present. In 2-3 days you should see first pins (baby mushrooms) of small mushrooms forming. Make small holes in the top of the plastic bag to provide additional free air exchange.
Pros: Simple, unlikely to have contamination issues
Cons: It’s harder to keep the humidity high, and if there isn’t enough light, the mushrooms may look paler and have less vitamin D.
Fruiting in a Bucket
What you’ll need:
· Brick or anything to elevate the Mushroom Block
Cutting the mushroom block open gently is best done over a sink or outside, where water can leak out. You can either gently rinse the mushroom block exterior or dunk the block in water for 2-5 seconds.

Put a brick in the bucket and add enough water so that the top of the brick is just above the water. On top of the water, put your mushroom block on the brick. Then, cover the bucket with a tea towel. The tea towel helps to keep the humidity up. You can check on it every so often; the first pins (baby mushrooms) usually appear in two to three days.
Place your bucket inside the house or outside in the shade. If the tea towel gets rained on, it will fall in the bucket and ruin the humidity. If there’s too much sun, it will heat the block up and dry it out.
A bucket is a low-tech way of fruiting mushroom
Pros: Simple, unlikely to have contamination issues
Cons: It’s harder to keep the humidity high, and if there isn’t enough light, the mushrooms may look paler and have less vitamin D.

How Long Does it Take to Grow Mushrooms? Most Accurate Timeline
FAQ
How long does mycelium take to grow from spores?
How long does it take for spores to colonize agar?
How to tell when mycelium is fully colonized?
How long does spore take to germinate?
How long does mushroom spore colonization take?
Fortunately, understanding the average time of mushroom spore colonization can help make the process much easier. This article will provide an overview of the average time of mushroom spore colonization. The average time for mushroom spores to colonize grain spawn can take anywhere from 7 to 21 days for the spores to fully colonize the grain spawn.
How long does it take mushroom spores to colonize grain spawn?
The average time for mushroom spores to colonize grain spawn can take anywhere from 7 to 21 days for the spores to fully colonize the grain spawn. It can vary depending on several factors, such as the type of mushroom, the temperature and humidity conditions, and the quality of the spores.
How long does it take a mushroom to colonize a bag?
In the column “Spawn run,” you will find the short answer to your question. As you can see, some of the species only need 12 days to fully colonize a bag while others take up to 45 days. But this is only valid for one species for one specific substrate. Table 1: Overview of different growing conditions for various mushroom species
How do you inoculate mushroom spores?
Inoculate the substrate: Inoculation involves introducing mushroom spores or mycelium to the substrate. You can purchase spore syringes, liquid culture, or pre-colonized grain spawn from reputable suppliers. To inoculate, inject the spores or liquid culture into the substrate or mix the grain spawn thoroughly.
- How to Grow Gorgeous Climbing Roses on a Wooden Fence - March 24, 2026
- Avoid These Plants When Companion Planting with Oregano - March 24, 2026
- 15 Great Trees to Plant Near Your House - March 24, 2026