The Venus flytrap is one of the most iconic and fascinating plants in the world. Known for its unique carnivorous qualities and distinctive jaw-like traps, the flytrap is a very intriguing subject to draw. While it may seem daunting at first, breaking down the drawing process into simple steps makes sketching this unusual plant much easier. In this guide, we will explore step-by-step how to draw a realistic, accurate Venus flytrap.
Gather Reference Photos
The first step before drawing any subject is gathering quality reference images. Look for photos of Venus flytraps from multiple angles and perspectives. Pay attention to key features like the shape of the open and closed traps the veins on the leaves, the curved spines along the edges and the formation of the plant. Reference images give you crucial information needed to capture the look and proportions of the flytrap accurately.
Start with the Basic Shape
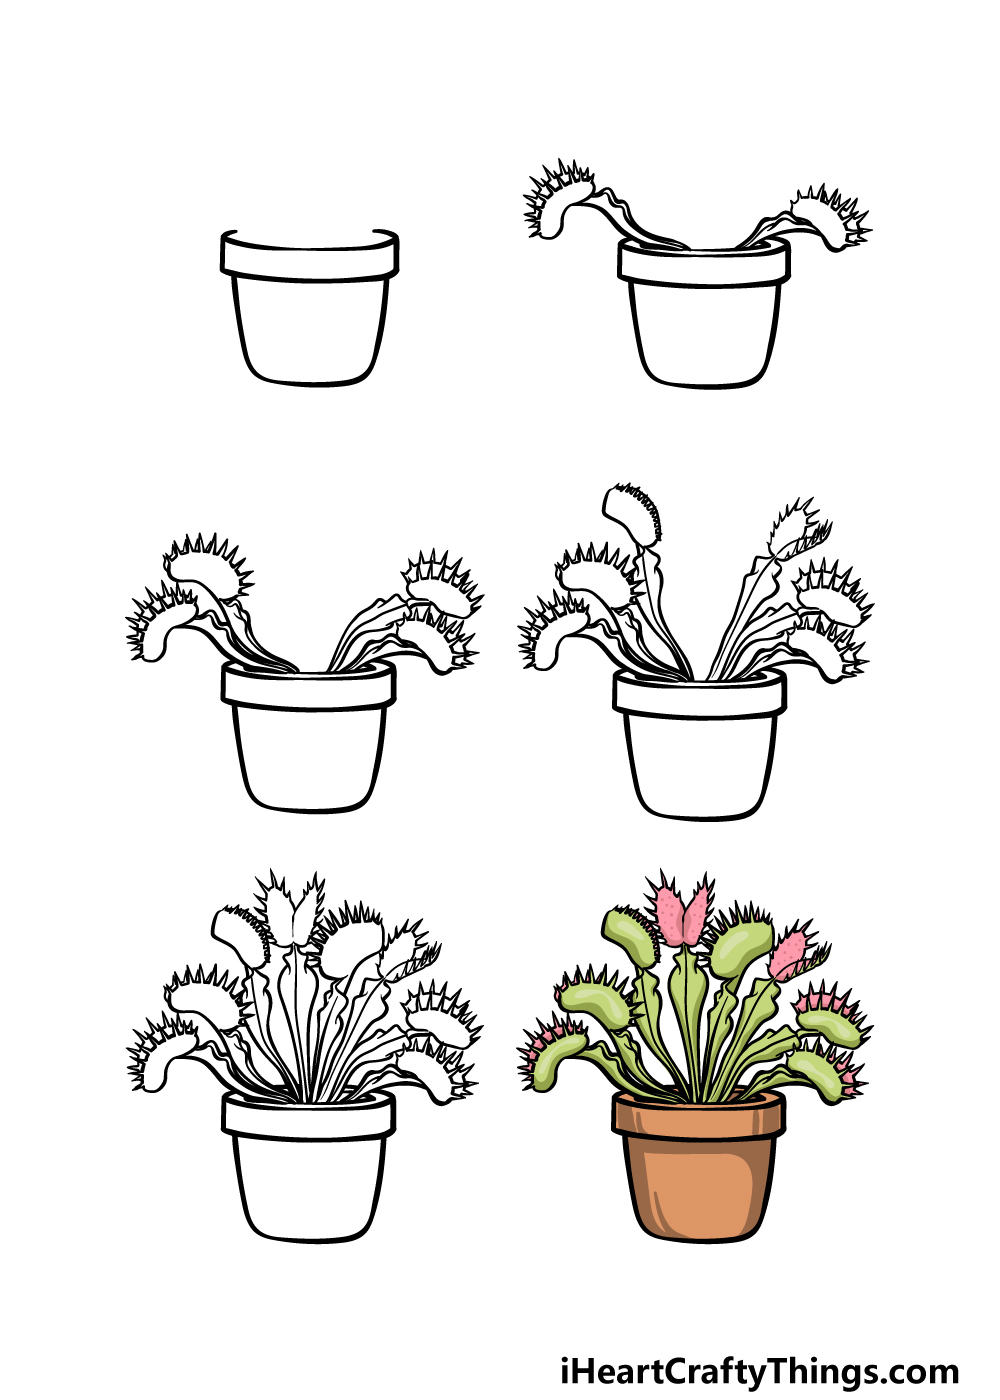
With reference photos handy, lightly sketch the basic shape of the flytrap using simple lines and shapes. Many Venus flytrap plants have between 4-7 traps emerging from a central rosette. Start by drawing the pot or soil at the base, then sketch circles or ovals for each trap. Connect the traps together into one plant with slightly curved or zig-zagging lines. At this stage, focus on capturing the overall formation rather than details.
Outline the Traps and Leaves
Once you have the basic shape down, clearly outline each leaf and trap. Draw the signature curved “teeth” or spines along the edges of the leaves. Then refine the shape of open and closed traps, noting the differences between them. Closed traps are more oval-shaped while open ones appear more circular. Don’t forget to delineate the thick veins that run down the length of each leaf. Cleaning up your initial sketch gives you the foundation to add the finishing details.
Add Shading and Texture
At this point, the basic form of the Venus flytrap is established and you can start shading Use darker lines and hatching to show the pitted texture of the traps and leaves. Shade the lower parts of the plant darker than the tips to convey a sense of depth and dimension Lighter shading on the open traps mimics the translucent appearance of the leaves, while closed traps will be darker inside. The underside of the plant and the soil at the base should be shaded darker as well.
Draw the Interior of the Traps
A key part of capturing a Venus flytrap is rendering the interior of the open traps accurately. Inside each open leaf is a reddish coloration near the “hinge” and small sensitive trigger hairs. Sketch these details lightly inside the open traps. The triggers can be drawn as small clusters of lines or dots. Avoid overworking the interior shading to retain a sense of realism.
Depict Prey or Insects Inside
An easy way to make your Venus flytrap drawing more engaging is to show it in action by including prey inside one or more of the open traps. This could be a small bug, spider, ant or other insect. Draw the prey suspended and captured inside the closed mouth of the trap. Focus it near the reddish trigger hairs to look as if it just triggered the trap to close. This brings further realism and interest to your artwork.
Add Color or Pattern (Optional)
A colored pencil, markers, watercolor or digital coloring can take your Venus flytrap illustration to the next level. However, plain graphite pencil is also striking for a more classic monochromatic look. If adding color, pay attention to the greenish-red inside the traps, the vibrant green leaves, the brownish-red spines and any patterning on the exterior. Subtle color gradients and shading also enhance the realism. Either way, don’t overdo the coloring to retain the sketch-like quality.
Refine Details and Lift Background
As a finishing touch, refine and sharpen small details for clarity, like the spiny teeth along the edge of the leaves. Also consider gently lifting out the darker shading in the background using kneaded eraser. This helps the detailed plant itself stand out more prominently. Take care not to over-erase your shading and lighting within the plant. Sign your name and date the artwork once satisfied!
Drawing the unique form of the Venus flytrap does take observational practice. But following these steps will teach you how to capture the look and qualities of this eccentric plant properly. Here are some additional tips to improve your flytrap drawings:
-
Use photos of the actual size plant you want to draw. Enlarging a small photo often distorts proportions.
-
Start light and keep your initial lines sketchy until you have the right shape, then reinforce them.
-
Pay attention to the direction of light source and shadows on the plant. Mimic this lighting logic.
-
Convey the 3-dimensional form of the traps by varying your line weight and shading.
-
Use an eraser to lift out graphite and soften lines rather than erasing completely.
-
Double check proportions – the “mouth” should take up about 1/3 of each leaf.
-
Study both the exterior and interior views of the traps to grasp their full structure.
With some thoughtful observation and practice, you can master drawing the one-of-a-kind Venus flytrap. Not only is it a fun subject to render, but the sequential process strengthens your technical illustration skills that can be applied to any botanical subject. Start with the steps here, then develop your own style for bringing these captivating carnivorous plants to life on paper.
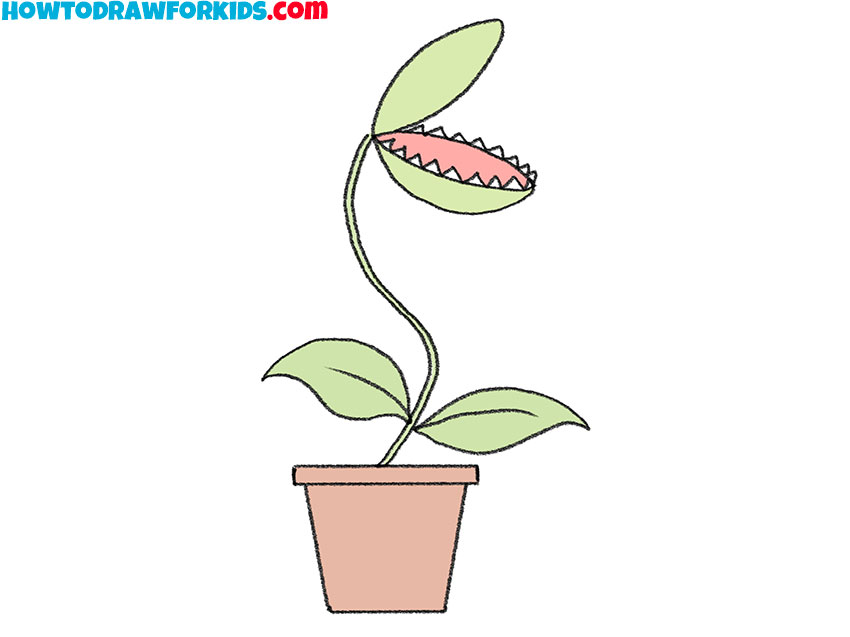
Venus Fly Trap drawing in just 6 Easy Steps!
With most plants found in nature, you will find that what you see is what you get. Some plants have hidden tricks or features, but the venus fly trap is one of the few that does!
This plant looks pretty scary, but it is actually a carnivorous plant that will swoop down on bugs and other small insects to eat them.
Because of this, venus fly traps are popular to own, and it can be fun to learn how to draw one.
If you adore this amazing plant, this guide will help you make a piece of art that looks just like it!
Our step-by-step guide on how to draw a venus fly trap will show you how you can draw it while also having a lot of fun doing so.
Step 6 – Finish off your Venus fly trap drawing with color
You’re almost done drawing the Venus flytrap. Now it’s time to add some great colors! We showed you how we would color this in the example given.
Browns were used for the pot, and darker colors can be used on the sides to add some shading.
After that, we used different shades of green for the plant stalks and heads. Finally, we used a pink with dark pink dots for the insides of the mouths.
These are the colors that we chose, but you shouldn’t feel limited by these choices.
Now you can show us what colors you think would look great with this. We can’t wait to see what you pick!
How to draw Venus Flytrap
FAQ
How hard is it to keep a Venus flytrap alive?
How to plant a Venus flytrap?
How do you trigger a Venus flytrap?
How do you draw a Venus Fly Trap plant?
Observing the plant’s details and textures will help us create a realistic and accurate drawing. Start by finding a Venus fly trap plant in person or through high-quality images online. Study the leaves’ unique shape and pattern, like lobster claws. Observe how the leaves grow, how they are connected to the stem, and how their ends form a trap.
How do you add texture and veins to a Venus flytrap?
When adding texture and veins to the Venus Flytrap, follow these steps: Start by lightly sketching the texture lines on the inner surface of each trap using a sharp pencil. To create a realistic look, vary the thickness and spacing of the texture lines. Pay attention to the natural patterns found on real Venus Flytraps.
Is a Venus flytrap a carnivorous plant?
The Venus flytrap is one of nearly 700 species of carnivorous plants. Others include the pitcher plant, cobra lily, butterwort, sundew, and bladderwort. The Venus flytrap is unique, however, in that it actually moves to catch its prey.
How do you paint a Venus Fly Trap?
Use your pen or pencil to make small dots in a gradient manner to suggest shadow and depth. Start with lighter dots and move towards darker ones. Stippling works well for creating the rough texture of the Venus Fly Trap’s leaves and stem. Creating texture using smudging involves rubbing the pencil marks to create a smooth transition of tones.