You just bought your first exotic hibiscus plants. The first thing you need to decide is whether to keep them in pots or plant them directly in the ground. For people who live in places that freeze in the winter, the answer is simple: keep your hibiscus in pots that can be moved to a warm place when it freezes. You can plant your hibiscus in the ground if you live in a warm area that only hits 32°F (0°C) one or two nights a year at most. We have found that hibiscus do very well when planted in the ground in warm climates. There are good reasons to keep them in pots, like being able to move them around.
Growing vibrant, tropical hibiscus plants in pots is easier than you think! With just a few simple steps, you can have a showstopping hibiscus plant flourishing on your patio, deck, or windowsill.
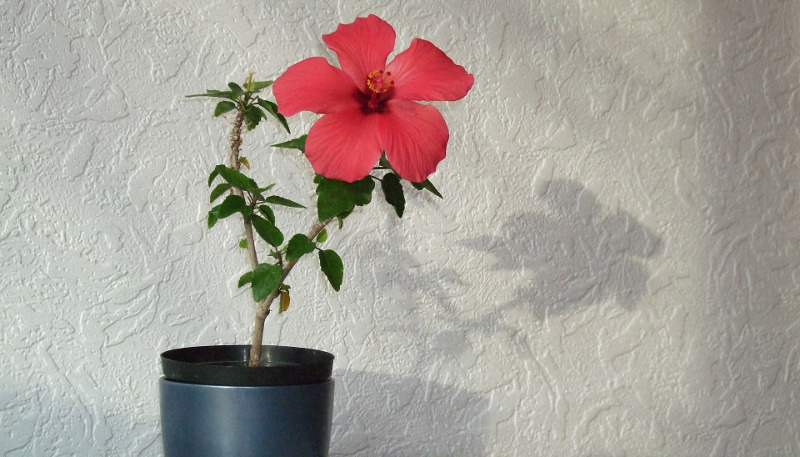
As an avid indoor gardener, I’ve successfully grown many hibiscus plants in containers over the years. Hibiscus are one of my absolute favorite plants to decorate my home with because their huge, colorful blooms bring a touch of the tropics indoors.
In this article, I’ll share everything I’ve learned about growing hibiscus plants in pots. I’ll cover how to select the ideal pot and soil, proper planting techniques, care and maintenance tips, and more. Follow these tips and you’ll have a happy, healthy hibiscus plant that rewards you with abundant exotic blooms.
Selecting the Right Pot for Hibiscus
The first step is choosing an appropriate container. When it comes to pots bigger is better for hibiscus plants. Select a pot that is at least 12-14 inches wide and has drainage holes in the bottom.
Terra cotta ceramic, plastic and wood pots all work well. Make sure to use a pot with a saucer to catch excess water and prevent messes.
Hibiscus have large root systems and prefer being slightly root-bound so don’t worry about upsizing the pot. A 14 inch wide 12 inch deep container will accommodate most hibiscus varieties for several years.
Use a Fast-Draining Potting Mix
Since hibiscus dislike soggy roots, a very porous, fast-draining potting mix is essential.
I recommend using a quality commercial potting soil blended specifically for containers. Or you can make your own by mixing:
- 1 part peat moss or coco coir
- 1 part perlite or bark chips
- 1 part compost or worm castings
This loose, airy mix will provide good drainage and aeration for healthy roots.
You can also add in a handful of slow-release fertilizer pellets to provide nutrients for the first few months.
How to Plant Hibiscus in a Pot
Once you have the perfect pot and soil ready, it’s time for planting! Follow these simple steps:
- Place 1 to 2 inches of potting soil in the bottom of the container.
- Remove hibiscus plant from its nursery pot and gently tease out roots if pot-bound.
- Set the plant in the container with the top of the root ball 1 to 2 inches below the rim of the pot.
- Fill remainder of pot with soil, firming it around the root ball.
- Water thoroughly until it drains from the bottom holes.
Position the plant so the most visible side faces outward. Keep some space between the root ball and pot edges for future root growth.
Caring for Potted Hibiscus Plants
With the right care, your potted hibiscus will thrive indoors or on the patio. Follow these tips:
Watering: Check soil daily and water when the top few inches become dry. Water thoroughly until it drains out the bottom. Hibiscus like moist but not soggy soil.
Light: Hibiscus need full sun – at least 6 hours of direct sun daily. West or south-facing windows are ideal indoors. Acclimate the plant gradually if moving it into brighter light.
Temperature: 65-80°F is ideal. Move potted hibiscus plants indoors if temps drop below 60°F.
Fertilizer: Use a balanced liquid fertilizer every 2-3 weeks during the growing season. This will fuel lush growth and prolific blooms.
Pruning: Prune back leggy stems and spent flowers to encourage bushier new growth.
Overwintering: Move hibiscus plants indoors before temps drop below 60°F. Place in a sunny window and reduce watering frequency.
Enjoying Gorgeous Blooms!
With proper care, you’ll be rewarded with incredible blooms in shades of red, orange, yellow, pink, purple, and white. Hibiscus flowers can grow up to 6-8 inches wide!
Deadhead spent blooms to encourage more flowers. Your hibiscus will bloom spring through fall if given sufficient light.
Growing hibiscus in pots is simple and fulfilling. Follow these tips and you’ll have a low-maintenance, high-impact plant that adds beauty and a tropical vibe to your indoor or outdoor space.
Growing Hibiscus in Pots
Many of us live in places where we can never plant our hibiscus, so the question for us is, “Can we keep hibiscus in small pots forever?” This is something we get asked a lot, and the answer is yes, you can keep hibiscus in small pots forever. This is exactly what we do in our greenhouse with our own hibiscus collection. We have to keep our plants in pots that are light, easy to move, and close together because greenhouses are always short on space. There are some tricks to making it work, but none of them are difficult.
Planting Hibiscus in the Ground
 In Warm Areas Hibiscus Thrive in the Ground In Warm Areas Hibiscus Thrive in the Ground |
Test your Drainage: Pour about a gallon of water into the hole to make sure it drains. If the water disappears within an hour that is good enough. If it’s still there after an hour, you probably planted it in clay or something else that won’t let water through. The hibiscus roots could end up drowning. You could also build a raised bed for plants or add “clay-busting” material to the soil, which you can get at most nurseries. If the hole drains well, plant the hibiscus pretty deep and add a couple of inches of soil around the root ball as you fill in the hole.
For a test of water permeation, dig a small well in the ground to see how well water soaks into the soil. Two or three times fill the well with water, then let it drain for about thirty minutes. Then, dig down and check the water line to see how far down the ground is wet. If there is water 8 to 10 inches below the surface, your soil is safe to plant hibiscus in. If only the top inch or two of soil is wet, the soil doesn’t let water through well. This means that no matter how much you water, your hibiscus could die of drought because the soil won’t soak up the water. You will need to dig a very large hole and fill it with good planting mix before you plant your hibiscus. This will give the plant plenty of room to grow roots.
Super Sandy Soil: If your soil is very sandy, you will probably have problems growing hibiscus in it. Very sandy soil does not absorb much water or hold fertilizer. The water that is put on sand quickly evaporates because most of it flows down past plant roots. If your soil is very sandy, you should either grow your hibiscus in pots or be ready to water it a lot and put timed-release fertilizers on top of the soil. The sandy soil can also be improved by adding good compost and other organic materials. This will help it hold more water and fertilizer. Check with your local Department of Agriculture and the Master Gardeners group in your area for more advice.
Before you dig the hole, make sure it’s a few inches wider on all sides than the plant pot. If the soil is good, this should work. If you are amending your soil, make the hole much wider than the size of the pot. Plant your hibiscus deeper into the ground, with the crown (where the roots meet the trunk) right at the surface. This will help the plant hold on to water if you live in a dry area where frost could damage it. If you live somewhere warm and wet, dig a hole that isn’t as deep so that the crown and tops of the roots stay above the ground around the hole. This will help your hibiscus grow longer, deeper roots. Break up and work the ground around the hole as much as possible. So take your time, and dig a $20 hole!.
Ready to Plant: Once the hole is ready, water it to make the soil wet all the way through before putting the hibiscus in it. Take your hibiscus plant out of its pot slowly, being careful not to pull the roots away from the plant’s base. Do not pull on the plant trunk to get the plant out of the pot, even though it may be tempting. Instead, put your hands on the soil, and gently turn the plant upside down up in the air. Then hug the pot, and let gravity drop the plant out of the pot into your hands. Break up a few of the roots around the rootball with your hands, then put the plant in the hole that you just made.
Look at your plant before you finalize the position. Check to see which way the branches grow and place it so that it looks best from where the viewer will be lying down. If the plant leans to one side in the pot, use this time to replant it so that it stands straight again in the hole in the ground. Putting the roots in the hole a little off to the side won’t hurt the plant at all. Look one last time at where the plant is placed, and then fill in the space with soil that isn’t too loose or packed down. Very well: water deeply two or three times to make sure all parts of the hole and rootball are wet. Et voilà! Youre done! Wait a week or two before beginning your fertilizing regime, then fertilize away. Hibiscus rarely experience transplant shock. They need space to spread their roots, and a hibiscus that has just been planted will often look and stand taller than it did in its pot.
Top 5 Tips to Grow HIBISCUS in Pots – Pure Greeny
FAQ
Do hibiscus grow well in pots?
How do you care for a potted hibiscus plant?
How to keep hibiscus blooming?
How long do potted hibiscus last?
Can hibiscus grow in pots?
Tropical hibiscus ( Hibiscus rosa-sinensis) is hardy in USDA zones 9-12, depending on the variety, and is sensitive to temperatures below 50 degrees F. This popular landscape shrub can also be grown in pots and is easy to care for when given the right type of container, rich soil, plenty of water and light.
How do you plant Hibiscus in a pot?
Here are the steps to successfully plant hibiscus in a pot: 1.**Container Choice**: – Select a container that is **1 to 2 inches wider and deeper** than the root ball of your hibiscus plant. – Opt
Can hibiscus grow in a black pot?
When you buy your plant, it will likely be in a black nursery pot. You will want to replant it into a pot that is one to two inches larger than the nursery pot. Since hibiscus can grow large, you will want to select a sturdy pot; cement, ceramic or clay pots work well. Tall hibiscus varieties can reach 5-6 feet (1.5-1.8m) in height.
Should Hibiscus be watered in a pot?
A good rule for watering in a pot is to never let the soil dry out. This timing will vary based on the location, size, and species of the plant. Tropical hibiscuses use up a lot of water and may need to be watered daily if they are in a hot spot, and in a container with ample drainage.
- The Moderate Growth Rate of the Stunning Edith Bogue Magnolia - April 10, 2026
- Cultivating Vibrant Dahlias in Garden Beds – A Complete Growing Guide - April 10, 2026
- Mediterranean Pink Heath in Summer – Tips for Care and Maximizing Bloom - April 9, 2026