Mosaic walkways made from pebbles, tiles or glass are a beautiful way to add artistry and whimsy to your garden landscape. The varied colors, patterns and textures create visual interest underfoot. Mosaic paths are also incredibly durable and practical. Follow this step-by-step guide to learn how to make your own gorgeous mosaic walkway.
What is a Mosaic Walkway?
A mosaic walkway is a pathway made by setting small pieces of colored stone, tile, glass etc into mortar or concrete to form a decorative pattern. Mosaics date back over 4000 years and were used by ancient cultures like the Romans to decorate floors and walls.
In gardens, mosaics are commonly used for:
- Walkways
- Patios
- Stepping stones
- Edging
- Benches
- Focal features like fountains
Mosaic designs can be simple or complex geometric patterns, scenes from nature, spiritual symbols like mandalas, or completely abstract.
Benefits of a Mosaic Walkway
Compared to materials like flagstone, brick or gravel, mosaic walkways offer:
- More color, texture and artistic interest
- Extreme durability from mortar base
- Low maintenance
- Slip resistance from pebble surface
- Customizable patterns and shapes
- Endless design possibilities
What You’ll Need
Materials
- Pebbles, tile pieces or glass in assorted colors
- Mortar mix
- Crushed gravel
- Concrete edging
- Plywood sheet
- Shovel, hoe, bucket, spray nozzle
Optional
- Cement coloring
- Mosaic adhesive like thinset
Safety Gear
- Dust mask
- Gloves
- Goggles
- Knee pads
How to Make a Mosaic Walkway Step-By-Step
1. Design and Layout
-
Decide on the location, shape, size and pattern for your mosaic walkway.
-
Sketch ideas and create templates if desired.
-
Mark the path layout with string and stakes. Excavate to depth of your gravel base.
2. Prepare Base
-
Dig 4-6 inches below finished height.
-
Add 2-4 inch layer of tamped crushed gravel.
-
Install concrete edging flush with finished height.
-
Let base cure before adding mortar.
3. Mix Mortar
-
Mix small batches of mortar to stiff, dense consistency.
-
Add colorant if desired. Work quickly before mortar sets!
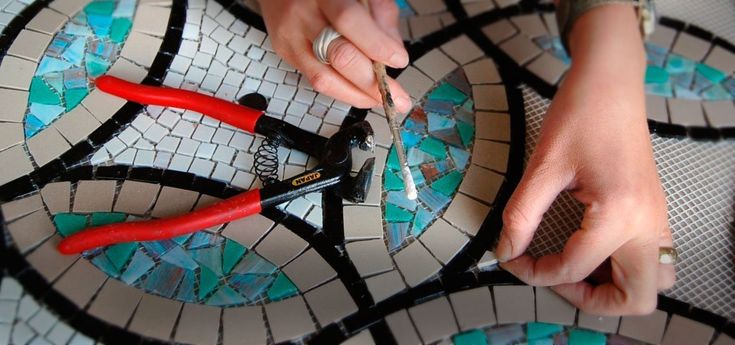
4. Set Mosaic Pieces
-
Wet pebbles/tiles before placing to aid adhesion.
-
Press pieces close together into mortar, filling gaps.
-
Use spacers for consistent grout lines if tiling.
5. Flatten and Clean
-
Lay plywood over finished sections and walk to flatten.
-
Gently wash away excess mortar with spray nozzle.
-
Let mortar cure completely, keep damp.
6. Grouting and Sealing
-
Once cured, grout and seal tile mosaics for extra protection.
-
Use mosaic adhesive instead of mortar for versatility.
Tips for Planning Your Mosaic Walkway
-
Choose a simple, geometric pattern for beginners. Curves and custom shapes are advanced.
-
Collect pebbles on walks for free materials. Smooth, flat-sided rocks work best.
-
Sort rocks by color and size in buckets to plan your design. Wetting reveals true colors.
-
Use pea gravel to fill small gaps for a polished look. Contrasting grout also highlights spacing.
-
Stick to a color scheme that complements your garden style for visual cohesion.
-
Consider durability and slip-resistance for high traffic areas. Smaller pebbles enhance traction.
-
Allow extra time for mortar to cure in colder climates to prevent damage from frost heave.
Creative Ways to Use Mosaic Walkways
Beyond basic pathways, consider these fun applications for mosaic walkways:
-
Stepping Stones – Create a mosaic trail across lawns or gardens.
-
Patios – Make a colorful, durable surface for entertaining.
-
Edging – Border planting beds and driveways.
-
Benches – Add mosaic seats and backs to garden benches.
-
Water Features – Use mosaic tiles to line ponds and fountains.
-
Accent Stripes – Add thin mosaic bands along paths, walls or steps.
-
Furniture – Mosaic tables, plant stands and pottery.
-
Signage – Welcome guests with a mosaic address plaque.
With the right materials, preparation and technique, you can create stunning, artistic walkways through your garden. Mosaic paths add so much visual delight, durability and personality to any landscape. Get creative with colors, shapes and patterns to make your garden flow with beauty underfoot!
Gardening tips, videos, info and more delivered right to your inbox!
Now is the time to sign up for the Gardening Know How newsletter and get our most popular eBook, “How to Grow Delicious Tomatoes,” for free. “Please send me news and deals from other Future brands. I also agree to receive emails from us on behalf of our sponsors and trusted partners.”
Install either metal or plastic edging along both sides of the path. Tamp the edging down. The spikes on the edging will push through the landscape fabric and hold it in place.
Add the last layer of pebbles on top of the landscape fabric and use the back of a rake to level it out.
DIY Pebble Walkway Ideas
You can use pavers or even have a path poured, but making meandering pebble walkways is a much more natural way to do it. They also look better in the landscape. You can pick pebbles in a color that goes well with your plants or pick ones that are a different color.
Another DIY pebble walkway idea begins simply with stones but ends up being anything but simple. This type of path uses the same ideas as a natural pebble walkway but takes them a step further.
Pebble mosaic walkways were first evident in Mesopotamia in the 3rd millennium BC. They were created in Tiryns in Mycenean Greece and during the classical Ancient Greek and Roman histories. A mosaic is a pattern or design created out of pebbles. More modern mosaics may be made out of glass, shells, or beads.
Making a pebble walkway is fairly simple. First, the path is laid out using string. Then grass and soil are removed from within the path outline. The path’s base is raked smooth and tamped down to a depth of about 10 cm (4 inches). ).
The bottom of the path is then lined with 2-3 inches (5 to 7. 5 cm. ) of crushed stone, which is also raked smooth. This is misted with a hose and then tamped down. The landscape fabric is then put over the first layer of stone, with the shiny side facing up. It is folded to fit the path’s curves.
Mosaic Walkway
What is a mosaic pathway?
A mosaic pathway incorporates the same ideas as a natural pebble walkway but amps it up a notch or two. Pebble mosaic walkways were first evident in Mesopotamia in the 3rd millennium BC. They were created in Tiryns in Mycenean Greece and during the classical Ancient Greek and Roman histories. A mosaic is a pattern or design created out of pebbles.
How do you make a colorful walkway?
Use colorful mosaic tile pieces between flagstoneto add a fun pop of color for your walkway! Lovely floral patterns are perfect for a walkway! Take it stepping stone by stepping stone to create one flowing piece of art! The step-by-step process used is fascinating to watch! Check out the link below! This walkway is colorful and exciting!
How do you make a mosaic?
Construct a colorful mosaic by placing pieces of glass in a matching shape. No piece of glass can touch more than one color. © 2023 Microsoft United States

Follow me on YouTube
- A Complete Guide to Caring for Yuki Cherry Blossom Shrub - January 23, 2025
- Identifying Red Hot Poker Seeds: What to Look For When Harvesting Torch Lily Pods - January 23, 2025
- A Complete Guide to Harvesting Evening Primrose Seeds - January 23, 2025