Since I’ve learned about organic farming, I like going to our community garden with my friends to try out new ways to grow plants and do other gardening experiments. I care deeply about exploring sustainable and mindful approaches to working with nature. This is my main interest, but I also love flowering plants! My favorite fruits are strawberry, mango, and guava. My favorite vegetables are artichoke, tomato, and rocket.
Making two rubber plants from one is not difficult. Here, you can learn how to easily propagate a rubber plant by taking cuttings or by air layering.
The rubber plant (Ficus elastica) is pretty to look at and also very low maintenance. All the more reason to grow new saplings from your own plant. You can easily multiply your rubber tree or even give some of these tiny green gems away. So it does not hurt to know how best to approach rubber plant propagation. Below, we show you how to go about propagating rubber plants via cuttings or by air layering.
Do you think it would be better to have many rubber trees instead of just one? If so, you should start thinking about how to grow your own rubber plants. The Ficus elastica can be propagated in the same way as most Ficus species. In general, there are two ways: By cuttings or by air layering. Taking cuttings is a very uncomplicated and easy to use method. Air layering is much more complicated and takes more time. The result – magnificent and vigorous saplings – makes this method all the more attractive. Whichever option you choose, the best time for propagation is in the spring.
As any indoor plant lover knows rubber plants (Ficus elastica) are extremely popular houseplants thanks to their glossy green leaves forgiving nature, and sculptural form. And what’s better than acquiring new rubber plants for free by propagating them yourself? Propagating a rubber plant from an existing one is quite straightforward, requiring just a few simple steps and some patience as you wait for roots to form.
In this comprehensive guide, you’ll learn everything needed to successfully propagate rubber plant cuttings, from selecting optimal cutting material to aftercare once potted. Follow these steps, and you’ll be able to multiply your rubber plant collection affordably.
Why Propagate Your Own Rubber Plants?
Here are some excellent reasons to try propagating rubber plants at home:
-
It’s free! Just the cost of a pot and soil as propagation requires only stem cuttings.
-
You can clone your prettiest, most robust rubber plant to get more just like it.
-
It’s easy for beginners as rubber plants root readily in water.
-
Allows you to multiply special variegated or dwarf rubber plants.
-
Fun hobby provides enjoyment watching roots develop on cuttings.
-
Great way to get more houseplants without spending much money.
-
Makes thoughtful gifts for fellow houseplant enthusiasts.
With a high success rate, simple process, and no need for special rooting hormones or tools, propagating rubber plants is very rewarding. Let’s go over how it works.
Selecting the Best Rubber Plant Cuttings
Choosing appropriate stem cuttings is an important first step for propagation success. Look for:
-
Sections of stem that are 6 inches or longer to allow for plenty of potential root growth. They can be cut back later if too long.
-
Stems that are relatively new green growth, not old woody stems.
-
Cuttings taken in spring and summer when the plant is vigorously growing.
-
Leaves that are fully formed and healthy, not small new ones.
-
Avoid flowering or fruiting stems which are less likely to root well.
-
Cut just above a leaf node so there is a wound for new roots to emerge from.
With proper stem selection, you stack the odds in your favor of growing strong new roots and new plants.
How to Cut and Prepare the Stem Cuttings
Once you’ve identified promising stems on your rubber plant, follow these steps:
-
Sterilize pruning shears, scissors, or a sharp knife to avoid transferring any diseases.
-
Select a stem and cut it diagonally just above a leaf node. Cut at an angle to increase the surface area for rooting.
-
Trim off any flowers or flower buds on the cutting.
-
Remove the bottom 1-3 leaves by gently pulling them off to expose more stem.
-
Optionally apply rooting hormone powder to the cleaned cutting end. Not required but may speed root growth.
The prepared 6 inch or so cutting is now ready for propagation by rooting it in water or soil.
Rooting Rubber Plant Cuttings in Water
Propagating rubber plants in water is widely preferred over soil because you can easily monitor root development without disturbing the cutting. Here’s the simple process:
-
Place the prepared stem cutting in a clean vase or glass with room temperature water.
-
Ensure at least 2-3 nodes are submerged in the water with some stem below.
-
Put the vase in a warm bright spot out of direct sunlight. Indirect light is ideal.
-
Keep water levels maintained but don’t change the water for a month or more.
-
Watch for small white roots to emerge from the stem nodes within 4-8 weeks in most cases.
Be patient as rooting time can vary. Established roots will branch out further as the weeks go by until the cutting is ready to pot up.
Transition the Rooted Cutting to Soil
Once the rooted rubber plant cuttings have an extensive root system about 3-4 inches long, it’s time to transition them to potting mix. This is done in stages:
-
Let the potting mix thoroughly dry out before use to prevent rotting.
-
Gently loosen the roots from the water vase and plant in a small pot with drainage holes.
-
Use a well-draining potting mix designed for African violets or orchids.
-
Keep the cutting humid while roots establish by covering with a plastic bag.
-
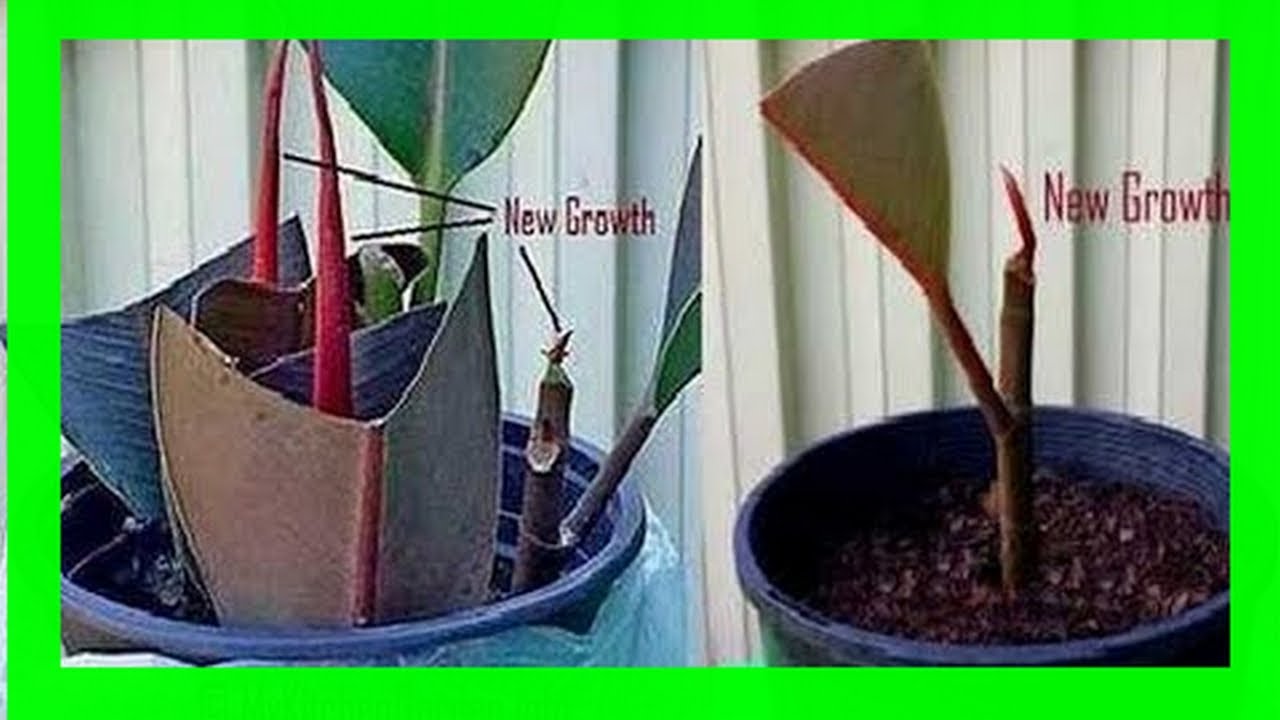
Place in partial sun away from direct light until new growth emerges.
-
Water when the top inch of soil is dry until established, then let dry out further between waterings.
With this gradual transition, the cutting will shift smoothly from water to growing in soil. Keep a close eye on it at first.
Caring for the New Propagated Rubber Plants
Congratulations on your new baby rubber plants! To keep your propagated cuttings growing strong:
-
Fertilize every 2-3 months during the spring and summer with a balanced liquid fertilizer.
-
Check soil moisture frequently at first to prevent drying out or rotting.
-
Pot up to a larger container once rooted if the plant is tipping over or stunted.
-
Maintain warm temperatures and moderate sunlight as you did for rooting.
-
Wipe leaves periodically with a damp cloth to keep them dust-free and shiny.
-
Prune back unfurling leaves if they become too large for their space.
With the right care, your propagated rubber plants will flourish! Enjoy watching them develop into full-size plants.
Troubleshooting Propagation Problems
If your rubber plant cuttings fail to root or decline after potting, here are some common issues to check:
-
Stem rotting: Keep water clean and use distilled or rain water to prevent bacterial or fungal infections.
-
Few roots forming: Increase ambient warmth and lighting levels for better growing conditions.
-
Leaves dropping: Don’t let new cuttings dry out as they need higher humidity while establishing.
-
Slow growth: Fertilize more often and be sure the plant drains well and isn’t root bound.
-
Leaf spots or damage: Isolate affected plants and treat with a fungicide if fungal disease is present.
Catch problems early and diagnose the cause. With proper care, you can get your propagation back on track.
Enjoy the Benefits of Propagating Rubber Plants
Propagating your own rubber plants from stem cuttings is deeply satisfying and a great money-saving strategy for expanding your indoor plant collection. Choose healthy stems, root them patiently in water, then transition to soil for a high rate of success. Before you know it, you’ll have new baby rubber plants to enjoy or give as gifts!
So give propagation a try. All you need is some basic gardening supplies, a sharp pair of shears, and a healthy mother plant. With this complete step-by-step guide, you’ll see how easy and fun growing new rubber plants can be. Your living space will soon be brimming with beautiful, sculptural leaves to liven up any decor.
Propagating a rubber tree from main stem cuttings
For main stem cuttings, find a healthy shoot. From this cut off a five to ten centimetre-long shoot tip. The cut should be set at an angle just below a leaf base. Now remove all the leaves from the shoot, leaving only the top. When cutting the rubber plant, a white-milky sap will seep out of the cut. Dab this with a damp cloth.
Tip: To protect your skin from the rubber tree’s mild toxicity, we suggest that you wear gloves when working on the tree.
Prepare a pot with drainage holes and special growing soil as a planting container for the cutting. A peat-free sowing soil such as our Plantura Organic Herb & Seedling Compost is ideal as a substrate. The cutting should now be placed in this container and moistened with a spray bottle. From now on, the rubber plant sapling will need warm, bright and humid conditions. Putting a plastic bag over the pot or putting it in a homemade mini greenhouse will raise the humidity and make a great environment for the cutting. Every few days, the cutting should be aired and the bag should be removed for a while. The future tree needs a miniimum temperature of 25 °C to grow. After about three months, you can put the sapling in a larger pot.

Summary: Propagating rubber plants from main stem cuttings
- Select a healthy shoot
- Cut off a 5 – 10 cm-long shoot tip
- Remove all leaves except the top one
- Put the cutting in potting soil and moisten it
- Place a plastic bag over the pot
- Regularly air it and spray with water
- Grow at 25 °C

- Perfect for herbs as well as sowing, propagating & transplanting
- For aromatic herbs & healthy seedlings with strong roots
- Peat-free & organic soil: CO2-saving composition
Propagating rubber plants from cuttings
You can choose between two ways to grow plants from cuttings: take cuttings from the main stem or, if your tree is already bigger, choose to grow plants from node cuttings. For both methods, it is best to use a clean and sharp knife.
Propagate Rubber Plant in water and soil FASTER
Can You propagate a rubber tree from cuttings?
After pruning, don’t throw out those cuttings; instead, use them to propagate a rubber tree plant. Propagating a rubber tree plant from cuttings starts with getting a good cutting. The cutting should be about 6 inches (15 cm.) long and have at least two sets of leaves.
How to propagate rubber plants?
Rubber plant propagation is mainly done through stem cuttings . Through stem cuttings, you can propagate Rubber plants in two ways: The other propagation methods are: Before starting with these methods, remember that Rubber plant propagation should always be done during the growing seasons, i.e., spring and summer.
How do you propagate a rubber plant using air layering?
To propagate a rubber plant using air layering: 1. Start with a healthy cutting that is about 12 cm in length. 2. Strip off the leaves from the bottom half of the cutting. Scrape away the outer bark in an area you want to root. It will look like a naked ring. 3. Apply a rooting hormone to help encourage new plant growth.
How do you plant a rubber plant?
Plant the cutting in moist and well-draining potting soil, such as the indoor plant soil mix from Perfect Plants Nursery, and in a pot that is suitable for its size. Planting in a suitable-sized pot will help you avoid having to transplant the rubber plant too soon. You can apply rooting hormone to the end of the cutting before you plant it.