A layered compost bin is easy to use and works well for turning food scraps and yard waste into rich, healthy compost. This step-by-step guide will help you set up and take care of a healthy compost bin in your backyard, no matter how much or how little you know about gardening.
Stacking carbon-rich materials (called “browns” like leaves and sticks) and nitrogen-rich materials (called “greens” like food scraps or grass trimmings) on top of each other is what layered composting is all about. A layered compost bin is simple to make and gives microbes everything they need to break down organic matter properly.
Food scraps are an important part of healthy layered compost, but it can be messy and gross to keep food scraps in a countertop bin and empty the sink strainer all the time.
But collecting food scraps can be effortless. With Sepura, you can wash all of your food scraps down the sink, and they will be sent to an odor-proof compost bin. Only liquids will go into your pipes! Check out Sepura, our composting garbage disposal, to make composting easy.
Composting is one of the most rewarding ways to reduce waste and create nutrient-rich soil for your garden. By layering different ingredients in your compost bin, you can create the ideal conditions for waste breakdown and nutrient cycling. Though it may seem complicated, composting just takes a bit of know-how. In this article, I’ll walk you through the key layers to include in a successful compost system.
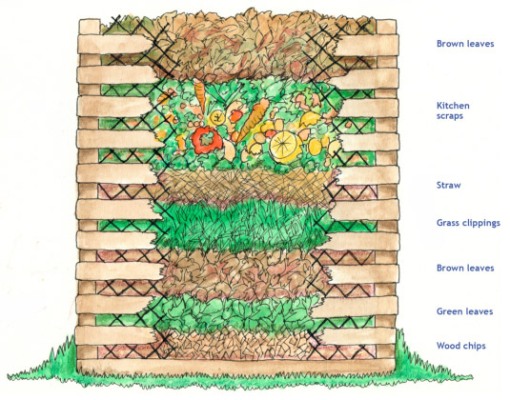
Start with Coarse Plant Material
The base of your compost pile should consist of twigs, small branches, corn stalks, or other coarse plant material. This layer allows for air circulation in the lower levels of your compost, which is essential for aerobic bacteria. Aerobic bacteria break down organic matter much more efficiently than anaerobic bacteria. Anaerobic bacteria thrive in the absence of oxygen, creating foul odors and slowing the composting process.
Aim for 6-8 inches of coarse plant matter on the bottom of your bin. You can gather twigs and branches from yard clippings or prunings. Avoid any diseased plant material which can harbor unwanted pathogens. If you don’t have access to twigs or branches you can substitute straw, wood chips, or other coarse substances. The key is creating a lattice that allows air to permeate the bottom of the pile.
Cover with Fall Leaves
Once you’ve laid your base layer, cover it with 2-4 inches of fall leaves. Oak, maple, and other deciduous leaves are ideal, as they break down easily compared to pine needles. You can stockpile leaves in the fall and store them until needed. Shredded leaves allow more air into the core of the pile.
Leaves provide carbon, which serves as an energy source for the microorganisms decomposing your waste. They also help retain moisture and allow air flow. If you don’t have an abundance of leaves, you can use shredded newspaper or cardboard in their place Avoid glossy paper, which takes longer to break down
Add Green Matter
Now it’s time to layer in nitrogen-rich “green” matter. This includes plant trimmings, fresh grass clippings, and other lush vegetation. These ingredients provide nitrogen, which helps balance the high carbon content of leaves and wood.
Aim for 2-4 inches of green matter after each brown layer. Green waste breaks down quickly, so your microorganisms will thrive when fed a steady diet. Avoid thick, matted layers of grass, which can restrict airflow. It’s ideal to shred or chop green material before adding it.
Bury Food Scraps
One of the best things about composting is keeping food waste out of landfills. Fruits, vegetables, eggshells, coffee grounds, and more can all be composted. For best results, bury your food scraps within the layers of your bin. This prevents odors and pests.
Chop or shred large items like melons, pumpkins, and corn cobs. Meat, fish, oils and dairy should be avoided, as they can attract rodents and create foul odors. If adding citrus peels or onions, mix them well with other ingredients to prevent them from smelling.
Use Natural Activators
Certain ingredients can give your compost pile a boost of living microorganisms. These natural activators speed the breakdown process by quickly colonizing your bin. Some examples include garden soil, aged compost, and manure from herbivorous animals.
Sprinkle compost boosters between the layers as you build your pile. 1-2 inches will inoculate the fresh waste with an active microbial community. Manure should be aged at least 6 months to avoid weed seeds. Garden soil introduces native bacteria and fungi well-adapted to your climate.
Don’t Forget Coffee and Tea
Coffee grounds and tea leaves or bags provide a quick shot of nitrogen and tannins. Tannins can help reduce compost odors. Coffee grounds also contain useful minerals like potassium, phosphorus, magnesium, and copper. Their small size allows them to filter through the layers easily.
It’s fine to sprinkle used coffee grounds and tea bags as you add food scraps from the kitchen. However, don’t use more than a thin layer at a time. Too much can create dense areas that restrict airflow. Moderation is key when adding these convenient kitchen scraps.
Top Off with More Browns
Once your compost bin is almost full, finish it off with a 4-6 inch layer of high-carbon “brown” matter. This cap helps contain odors and promotes aerobic conditions. Use shredded leaves, straw, or wood chips. Avoid any thick mats or clumps that can restrict oxygen flow.
Topping off with a carbon layer allows the center contents to finish breaking down. You’ll know your compost is finished when the pile shrinks, darkens, and gives off an earthy smell. Turning or mixing the pile once or twice during decomposition will speed results. In 2-4 months, your layers will have transformed into dark, crumbly compost!
Troubleshooting Tips
- Rotten egg smells – Too much nitrogen-heavy green matter. Add more browns.
- Ammonia smell – Too much green matter. Add more browns.
- Lack of heat – Add a nitrogen booster or turn the pile.
- Pile too dry – Add water or “green” ingredients like fruit waste.
- Pests – Bury food scraps, cover with soil, use wire mesh to enclose.
The Benefits of Layering
By stacking a variety of natural ingredients, you can create the ideal environment inside your compost bin. Layers provide:
- Balanced carbon and nitrogen ratio
- Air circulation and oxygen
- Moisture absorption and retention
- Gradual breakdown from edges inward
- Thermal insulation for heat retention
- Convenient mixing of diverse waste types
- Blocking of light to prevent weed growth
- Blending of coarse and fine particles
- Nutrient cycling and rich finished compost
Proper layering takes some trial and error, but the results are well worth it. With a little practice, you’ll be on your way to black gold in no time! Your plants will thank you for this nutrient-rich “superfood” generated right in your own backyard.
Step 1: Choose the Right Location and Bin
It’s best to put the compost somewhere that gets some sun and some shade so that it doesn’t dry out too quickly. The heat from the sun will help the compost break down. It should also be easy to add materials and close to a water source to make managing moisture simple.
There are compost bins you can buy, or you can make your own out of pallets, wire mesh, or even just a pile of leaves on the ground. To give the composting materials enough room to heat up and break down, make sure the bin is at least 3 feet wide and deep.
How to Make a Layered Compost Bin
A simple and effective way to turn kitchen scraps and yard waste into nutrient-rich compost is to make a layered compost bin. Heres a step-by-step guide to help even beginners set up their composting system successfully.
The Perfect Compost Recipe – How to Get Your Compost Heap Cooking!
How do you make a compost bin?
Start with a layer of coarse materials in the bottom of the bin to facilitate drainage. Add a layer of 3 to 4 inches of green materials (This is the first ⅓ nitrogen), For example, fresh leaf trimmings, grass clippings, fruit and vegetable scraps. Sprinkle 1 or 2 inches of soil on top (or finished compost).
What is composting in layers?
Composting in layers, also known as the layering method or lasagna composting, involves adding alternating layers of green and brown materials to the compost pile. This layering method helps facilitate the decomposition process and ensures a balanced mix of ingredients.
How to layer a compost bin for optimum composting success?
Now you know how to layer a compost bin for optimum composting success. Just remember the four essentials: nitrogen, carbon, water, and oxygen. Add layers of green and brown waste in the right proportions, and your compost will be on its way to becoming a nutrient-rich soil amendment!
How many gallons in a compost bin?
For most households, a compost bin with a capacity of 60 to 80 gallons should suffice. Begin by creating a base layer using coarse materials, such as twigs or small branches. This layer should be about 4-6 inches thick and will help with airflow and drainage within the bin.
- The Moderate Growth Rate of the Stunning Edith Bogue Magnolia - April 10, 2026
- Cultivating Vibrant Dahlias in Garden Beds – A Complete Growing Guide - April 10, 2026
- Mediterranean Pink Heath in Summer – Tips for Care and Maximizing Bloom - April 9, 2026