Tulips are a classic spring flower loved for their vivid colors and elegant blooms. While often grown in garden beds, you can also plant tulip bulbs in containers for a stunning portable display. However, overwintering potted tulips properly is key to getting them to reflower year after year Follow this complete guide to best practices for planting tulip bulbs in pots in fall and caring for them through the winter months.
Why Grow Tulips in Pots?
There are several advantages to planting tulip bulbs in containers rather than directly in the ground
-
Portability to move pots into optimal sun or display positions.
-
Avoid garden soil-borne diseases and pests.
-
Protect bulbs from digging rodents.
-
Easily control moisture and drainage.
-
Forced bulbs can bloom weeks earlier indoors.
-
No need to dig up and store bulbs after blooming.
With proper care through winter dormancy, potted tulips can thrive just as well as in garden beds.
Choosing the Best Tulip Varieties for Pots
Nearly any spring-blooming tulip can grow well in a container. Consider these factors when selecting varieties:
-
Bloom time: Early-blooming cultivars work best for overwintering in pots. Choose early or mid-spring types.
-
Mature height: Shorter types under 12 inches are ideal. Tall tulips may topple over.
-
Flower size: Large, showy flowers make the biggest impact.
-
Hardiness: Pick varieties known for return blooming like Darwin and Triumph types.
Some top potted tulip picks include ‘Red Riding Hood’, ‘Pink Impression’ and ‘Strong Gold’.
When to Plant Tulip Bulbs in Pots for Spring Bloom
Tulip bulbs require a period of cool dormancy to flower properly in spring. For best results, follow these fall planting guidelines:
-
Zones 3-7a: Pot up bulbs 6-8 weeks before first hard freeze (October-November).
-
Zones 7b-11: Plant bulbs in late November-early December.
-
If forcing bulbs for winter bloom, plant 8-12 weeks before desired bloom time.
Allow enough time for good root growth before cold weather arrives. Avoid fall planting after hard frosts begin.
How to Plant and Pot Up Tulip Bulbs
Use these steps for proper bulb potting technique:
-
Select containers at least 5-6 inches wider than bulb height. Include drainage holes.
-
Use a quality potting mix, not garden soil. Mix in a slow-release fertilizer.
-
Place bulbs pointy-side up, 2-3 times their height deep. Pack soil firmly.
-
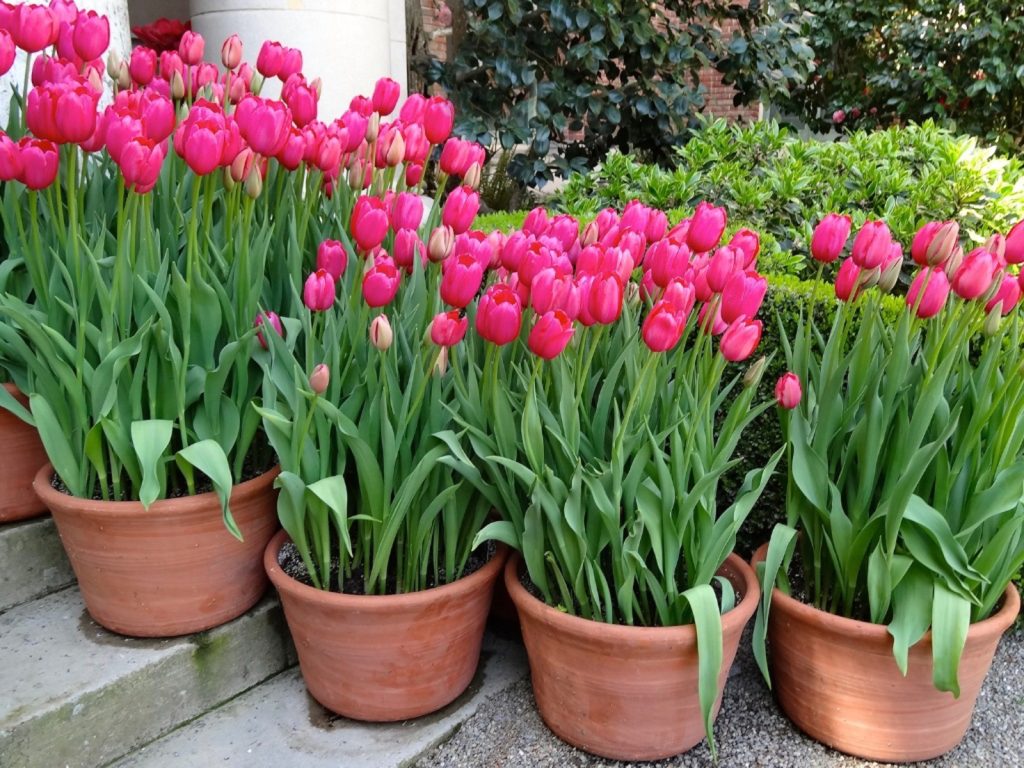
Space bulbs closely, almost touching. Groups of 5-7 bulbs work well per pot.
-
Label pots for spring reference. Water soil thoroughly after planting.
-
Add protective mulch layer if overwintering outdoors.
Proper planting depth and close spacing helps bulbs support each other as they grow.
Caring for Potted Bulbs Through Winter Dormancy
Give bulb pots the conditions they need to keep bulbs happy in winter:
-
Temperature: Keep between 35-45°F for optimal cold period. Avoid freezing or overheating.
-
Moisture: Check soil monthly and water sparingly if dry. Too much moisture causes rot.
-
Light: Keep pots in complete darkness once cold weather arrives until growth resumes.
-
Air circulation: Maintain good air flow around pots to prevent condensation.
-
Fertilizer: Do not feed bulbs again until active growth after winter dormancy.
Monitor potted bulbs carefully through winter and adjust storage conditions as needed.
Transitioning Bulbs Back to Growth in Spring
As spring warms up, potted tulip bulbs need special care when transitioning back to active growth:
-
Bring pots back into light around mid-February to early March. Move to a sunny, sheltered spot outdoors.
-
Check soil moisture weekly and water when the top few inches become dry.
-
Remove any protective winter mulch from potted bulbs as they begin actively growing.
-
Apply a balanced liquid fertilizer every 2-3 weeks to support bloom and foliage growth.
-
Watch for sprouts and signs of green emergence. Tall varieties may need staking.
With proper moisture and warmth, potted tulip bulbs will quickly shift back into spring growth mode for abundant blooms.
Aftercare Once Potted Tulips Finish Blooming
Tulip foliage needs time after blooming to fuel the bulb for next year’s flowers. Handle pots carefully after petals drop:
-
Allow foliage to completely yellow and die back naturally, 4-6 weeks after bloom.
-
Feed with a high potassium liquid plant food to nourish bulbs for next year.
-
Slowly reduce watering but keep potting soil slightly moist through summer dormancy.
-
Store dormant bulb pots in a cool, dark place for 8-12 weeks minimum.
-
Ideally replant bulbs in fresh soil before winter. Compost last year’s soil.
Taking steps to properly ripen bulbs after blooming is just as vital as overwintering for ongoing success.
Troubleshooting Issues with Potted Tulips
If your container tulips underperform, look at these common problems:
-
No blooms: Bulbs stored incorrectly over winter, planted too shallow, or unsuitable climate.
-
Sparse, weak foliage: Insufficient nutrients or sunlight.
-
Leaning stems: Not enough sunlight, excess nitrogen fertilizer, or thin stems.
-
Small blooms: Planted too deep, crowding, insufficient light exposure.
-
Slow decline: Poor drainage leading to bulb rot. Pests like aphids.
Adjusting planting depth, fertilizing, sunlight exposure and pest prevention can get potted tulips back on track.
Enjoying Tulips Grown in Pots
Creative containers let you design customize tulip gardens on your patio, entryway or anywhere you want a pop of spring color.
-
Mix early, mid and late blooming varieties for months of flowers.
-
Combine tulips with cool weather annuals like pansies or violas.
-
Use sturdy dwarf or short varieties as edging plants.
-
Elevate standard pots on platforms for extra height and impact.
-
Add other bulbs like hyacinths, crocuses or daffodils to extend the show.
With the right bulb preparation and care, potted tulips will flourish indoors and out.
Planting Tulip Bulbs in Fall Pots for Spring Rewards
By following best practices for planting, overwintering, and post-bloom care, gardeners can cultivate gorgeous potted tulips that return year after year. Set your bulbs up for success by selecting prime varieties for containers, allowing adequate dormancy time pre-winter, and providing attentive storage conditions. With a bit of knowledge and effort, you’ll be rewarded with cheerful tulips blooming beautifully in pots come springtime.
Step 1: Plant bulbs so that they almost touch
Putting a plastic grow pot on its side at the bottom of each container will make it lighter and easier to move. Fill the containers two-thirds full with any inexpensive, lightweight potting mix. Don’t bother with fertilizer. Ignore traditional spacing guidelines, and place the tulip bulbs in a tight circular pattern. Plant the bulbs at the same depth you would plant them in the ground, which is usually two to three times the bulb’s height. Cover the bulbs with potting mix.
Animals are less likely to disturb tulips planted in containers than those planted in the ground. Place a wire grid, like a round peony support, on top of the soil and cover it with a thin layer of potting mix. This will protect the plants even more.
Step 2: Give them a sheltered spot to spend the winter
If you live in USDA Hardiness Zones 4 to 7, place the planted pots in an unheated garage. This protects them from undergoing a freeze-and-thaw cycle, which turns potted bulbs into mush. Water them when they’re in place; you won’t need to water again until spring. If you don’t live in a cold area and don’t have an unheated garage, you’ll need to find another way to keep the containers cold, dry, and insulated. The goal is to keep the planted bulbs just above freezing.
Check on your pots in early spring. Water them lightly. When the tulips start peeking above the surface, bring them out and place them on display. Give the tulips the same amount of water as any other plant in a pot, and they will bloom at the same time as plants in the ground.
Once the flowers are gone, you can carefully move the bulbs to a sunny bed, but remember all the things you should know about planting in the ground. The bravest and best thing to do is to just throw away the dead bulbs and start planning a new color scheme for next year.
Planting 24 GORGEOUS Containers with Bulbs + Tips to Get Them to Survive Winter! // Garden Answer
FAQ
Can you leave tulip bulbs in pots all year?
Do tulips do better in pots or in the ground?
Can potted tulips stay outside?
How do I save my potted tulip bulbs for next year?
How do you plant tulips in winter?
According to the Cornell study (done over a six-year period), you should plant tulips during winter in this way: Clear away snow and loosen soil, if possible. If not, choose an area with soil full of organic matter. Scratch in bulb fertilizer. If the ground is totally frozen, scatter fertilizer sparingly and over a larger range than normal.
Can tulip plants grow in winter?
Choosing the right pots and soil is crucial for successful tulip container gardening in winter. Selecting the appropriate tulip bulbs and varieties will help ensure a gorgeous display come springtime. Proper planting techniques, winter care, and protection from frost and cold are all key to overwintering tulips in pots.
How do you care for tulips in winter?
Water the bulbs and do not water again unless the soil starts to dry out. Set tulips in pots over winter in a cold, dark place with a temperature between 35 and 45 degrees Fahrenheit. As spring draws near, look for green shoots, and when you see them, set the pots in the light and wait for them to bloom.
Can tulip bulbs grow in pots?
Grown in USDA hardiness zones 4 through 10, tulips are usually planted outdoors in the fall for spring flowering, but you can also plant tulips in pots over winter. Planting tulip bulbs in pots can provide spring flowers, or you can force the bulbs to enjoy tulips in pots over winter.
- The Moderate Growth Rate of the Stunning Edith Bogue Magnolia - April 10, 2026
- Cultivating Vibrant Dahlias in Garden Beds – A Complete Growing Guide - April 10, 2026
- Mediterranean Pink Heath in Summer – Tips for Care and Maximizing Bloom - April 9, 2026