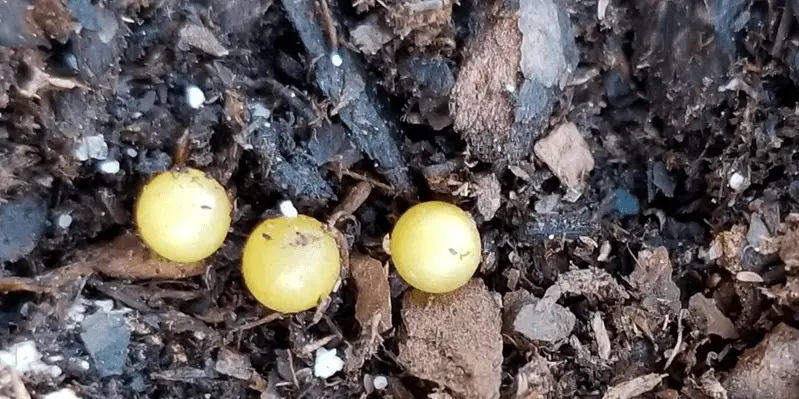
Many people are happy to use potting soil and trust that everything in the bag belongs there. Others, however, may be suspicious of the little yellow balls in the plant soil. What are those things, and are they supposed to be there? Are insect eggs in this bag of potting soil, or is there some strange chemical mixed in?
Have you noticed some strange small yellow balls mixed in with the soil of your garden or houseplants? If so, you’re not alone. Many gardeners and plant owners wonder about the identity and purpose of these odd little spheres. Well, wonder no more! This article will explain everything you need to know about those small yellow balls in the soil.
What Are They?
The small yellow balls are a type of fertilizer called polymer-coated fertilizer, often referred to by the brand name Osmocote. The most common form is made of urea formaldehyde a nitrogen fertilizer, with added nutrients like phosphorus and potassium. The nitrogen phosphorus, and potassium are the primary macronutrients needed for healthy plant growth.
The fertilizer granules are coated with a polymer resin shell that regulates the release of the nutrients inside. This allows the fertilizer to break down slowly over time, providing a continuous feed to plants for up to 3-4 months. The slow-release property makes this type of fertilizer very convenient, eliminating the need for frequent applications.
Osmocote and similar polymer-coated fertilizers come in various sizes, usually between 1-4 mm across. The color varies from yellow to orange to brown or even greenish depending on the specific formulation.
Why Are They in My Soil?
If you did not apply any fertilizer yourself, the most likely source of the fertilizer balls is from the potting mix or soil that your plants were grown in. Many commercial potting mixes and bagged soils contain this type of coated fertilizer as a standard component to provide nutrients to plants.
Nurseries and greenhouse growers routinely incorporate controlled-release fertilizers into their potting media to feed plants while they are being propagated and grown to retail size. This saves the effort of having to frequently fertilize each container. The fertilizer balls are simply leftover from the original nursery soil when you brought the plant home.
The beads may also have been intentionally added to potting mix by a gardening friend or relative who repotted your plant as a gift. Either way, their presence is quite normal and nothing to be alarmed about.
Are They Harmful?
The good news is, the fertilizer balls are completely harmless to plants. The polymer coating prevents the release of too many nutrients at once, making fertilizer burn nearly impossible. As they break down, the nutrients are provided in appropriate amounts that most plants thrive on.
In fact, the fertilizer balls are actually beneficial, providing a slow feed of nitrogen, phosphorus, and potassium – the main nutrients that all plants need. Their presence indicates that your plants have a ready food source available right in the soil.
The fertilizer is also safe for people and pets who may come into contact with the soil. The resin coating prevents the dust and chemicals inside from being released. As an added bonus, the balls gradually fade away on their own so there is no cleanup required.
Caring for Plants with Fertilizer Balls
Caring for plants that already have fertilizer balls mixed into the soil is simple. You can just plant them normally and let the fertilizer do its work. Here are a few tips:
-
Don’t add more fertilizer – The pre-existing fertilizer beads provide all the food the plants need for several months. Adding more fertilizer on top of this risks over-fertilization.
-
Water normally – Continue your usual watering regimen as the fertilizer does not change the water requirements of the plants. The balls will slowly and evenly release nutrients with each watering.
-
Re-pot after a few months – Once the fertilizer is depleted after 3-4 months, the plants will need re-potting with fresh soil and fertilizer to continue receiving nutrients.
-
Mix balls into soil – When re-potting, try to mix in any remaining intact fertilizer balls with the new potting mix so they can continue releasing nutrients.
Identifying Fertilizer Balls
It’s easy to recognize Osmocote and other polymer-coated fertilizers, especially once you know what to look for. Here are the key identifying traits:
-
Small granules – Typically 1 to 4 mm in size, similar to the diameter of a pea or bead.
-
Uniform shape – The granules are perfectly rounded balls, not irregularly shaped.
-
Shiny appearance – The polymer coating gives the balls a smooth, shiny, lacquered look.
-
Vibrant colors – Common colors are bright yellow, orange, green, red, or brown. The color comes from the fertilizer chemicals inside.
-
Hard texture – The balls are hard and do not crush or flatten easily between your fingers. The plastic coating makes them firm.
-
No unpleasant odor – The fertilizer does not give off any smell, unlike organic fertilizers.
-
Gradual breakdown – The balls slowly break down and disappear over a period of months as the nutrients are used up.
Once you learn how to spot them, you’ll be able to easily recognize polymer-coated fertilizer in your potting mixes. There’s no longer any mystery about those colorful beads!
When to Remove Them
In most cases, it is best to just keep the fertilizer balls in the soil and let them do their job. However, there are a couple situations where you may want to remove some of the beads:
-
If re-potting seedlings or young plants that don’t need much fertilizer yet, remove some of the balls to avoid over-feeding them. Mix in just a few for a lighter dose of nutrients.
-
If noticing signs of over-fertilization like leaf burn, remove some beads to lower the nutrient levels. Adjust the ratio of fertilizer to soil as needed.
-
When propagating cuttings in water, leave out the beads entirely as cuttings don’t need fertilizer in the initial stages.
Aside from these special cases, try to retain the existing fertilizer when re-potting and enjoy the feeding convenience they provide!
Troubleshooting Issues
While the fertilizer beads are generally harmless, occasionally they can cause some minor issues:
-
White buildup on pots – Excess salts from the fertilizer may leave a white film on clay pots. Flush pots monthly with clean water to remove buildup.
-
Excess moisture retention – Too many beads can make soil stay overly wet. Use a well-draining soil and reduce quantity of beads if needed.
-
Lingering old balls – If re-potting a plant that had fertilizer balls long ago, some may still remain. It’s fine to mix them into fresh soil.
-
Pet or child ingestion – The balls look like candy or fruit, so keep houseplants out of reach if young kids or pets may mouth them. They’re non-toxic but a choking hazard.
With a little awareness, the small fertilizer balls almost never cause serious problems. Think of them as helpful allies in your gardening routine!
Those little yellow spheres mixed into your potting soil are actually beneficial fertilizer, not something to be worried about. The polymer coating makes Osmocote and similar products safe, clean, and easy to use. Aren’t you glad to finally know the mystery of those small yellow balls is solved? No more need to wonder what they are or why they are in your soil. Now that you understand their purpose, you can confidently utilize them to feed your plants. So go ahead and let those colorful beads work their magic!
Small Yellow Beads in Soil
Video of the Day
Most of the time, these beads are not only harmless but desirable. These are slow-release fertilizers that are incorporated in commercially sold potting soil to improve its effectiveness. The color of the balls can indicate which kind or compound of fertilizer they contain. Osmocote is made up of small, yellowish-brown granules that contain a mix of potassium sulfate and ammonium nitrate that help plants grow in a healthy way. Osmocote can last up to five months in the soil before being depleted.

Video of the Day
Nutricote-type fertilizers, on the other hand, are little gray balls that can stay in the ground for up to a year and keep giving off nutrients.
That’s why there are little yellow balls in the soil, right? Well, that’s not always the case. Worms, snails, and gnats have been seen to lay their eggs in the small holes in soil bags. Although the chances are low, you can do a few things to discern fertilizer pellets from insect eggs.
Insect Eggs vs. Fertilizer Pellets
The small yellow balls in potting soil are almost always slow-release fertilizer pellets. However, the small yellow or white balls in plant soil could be the eggs of insects that are bad for plants. The end of a snail egg is slightly pointed, making it an imperfect sphere. Snail eggs are white and mostly round. Worm eggs are elongated, and ant eggs are bean-shaped. Even though pearlite looks like ant eggs sometimes, it is safe and is added to potting soil to help water drain away.
One litmus test you can use is temperature-based. Fertilizer pellets dissolve quicker in warm temperatures. Osmocote-style pellets sometimes dissolve in as few as four days at temperatures above 70 degrees Fahrenheit. If you’ve been keeping an eye on the warmer soil for at least a week and the small balls are still there, you may have gotten a bag with insect eggs in it. Even if the company that makes the bags is very careful, bugs will still get inside because the bags need holes in them so mold doesn’t grow inside.
What are these tiny bugs in the soil?
FAQ
What are small yellow eggs in soil?
What are the balls growing in my soil?
What is the yellow dot in my soil?
What are the yellow balls in Miracle Gro compost?
What are yellow balls in soil?
Although insect eggs and fertilizer undoubtedly fall under the category of “yellow balls,” you might also encounter other yellow balls in your soil. It can be other items – tiny yellow bugs, plant seeds, or even spider eggs. It makes sense to assume that yellow eggs are bug eggs since most insects begin as eggs.
Why are there yellow balls in my potting mix?
There are different possible reasons for which, you can see small orange or yellow balls in the soil. Let’s discuss what type of yellow balls you are facing in your potting mix and the way you can deal with them. 1. Fertilizer Balls Commercial pot mix soil (not garden soil) bought from stores mostly has these yellow balls inside.
Why are there yellow spheres in my soil?
Before ridding your soil of these tiny yellow spheres, it’s important to identify what they exactly are, as fertilizer is useful, and removing it from your soil could be detrimental to plant growth. As a general rule, clusters of balls in the soil are most likely insect eggs, as opposed to fertilizer.
Are yellow balls in your soil beetle eggs?
If you think the yellow balls in your soil are beetle eggs, then you’ll need to take action to get rid of the pests before they hatch. The best way to do this is to remove the eggs from the soil and dispose of them far away from your plants. To remove the eggs, simply use a spoon or your fingers to scoop them out of the soil.
- The Moderate Growth Rate of the Stunning Edith Bogue Magnolia - April 10, 2026
- Cultivating Vibrant Dahlias in Garden Beds – A Complete Growing Guide - April 10, 2026
- Mediterranean Pink Heath in Summer – Tips for Care and Maximizing Bloom - April 9, 2026