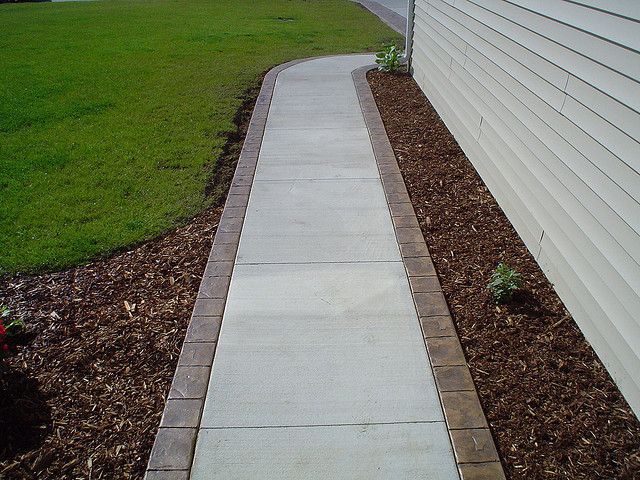
A beautiful concrete walkway lined with brick borders can completely transform the look and feel of your outdoor space. This simple yet elegant landscaping feature is relatively easy for a DIYer to install and can add immense curb appeal and functionality to your home’s exterior.
Why Add a Concrete Walkway?
There are many great reasons to install a new concrete walkway on your property:
- Creates a clear path from your driveway to your front door side gate or other destinations on your lot. This prevents having to trudge through mud or mess up the grass.
- Looks much nicer and more purposeful than a dirt path that gets carved into your lawn over time from foot traffic.
- Concrete is a highly durable material that will last for decades with minimal maintenance required.
- Provides a flat, even surface for walking or rolling wheelbarrows, lawn mowers, wagons, etc over.
- Allows you to shovel snow off of it easily in winter. A concrete path gives you a place to pile shoveled snow.
- Increases your home’s curb appeal and makes your landscaping look planned out and intentional.
- Adds visual interest to what would otherwise just be grass or mulch.
- Creates an opportunity for adding decorative touches like brick borders, stone accents, etc.
Why Add Brick Borders?
Installing a brick border along the edges of a concrete walkway offers some nice benefits:
- Brick provides an attractive contrast in color and texture against the concrete.
- Helps delineate the edges of the path and make it appear wider/more substantial.
- Creates a more finished, upscale look compared to just having exposed concrete edges.
- Brick borders prevent the edges of the concrete from crumbling over time.
- Adds opportunities for decorative patterns, designs, etc when laying the bricks.
- Ties together other hardscape elements like patios, retaining walls, or driveway with a cohesive look.
- Provides a durable edging that won’t rot or degrade like wood borders often do.
- Allows you to match existing brick on your home, mailbox, or other structures.
Design Considerations
There are a few things to think about when planning your concrete walkway with brick borders:
- Location – Determine the optimal placement for the new walkway based on foot traffic patterns and connections to entryways.
- Size – Make sure to build wide enough for 2 people to walk comfortably side-by-side, generally 4 feet wide is good.
- Length – Account for how far you want the path to extend across your property in each direction.
- Curves or corners – Decide whether you want the path straight or add angles and curves for visual interest.
- Brick colors/textures – Select bricks that complement your home’s exterior and other hardscapes. Using reclaimed bricks can provide a charming vintage look.
- Brick patterns – Simple running bond patterns are easiest to DIY, but you can get creative with herringbone, basketweave, or other designs.
- Gravel base – A gravel subsurface is crucial for drainage and preventing cracks/shifts. 4-6 inches of packed gravel is ideal.
- Concrete options – Standard gray concrete blends in well, or add color/stamping for ornamental flair.
- Joint filler – Polymeric sand makes a nice choice for filling the gaps between bricks to prevent weeds.
How to Install a Concrete Walkway with Brick Borders:
Installing this project is straightforward for an intermediate DIYer. Here are the basic steps:
- Layout the location with landscape paint or chalk and stakes. Dig out 4-6 inches deep.
- Fill the excavated area with packed gravel as your base, tamping it down firmly. This may need to be done in layers to get proper compaction. Leave a 1 inch gap at the top.
- Form the edges of the walkway using sturdy wood planks staked into the ground. These will hold the concrete until it cures.
- Lay rebar or wire mesh inside the form to reinforce the concrete and prevent cracking.
- Pour premixed concrete into the form, slightly above ground level. Shovel and rake it smooth.
- Once concrete firms up somewhat, strike the surface with a float for a lightly textured finish.
- Cover the surface with plastic while concrete fully cures over several days.
- Remove forms and dig narrow trenches along the perimeter to lay bricks into.
- Fill brick border trenches with sand, tamp smooth, and use a level to ensure even height.
- Place bricks snugly into sand bed, tamping them flush with concrete surface. Cut any custom shapes needed with a masonry saw.
- Sweep polymeric sand over bricks and vibrate into joints with a tamping tool to lock everything together when dry.
- Make any final cosmetic touches as needed once materials fully cure. Sweep away excess sand.
Proper planning, patience, and attention to detail in each step will ensure your concrete walkway with brick borders stands the test of time and enhances your landscape for decades to come. Maintaining a slight slope for drainage and controlling any weed growth between bricks will help keep it looking pristine.
Overall, this simple landscaping project creates an elegant, cohesive look that complements both traditional and contemporary home exteriors. The classic blended materials also pair beautifully with lush greenery and flowering plants. Investing some sweat equity into a decorative walkway and brick border accents makes for a home exterior you can always be proud of. Give this straightforward DIY project a try and transform the feel of your outdoor space!
Adding Brick Border To Sidewalk – M18 EP31
FAQ
Can you put brick over a concrete walkway?
Can you lay bricks on a concrete path?
Can I use bricks as edging?
What is a brick paver walkway?
Brick or precast concrete paver walkways (whether laid on a sand bed or mortared to a slab) employ many of the same techniques used to build a patio. They also offer the same potential for a varied, handsome surface, only on a smaller scale. You will notice one difference, however, between a mortared path and a mortared patio.
Do brick walkways start in a corner?
All brick walkways start their paving in a corner. You’ll want to be sure to lay the base materials in layers and compact one layer before adding the next one. This is especially important if your walkway will be subjected to frequent or hard use, such as the movement of garden equipment.
How do you make a brick walk?
Lay the brick, starting from the perpendicular line, offsetting every row a half brick. Family Handyman Set full bricks at the outer edge of the walk to form a ‘soldier’ row. Leave bricks out that need to be cut and cut them later. Family Handyman Hold a brick in place and mark each edge of the cut with a marker.
How do you sand a concrete walkway?
Install plastic edging around perimeter of walkway to hold the pavers in place. Secure the edging with 12-inch-long spikes. 15. Cover the pavers with ½ inch of sand, and then run the plate compactor over the walkway to drive the sand down into the joints between the pavers. 16. Use a push broom to sweep the excess sand from the walkway.

Follow me on YouTube
- A Complete Guide to Caring for Yuki Cherry Blossom Shrub - January 23, 2025
- Identifying Red Hot Poker Seeds: What to Look For When Harvesting Torch Lily Pods - January 23, 2025
- A Complete Guide to Harvesting Evening Primrose Seeds - January 23, 2025