Garden edging is an easy DIY project that can completely transform the look of your yard and flowerbeds. With a variety of affordable materials like wood, stone and metal to choose from, you can create custom edging that adds aesthetic appeal keeps your plants neatly contained and prevents grass and weeds from invading your garden beds.
From rustic wood log borders to straight-edged steel and modern stacked stone, there are endless possibilities when looking for DIY edging options. Not sure where to start? Here’s an overview of some of the most popular garden edging ideas and materials to help you dress up your landscape.
Wooden Edging Offers A Natural, Rustic Look
Wood is one of the most beautiful and inexpensive ways to edge your flower or vegetable beds. It creates a casual, natural style and is easy to install.
-
Landscape timbers are a popular pick and come in standard sizes usually 8 to 12 feet long and 3 to 5 inches thick. They have a rough-hewn look and can be cut to your desired length. Simply hammer rebar stakes into the ground along your bed perimeter and attach the timbers with outdoor wood screws.
-
Wood boards or planks give a similar rustic vibe. Use 2×4 or 2×6 inch boards, driving the stakes at least 12 to 18 inches into the ground. For a more finished look, go with cedar, redwood or composite decking boards.
-
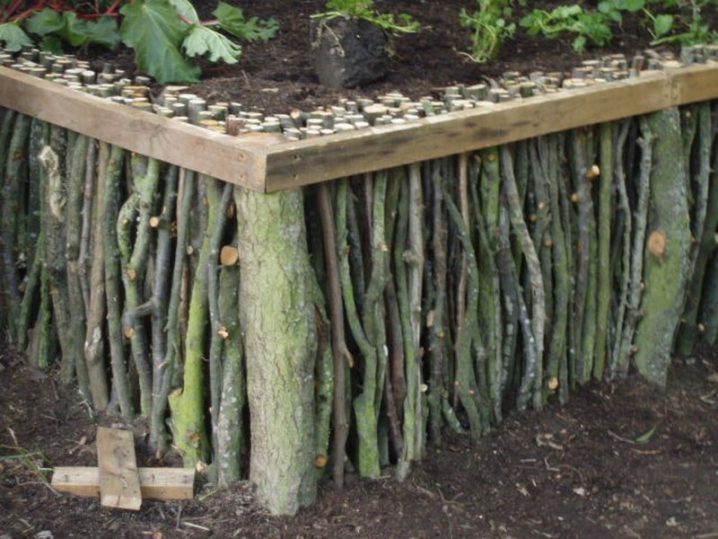
TREE LOGS bring beautiful, organic texture when used as garden edging. Slice cross-section discs to desired thickness for mini borders or go for whole half-logs for a more substantial woodsy border.
-
Branches weaved together add whimsical, natural charm and keep plants where they belong. This works best for ephemeral garden beds that change each season.
Stone & Brick Lend Structure & Permanence
For an edging style with permanence, stack stone and brick make excellent choices with their classic, structured look. Both can be implemented in straight or curved designs.
-
Stacking flagstone and laying it flat or on its edge gives a clean, finished look that lasts. Use a compactible gravel base and mortar between stones for long-lasting results.
-
Weathered boulders create a dramatic border, especially flanking perennials, trees or bushes. Partially bury and stack them for visual interest.
-
Brick borders have a quaint cottage garden vibe. Dig a trench, fill with a gravel base, then lay bricks and backfill. For straight lines, lay bricks end-to-end; for curves, stack bricks.
-
Cobblestone gives beds an antiqued European flair. Use small round stones, setting them closely together with mortar in between to prevent shifting.
Metallic Edging Offers Crisp, Linear Styles
For contemporary gardens, metal edging offers sleek lines and perfect geometric shapes. Opt for aluminum, steel, copper or galvanized metals.
-
Steel lawn edging installs easily for straight lines. Flexible or rigid strips have pre-punched holes for stakes. Use a mallet to pound stakes flush with the edging.
-
Corrugated steel, often galvanized, makes an industrial-chic border. Make neat 90-degree corners or shape into curves. Pounding posts through the corrugation affixes it in place.
-
Aluminum edging has a lightweight flexibility that works for both straight and curved beds. It won’t warp or corrode and is easy to cut to size.
-
Copper strip offers a luxurious touch with its unique color. Hammer to create soft waves or adhere to a rigid backing for sharp lines. Over time, the copper will patina for added charm.
Fun Accents Like Cables, Pipes & Bottles
Everyday items like wire, cable, plastic bottles and tubing can become inventive garden borders with a bit of imagination. Upcycle materials headed for the landfill into trendy accents.
-
Coiled wires or cables, from telephone wire to thick ship cable, add freeform flair. Anchor them in place with metal stakes. Try stringing lights along them for nighttime appeal.
-
Rain chains offer zen-like borders with the pleasant sound of water. Affix cup hooks on the outer side to catch and guide runoff into drain pipes or collection barrels.
-
Plastic bottles filled with colored water or flowers make rainbow garden accents. Cut off the tops and bottoms, then nestle them top-down into the soil along your beds.
-
Flexible tubing or hose can be shaped into wavy, serpentine beds or staked for straight lines. Try clear tubing filled with colored water or gravel for fun.
Give Borders Added Function with Built-In Planters
Take your edging up a notch by integrating built-in planters, transforming your borders into decorative accents that bloom. This edging does double duty keeping plants neat while also letting you add pops of color or trailers.
-
Use wood planks with notches or drill holes for flowers. Try painting them a contrasting color to really make them pop.
-
Stack cinder blocks with openings facing outward for built-in planters. Fill gaps with potting soil and flowers.
-
Line galvanized buckets or tin cans with landscape fabric, fill with soil and edge your beds with charming blooms.
-
Make mini planter boxes by screwing small wood boards onto your edging at intervals. These can hold tiny gardens of succulents, herbs or annuals.
DIY Garden Bed Edging Techniques & Installation Tips
Installing your own DIY edging is a relatively easy weekend project. Follow these tips for success:
-
Layout the shape using a hose or spray paint prior to installing edging for straight lines or smooth curves.
-
Dig a narrow trench 6-12” deep along the layout to accommodate your edging thickness.
-
Add a base layer like gravel, sand or patio base for drainage under stone, block or concrete borders.
-
For freestanding wood or plastic edges, drive stakes at least 8-12” deep and attach edging. Use rebar for very firm ground or wood stakes in softer soil.
-
Backfill behind edging as you go tamping down with a hand tamper or mallet for stability. Grass can be planted right up to the edge.
-
For mortared stone or block, fully prepare, level and compact a trench base first. Mortar each piece for long-lasting results.
-
Consider sprinkler placement and make allowances for pipe openings to pass under edging while maintaining stability.
-
For built-in planters, line with landscape fabric and fill with quality potting mix, not garden soil which can harbor pests and weeds.
DIY garden edging can make a huge visual impact whether you prefer neat, modern lines or an informal, natural look. And it serves practical purposes like protecting your plants, keeping grass at bay, preventing soil erosion and helping to manage water runoff. With so many easy, budget-friendly options, you can get creative to design borders that suit your unique landscape and style. A well-defined garden edge pulls your yard together, gives it a polished look and lets your flowerbeds, plants and garden features really shine.
DIY Garden Bed Edging anybody can do
FAQ
What is the cheapest way to edge your garden?
What can I use instead of garden edging?
What can I use as garden edging?
- How to Grow Gorgeous Climbing Roses on a Wooden Fence - March 24, 2026
- Avoid These Plants When Companion Planting with Oregano - March 24, 2026
- 15 Great Trees to Plant Near Your House - March 24, 2026