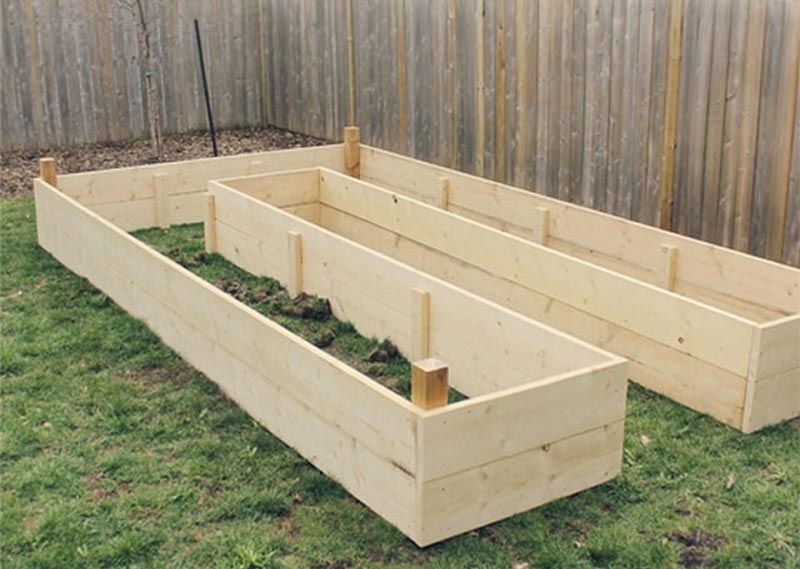
Raised garden beds are a great way to create a contained space for growing vegetables, herbs, and flowers. The U-shape design makes for an efficient use of space while still allowing easy access from all sides. Building your own DIY U-shaped raised bed can be a satisfying weekend project that will provide years of gardening enjoyment.
Benefits of a U-Shaped Raised Bed
There are many advantages to utilizing a U-shaped raised bed in your yard or garden
-
Make efficient use of space – The U-shape maximizes planting area while taking up minimal ground space The center cutout area provides an entry point for accessing the bed.
-
The raised bed makes it easier on the back because you don’t have to bend over or kneel on the ground to plant, weed, or harvest. This reduces back strain.
-
Better drainage – Raised beds allow for superior drainage compared to traditional in-ground gardening The loose, amended soil mix drains faster
-
Warmer soil – The contained soil mass heats up quicker in the spring, allowing for an earlier start to the growing season.
-
Keep pathway clear – The U-shape design leaves the center walkway open for easy access to your plants without compacting the soil.
-
Customized soil mix: If you use a good potting mix to fill your raised bed, you can change the ingredients in the soil to help plants grow best.
Planning Your DIY U-Shaped Raised Garden Bed
When taking on a DIY raised bed project, the planning stage is crucial to make sure you end up with a bed that meets your space requirements and gardening needs. Here are some tips for planning:
-
Size appropriately – Consider how much planting space you need, but keep in mind that 4 feet wide allows easy reach to the center from either side. Length can vary.
-
Sun exposure – Ensure you locate the bed in a spot that will receive at least 6 hours of direct sunlight daily for growing vegetables.
-
Level ground – Choose a level or near-level spot in your yard to make bed construction easier. Avoid steep slopes.
-
Accessible location – Pick a space you can easily access from your house, garage or garden shed for fetching tools and hauling materials.
-
Utilities and obstructions – Check below ground for things like electrical lines, pipes, tree roots, etc. and avoid those areas when placing your bed.
-
Material selection – Redwood and cedar are good rot-resistant natural woods. Treated pine is economical but avoid using near edibles. Synthetic lumber works too.
Tools and Materials Needed
Building a raised bed is a relatively easy woodworking project. Many everyday DIY tools will get the job done. You’ll need:
- Circular or reciprocating saw
- Drill/driver
- Tape measure
- Level
- Shovel
- Scissors (to cut landscaping fabric)
- Stakes & string (for layout)
- Work gloves & safety glasses
For materials, you’ll need:
- Boards for the sides (1×6 or 2×6 wood boards)
- Boards for corner braces (1×2 or 2×4 wood)
- Long screws to attach boards together
- Landscaping fabric to line bottom (prevents weed growth)
- Quality gardening soil mix to fill the bed
- Gravel or mulch for pathways (optional)
Shop for these materials at your local home improvement store. For a 10×4 foot U-shaped bed, you’d need approximately 3 cubic yards of soil mix to fill it.
Step-by-Step Building Instructions
Follow these steps to build your own custom U-shaped raised bed:
Step 1: Layout and Level
- Mark out the shape with stakes and string.
- Check for level in all directions with a 4-foot level.
- Remove any sod or grass inside the area.
Step 2: Assemble Side Boards
- Cut boards to the required lengths.
- Drill pilot holes to prevent splitting.
- Screw boards together at corners to form long sides.
Step 3: Install Corner Braces
- Cut boards for corner braces.
- Position braces diagonally across corner joints.
- Drill pilot holes and screw into place using long screws.
Step 4: Line Bottom with Landscaping Fabric
- Cut fabric to size with scissors allowing for plenty of overlap.
- Lay fabric over level ground inside the frame.
Step 5: Move into Position
- Carefully move the frame into position atop the fabric.
- Check corners for square and level. Adjust if needed.
Step 6: Backfill with Soil
- Shovel gardening soil into the bed within 2-3 inches of top.
- Break up any large clumps as you go.
- Gently tamp down occasionally while filling.
Step 7: Top up Soil & Mulch Paths
- Fill bed to the top with soil.
- Spread gravel or mulch in pathways between beds.
And that’s it! Your DIY U-shaped raised bed is ready for planting. Maintain the shape by periodically checking for level and structural integrity. Enjoy the ease and convenience of raised bed gardening!
Customization Options
Part of the beauty of DIY raised beds is the ability to customize to your space and gardening needs:
-
Size – Adjust length, width, and height as desired. Just allow for at least 18-24 inches of growing depth.
-
Shape – Make multiple rectangular beds, L-shaped beds, or curved bed edges instead of a U-shape if you prefer.
-
Materials – Consider natural stone or masonry blocks for a more permanent raised bed. Or use reclaimed lumber.
-
Finishes – Stain or paint the wood to match your home. Or use naturally rot-resistant cedar or redwood.
-
Soil mix – Experiment with custom soil mixes like mixing compost into the lower layers for added nutrition.
-
Height – For accessibility, keep beds under 36 inches high. Lower heights around 18 inches minimize bending.
-
Covers – Add hoops, arches and covers over the beds to create a mini greenhouse environment.
Tips for Growing in a Raised Bed
Once built, follow these tips to get the most out of your raised bed garden:
-
Enrich the soil annually with 2-3 inches of compost mixed in to feed plants.
-
Rotate vegetable families each year to prevent disease and nutrient deficiencies.
-
Use drip irrigation or soaker hoses to efficiently water your raised bed.
-
Utilize vertical growing with trellises and cages to maximize space.
-
Try interplanting with companion plants that grow symbiotically together.
-
Use row covers, netting and fencing to protect from pests when needed.
-
Weed regularly when plants are young to prevent competition for nutrients and water.
-
Amend native soil if drainage issues arise. Aerate with a fork and top dress with compost.
Building your own U-shaped raised garden bed unlocks the benefits of vertical gardening and efficient use of yard space. Follow the planning and construction steps outlined to create a bed tailored to your gardening vision. Soon you’ll be growing fresh fruits, vegetables, and herbs in your customized U-shaped DIY raised bed.
U Shaped Raised Garden Bed
FAQ
What should I put at the bottom of a raised garden bed?
How do you make a layered raised garden bed?
Can you build a raised bed garden?
Building one is an easy DIY project that you can complete in a day or two. Raised bed garden plans come in all shapes and sizes to fit almost any space, and they can include conveniences like benches, trellises, or cages to support and protect sensitive plants. Follow along as we take a look at some of the best elevated planter box plans available.
What is a U shaped garden bed?
1. U-Shaped Cedar Raised Garden Bed Cedar is known for its natural rot resistance, making it an excellent material for garden bed construction. This U-shaped raised garden bed is an ideal design to maximize your growing space in a smaller area.
What is a good garden bed design?
Try this medium raised wood garden bed design. This is actually more of a planter, but it works well as a small raised bed. If you’re planting annual crops at the end of a growing season, this simple bed might be a hit. Tip: Place your raised bed where the plants in it get the optimal amount of sunlight.
How do I build a raised bed?
Grab a shovel, rake, a 4’ board, and you’re ready to start building. One thing to remember, however, is to consider how much room you have and the herbs you want to plant. Different herbs need varying amounts of space for optimal growth, and some can be quite invasive. Build This Raised Bed Raised Bed with Built-In Benches. source
- How Fast Does Boston Ivy Grow? A Complete Growth Guide - June 9, 2026
- Gravel for Garden Beds: A Functional and Beautiful Option - June 9, 2026
- The Best Mulch for Raised Garden Beds – Pros, Cons, and Tips - June 9, 2026