Orchids are beautiful, exotic plants that can add a touch of elegance to any space As orchids mature, they often outgrow their pots, resulting in reduced blooms and lackluster growth Fortunately, dividing orchid plants is an easy and effective way to encourage new growth and flowering. In this comprehensive guide, we’ll cover everything you need to know about dividing orchid plants successfully.
When to Divide Orchid Plants
The best time to divide an orchid is when new growth begins in the spring after blooming has completed. This ensures the divided sections have time to develop robust root systems before going dormant in winter. Wait until the plant has finished flowering, as dividing can interrupt bud development and prevent flowering that season.
Only divide orchids when they have become overcrowded or to propagate new plants. Healthy, thriving orchids that bloom well do not need to be divided. Signs that your orchid needs dividing include
- Declining blooms and growth
- Roots growing over the edge of the pot
- Congested rhizomes and pseudobulbs
How to Prepare for Dividing Orchids
Proper preparation is key for minimizing stress and ensuring the divided sections thrive after separating an orchid. Follow these tips when getting ready to divide your plant:
- Sterilize cutting tools with rubbing alcohol to prevent disease transmission.
- Water the orchid plant thoroughly 1-2 days before dividing. This plumps up pseudobulbs and roots.
- Remove the orchid from its pot and loosen any circling roots.
- Scout for any disease or pest problems, isolating affected sections if needed.
- Prepare new pots with fresh, sterile potting mix for the divided plants.
Steps for Dividing Orchid Plants
When you’re ready to divide your orchid, follow these steps for the best results:
1. Select Dividing Point
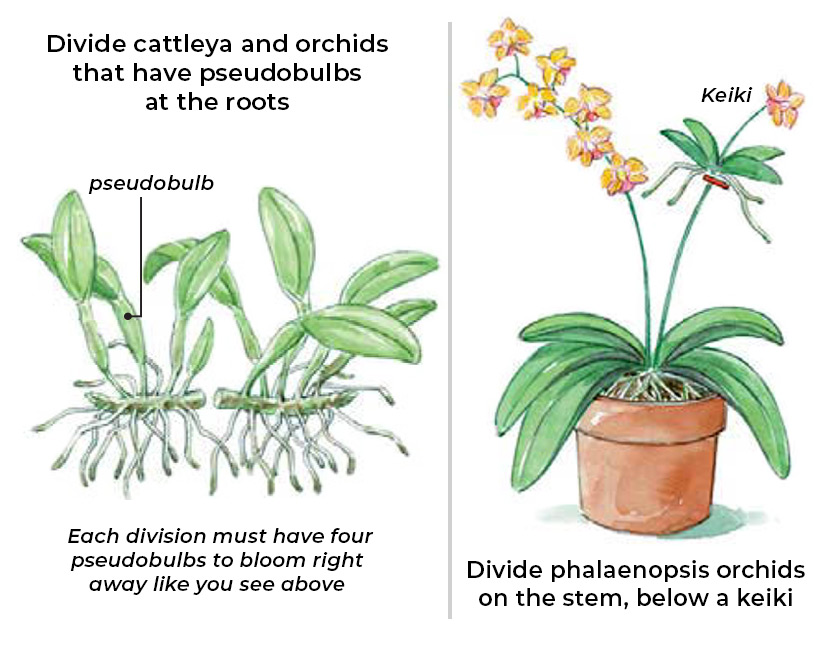
Examine rhizomes and pseudobulbs carefully to choose optimal dividing points. Each new division should have 3-5 pseudobulbs. Avoid cutting through any roots if possible.
2. Sterilize Cutting Tool
Dip cutting tool in rubbing alcohol and wipe clean. This prevents transferring diseases between cut sections
3. Make Decisive Cuts
Make straight, smooth cuts through rhizomes using your sterilized tool. Damage to pseudobulbs or roots creates vulnerability to rot and disease.
4. Prepare New Pots
Fill new pots with sterile orchid potting mix. Choose a potting mix and container suitable for your orchid variety.
5. Transplant Divided Sections
Gently place each divided orchid section in its new pot. Spread roots over surface of potting mix and top with a bit more mix if needed.
6. Water Newly Potted Divisions
Water newly potted orchid sections thoroughly once transplanting is complete. This removes any air pockets in the soil.
7. Provide Care as Usual
Put your divided orchids in their normal growing spot and care for them as you usually would. It may take time for them to bounce back from division stress.
Post-Division Orchid Care Tips
Orchids need some extra TLC after dividing to help them overcome transplant shock. Follow these tips for a smooth recovery:
- Keep the growing environment more humid to prevent pseudobulb dehydration.
- Avoid direct sunlight while new roots establish.
- Only water when mix is almost completely dry to prevent rot in water-storing pseudobulbs.
- Stake pseudobulbs until new roots anchor the plant if needed.
- Apply a dilute fertilizer solution every 2-3 weeks to stimulate new growth.
Monitor your freshly divided orchids closely for signs of distress like wrinkled pseudobulbs or yellowing lower leaves. Increase watering frequency if the divisions show dehydration stress. With attentive care, your orchid divisions will be growing and blooming beautifully again in no time.
Troubleshooting Common Dividing Issues
While dividing orchid plants is a fairly straightforward process, issues occasionally arise. Here are some common problems and solutions:
Damaged roots – Prune any crushed or split roots, then dust with cinnamon to prevent rot.
Fungal infections – Isolate affected pseudobulbs and treat fungal infections promptly.
Transplant shock – Increase humidity, reduce light, and limit watering until new roots grow.
No new growth – Increase sunlight exposure, fertilize more frequently, and ensure adequate watering to stimulate growth.
Failure to bloom – Wait at least a year before worrying about lack of reblooming. Focus on building plant health.
With attentive post-division care and swift treatment of any issues, your divided orchids should make strong recoveries. Don’t hesitate to repot stressed or struggling divisions again if needed.
Dividing Orchids to Propagate
One of the top reasons to divide orchid plants is producing new plants. Follow these guidelines when propagating orchids through division:
- Select a healthy parent plant that blooms reliably.
- Make divisions with 4-6 pseudobulbs for the best success rate.
- Pot divisions in small pots to keep roots crowded and stimulated.
- Grow new divisions alongside the parent plant until well established.
Dividing orchids is a rewarding way to expand your collection with robust, mature new plants. Share extras with orchid-loving friends or use as garden gifts.
Enjoy the Benefits of Divided Orchids
Dividing overgrown orchids benefits plants and owners alike. Your orchids will grow better, bloom more spectacularly, and have lower disease risk when not overcrowded. Meanwhile, you’ll get the pleasure of more manageably sized plants and perhaps some extras to gift or sell.
Approach dividing with care and patience for best results. With this complete dividing guide, you have all the information needed for dividing orchids successfully. Before long, your newly divided plants will be thriving and filling your growing space with vibrant blooms.
OrchidWeb – How to divide your orchid plants
FAQ
How do you divide and repot an orchid?
How do you multiply orchids at home?
Where do you cut orchids for rebloom?
How do you divide an orchid plant?
The next step is to divide the roots of the orchid plant. This can be done by using a sharp knife or scissors. To divide the roots, carefully cut the plant in half. Make sure to cut the roots evenly so that each division has a healthy root system.
How to split an orchid plant?
Once the orchid plant has been repotted, you can begin the process of splitting it. To split an orchid plant, you will need: A sharp knife or razor blade. A pair of gloves. A clean work surface. 1. Wear gloves to protect your hands. 2. Place the orchid plant on a clean work surface. 3. Gently remove the orchid plant from its pot. 4.
Should I repot or divide orchids?
When repotting orchids, dividing them can have several benefits. It helps prevent overcrowding in the pot, allowing each plant to receive adequate nutrients and space for growth. Dividing orchids also promotes better air circulation around the roots, reducing the risk of root rot and other diseases.
Should I Divide my orchids?
Since seed propagation is next to impossible in our homes, dividing is the next best thing, at least for some Orchids!
- How to Dig a Garden Bed: A Step-by-Step Guide for Beginners - April 14, 2026
- The Moderate Growth Rate of the Stunning Edith Bogue Magnolia - April 10, 2026
- Cultivating Vibrant Dahlias in Garden Beds – A Complete Growing Guide - April 10, 2026