We recently laid natural stone steps connecting our new pool area to our existing walkway. At first glance, a project like this looks pretty simple. At least, that’s what we thought! That is until we tried to move one of the stones. Each of these things weighs 450 pounds, which made this project one of the hardest ones I’ve ever done. You can do it! I’ll show you how we did it and tell you what you need to know before you start a project like this.
Natural stone steps add elegance and charm to any outdoor space. The earthy textures and organic shapes bring nature’s beauty, while the sturdy construction provides safe passage across slopes or between levels. Learning how to properly lay stone steps takes planning, preparation, and patience, but it’s a DIY project a motivated homeowner can tackle. Follow this step-by-step guide to lay fetching stone steps.
Choose the Right Stone
Many types of natural stone work well for steps, such as:
- Bluestone – Dense and resistant to spalling with a blue-gray hue
- Flagstone – Flat-shaped sandstone or limestone in earthy colors
- Limestone – Dense, durable, and ranging from buff to gray
- Granite – Extremely hard, color varieties include gray, pink, white
- Sandstone – A sedimentary stone with swirled beige-brown colors
- Slate – Thinly layered for a foliated look, black to purple shades
Consider the size of your planned steps, prevailing weather, expected foot traffic, and aesthetic preferences Visit stone suppliers to view options in person. Medium stones around 4-8 inches thick are ideal. Tiny pebbles shift, while massive slabs need heavy equipment to maneuver
Calculate Step Dimensions
An average step height or “rise” is around 6-7 inches. The “run” or horizontal length is usually 12-14 inches. For comfortable use, rise and run should be proportional. Calculate total rise by measuring the vertical height you need to span. Divide by the riser height to get the number of steps required. Next, measure overall horizontal run and divide by number of steps for ideal run length. Adjust tread depth if needed.
Prepare the Base
Laying a proper base prevents settling and instability. Excavate 6-8 inches deep and fill with packed gravel for drainage. Compact gravel, then add a layer of sand. Make sure the area is level. If needed, install perforated drainage pipe behind steps. The first step can sit on compacted soil. Ensure steps tilt slightly forward so water runs off the front.
Set the Bottom Steps
For stability, begin at the bottom and work up. Place the first step atop packed soil. For step two, excavate and add gravel and sand layers to achieve proper rise height. Ensure second step is level and overhangs the first by an inch for water runoff. Continue digging out, compacting gravel and sand to correct heights as you ascend.
Check Step Orientation
As you set each new step, examine the stone’s orientation. Irregular sides and textures should face outward for visual appeal. Create organic looking steps by alternating stones for different shapes and positioning. Granite steps can be sawn for clean edges. For safety, ensure steps are level with no wobbling and tops are smooth.
Fill Gaps
Once all steps are laid, fill gaps between stones Use stone chips or pea gravel for drainage For more stability, sweep sand into cracks then wet the sand. As it dries, it will harden like concrete. Wider gaps can be filled with mortar but allow it to cure before applying weight. Ensure all stones are solidly packed together when finished.
Add Side Support
For added safety and visual appeal, install stone or masonry side walls flanking the steps. Match construction style and materials to the steps. If mortared, let cure fully before use. Consider adding a handrail for additional support if steps are tall or traverse steep slopes. Light fixtures can also enhance visibility and ambiance.
Finishing Touches
Finally, complete your stone steps with decorative accents and surrounding landscaping to complement the earthy staircase. Consider these pretty finishing touches:
- Add containers, sculptures or decorative rocks around steps
- Use stone walls, trellises, or short fencing to frame the area
- Plant low-growing, walkable greenery around the steps
- Fill crevices between steps with moss or low-growing ground cover
- Add lighting for visibility and ambiance at night
Tips for Successful Stone Steps
Follow these tips and tricks for beautiful, sturdy stone steps:
- Choose stone thickness appropriate for the step’s rise height
- Ensure adequate drainage with base gravel and/or drainage pipes
- Allow new mortar to fully cure before walking on steps
- Keep steps clear of debris, plants, and other hazards
- Use stone sealer periodically to prevent staining and damage
- Check steps annually for shifting or settled stones and repair promptly
- Consider adding traction tape or rails for safety in snow or rain
- Ensure steps have even rises and runs for comfort and accessibility
With smart planning, quality materials, and proper construction techniques, you can create gorgeous natural stone steps to gracefully navigate the slopes on your property. Take your time, do the prep work, and don’t skip steps. Your new stone staircase will quickly become a treasured garden focal point. Happy building!
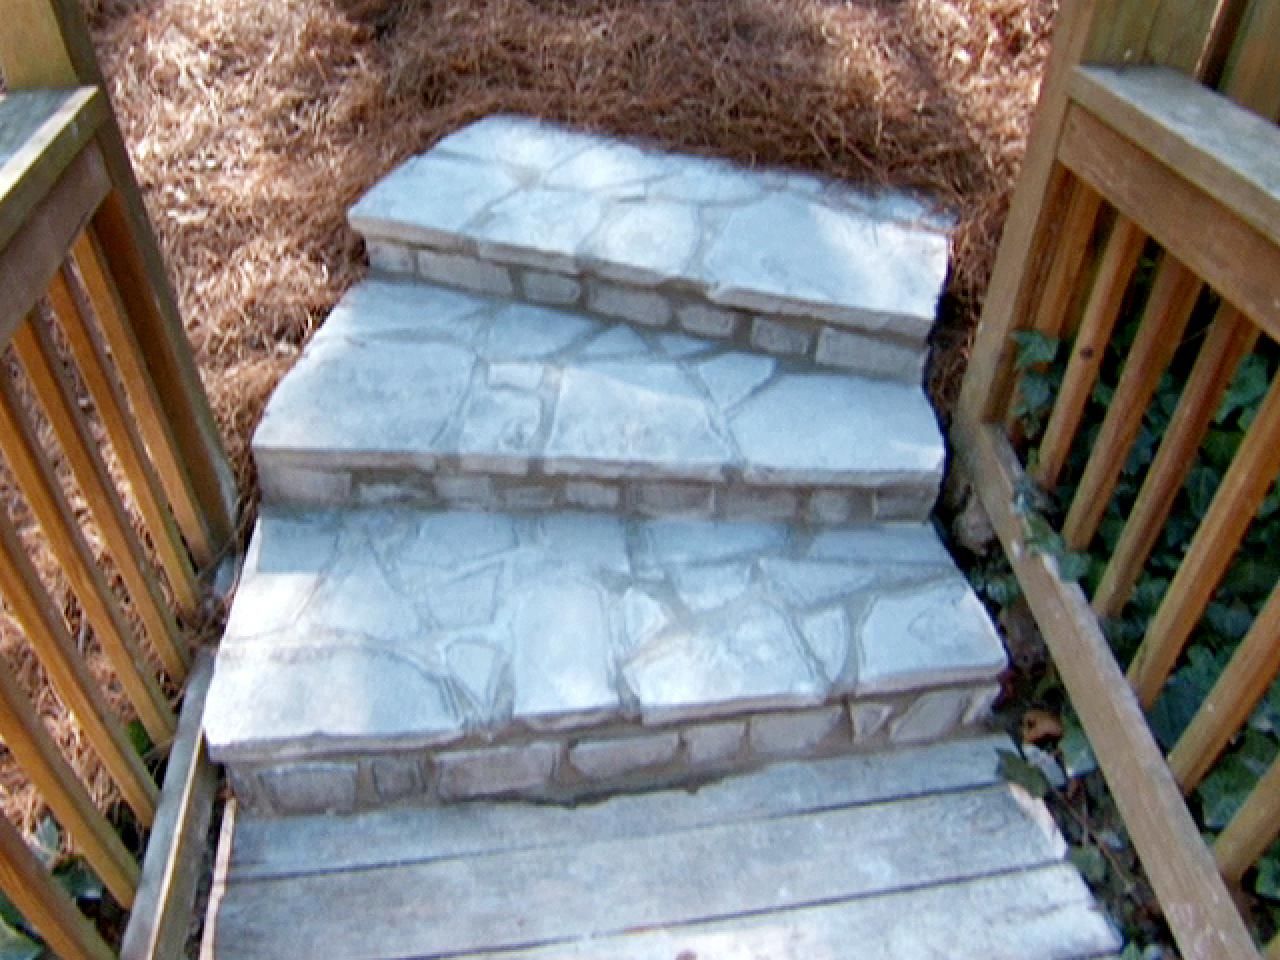
Step 1: Measure Your Space
Do some measuring to find out what size and number of stones you need for your natural stone steps before you buy them. Our measurements were as follows:
- 5′ 7″ from the sidewalk to the pool decking
- It is 4 feet 7 inches from the house to the edge of the pool deck.
- 20″ in elevation from the pool decking to the sidewalk
Typically these types of solid stone steps come in 2 lengths: 3ft and 4ft. We quickly ruled out the 4′ stones because we knew we would have to move them by hand. The 3′ stones, on the other hand, would be much easier to handle. They would also fit better in the space and allow room against the house for some small plants.
Because the stone steps are only 1′ 6″ in length, we needed 4 of them. Each step is 7 inches high, but we only needed all of them to add up to 20 inches. This required a little figuring. But in the end we were able to find one stone that was only 5 1/2″ thick. This meant that the first step had to be in the ground and level with the pool deck, and the last step had to end just below the sidewalk. That was fine with us. We definitely didn’t want it to come up above the sidewalk.
Keep in mind that if you want your solid stone steps to look great, you will have to plan them out a lot before they are built or have them cut to order, which will take a long time.
Step 2: Dig Area for Natural Stone Steps
Before you place your first stone step, you’ll want to make sure the ground is level. I used a shovel to dig out the area where I would be placing the stone. The stone was about as high as I dug it, and I tried to get it as level as I could.

Once I had it pretty close, I used a tape measure to make sure the stone would fit. To give yourself some room, it’s best to make the space a few inches bigger than the stone.

Then I used a shovel to spread gravel out evenly over the area and used a level to make sure it was level.
Natural Stone Steps Time-lapse Installation
FAQ
What is the base for stone steps?
What is the best way to lay stepping stones?
How do you adhere stone steps?
How do you lay a stepping stone on a slope?
Place the first step: Position the first stone step at the bottom of the slope, ensuring it is level both side to side and front to back. Use a level and a rubber mallet or hammer to adjust the stone as needed. Level and stabilize: As you proceed with laying each stepping stone, ensure that it is level and stable.
How do you build stone steps?
To build stone steps, start by making a plan that includes the number of steps, required tools, timeframe, design, and layout. Choose the type of stone for the steps, such as flagstones, limestone, or creek rock. Measure the height and depth of the stairs for safe and comfortable steps.
How do you lay steps on a slope?
Some tips for laying your steps: Start the first step just before the slope begins. Overlap each stone by at least 1”. You can use stone chips to shim your steps close to level. End your steps just below the top of the slope for a nice, smooth transition. It’s a surprisingly easy and forgiving project.
How do you lay a foundation step on a stone step?
You also need to make sure that the ground is leveled before laying gravel. You can prevent water clogging on your stone steps by sloping the gravel downwards away from your front door. Ensure that your gravel is at least 2 inches thick before you lay down your foundation step on top of it.
- How to Grow Gorgeous Climbing Roses on a Wooden Fence - March 24, 2026
- Avoid These Plants When Companion Planting with Oregano - March 24, 2026
- 15 Great Trees to Plant Near Your House - March 24, 2026