You’ve built or purchased the perfect raised garden bed – now it’s time to fill it up! Proper soil layering creates an ideal environment for your plants’ roots to thrive. Follow these simple steps to layer your raised bed for optimal drainage nutrients and moisture retention.
Why Layering is Crucial for Raised Beds
Unlike in-ground gardening, you have full control over the soil composition in a raised bed. This allows you to create the ideal layered “cake” for healthy plant growth. Here’s why it matters:
-
Drainage – Adding a base layer of gravel, pebbles or woodchips improves drainage so roots don’t get waterlogged.
-
Nutrients – Layering different soils and amendments creates the perfect nutrient profile for your veggies or flowers.
-
Cost: It’s cheaper to start with regular garden soil or compost on the bottom than to fill the whole bed with premium mix.
-
For weed control, put landscape fabric between the layers to stop weeds from growing in the bed.
-
Customization—Different layers can meet the needs of different plants, such as tomatoes, greens, root crops, and so on.
-
Soil Volume – Layering helps stretch bagged soil and compost to adequately fill the entire bed depth.
Following the layering method outlined below will set up your plants for success!
Step 1: Prepare Your Raised Garden Bed
Before starting any layering, make sure your raised bed structure is firmly in place and ready to be filled. Here are some prep tips:
-
Clear out any debris, stones or grass inside the bed walls. Level the ground evenly.
-
Line the bottom and sides with weed barrier or landscape fabric if desired to prevent weeds. Staple it in place.
-
Install drip irrigation tubes if you’ll be using them. Position evenly spaced across the length of the bed.
-
For existing beds, remove old plant matter and turn over the top few inches of remaining soil. Break up clumps to loosen.
Prepping the framework ahead creates the ideal blank canvas for building up your layered soil cake. Now let’s get layering!
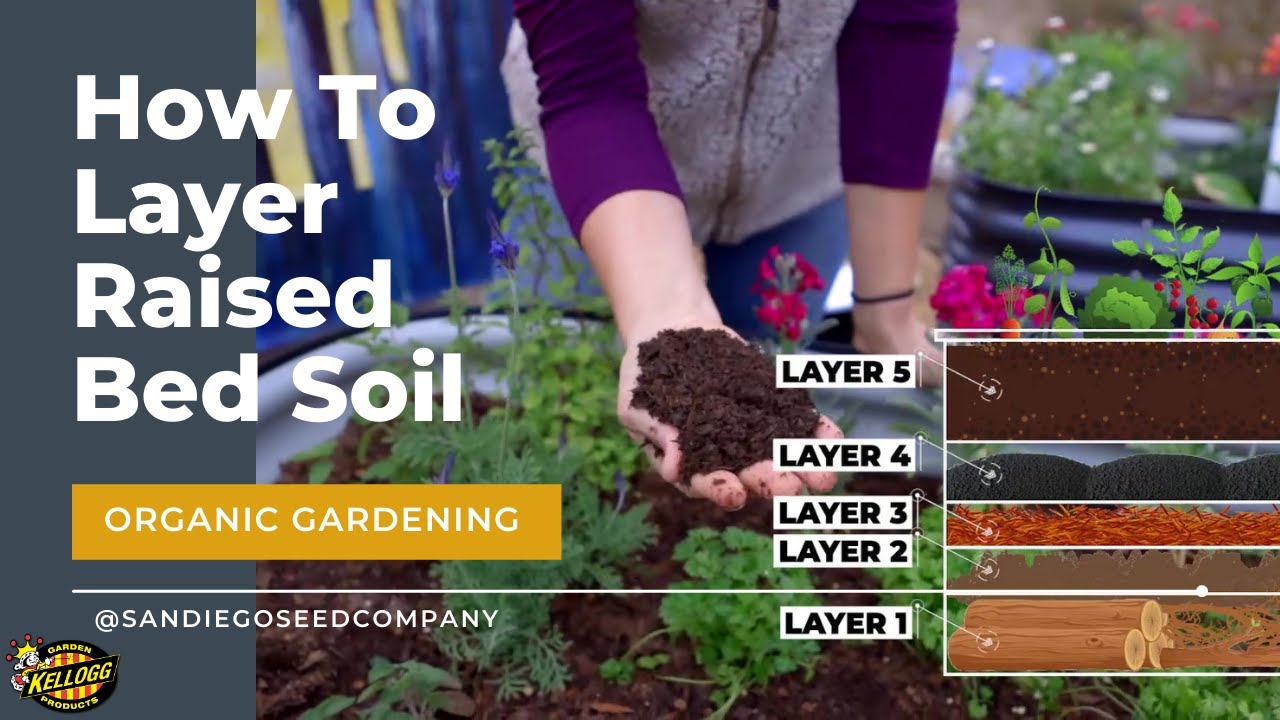
Step 2: Add a Drainage Layer
To start, put down a base layer of gravel, pebbles, wood chips or other coarse material. This will:
-
Allow excess moisture to drain out the bottom, preventing soggy soil.
-
Keep plant roots up out of standing water for healthy oxygen circulation.
-
Discourage weed growth since few can sprout without soil.
-
Deter burrowing pests like gophers from digging up into the bed.
How thick should your drainage layer be? 4 to 6 inches is ideal for most raised beds. Here are suitable materials to use:
- Pea gravel or pebbles
- Crushed rocks or small stones
- Coconut coir chunks
- Wood chips, bark or twig mulch
- Packing peanuts
- Styrofoam chunks
- Broken terracotta or clay pots
- Packing peanuts
This coarse base layer transforms your raised bed into a self-draining container garden. Now it’s ready for soil!
Step 3: Add a Layer of Ordinary Garden Soil
On top of the drainage layer, pour in a 4 to 6 inch layer of ordinary garden soil, topsoil or subsoil. This provides:
-
A cost-effective filler to boost overall soil volume. Bagged soils can be pricey!
-
Important micronutrients from natural mineral content.
-
A moisture-retentive middle layer between drainage base and nutrient-rich upper layers.
-
Great body and loft for healthy root expansion and development.
You can use:
- Existing soil dug up from your yard
- Bags of topsoil or subsoil from a garden center
- Bulk deliveries of loam, sandy or clay soils
Avoid using:
- Pure clay, which is too dense
- Sandy soil alone, which can’t retain moisture
- Unscreened fill dirt with excessive rocks
This foundational soil layer provides excellent mass to fill up the box and retains some moisture too.
Step 4: Add Some Premium Potting Mix
Now for the goods – premium potting mix! On top of your garden soil base, pour in a 4-6 inch layer of quality potting mix or raised bed soil. Options include:
- Organic potting mixes
- Container blends
- Raised bed & palette soils
- Coir or peat based mixes
- Compost and humus blends
Look for mixes labeled for raised beds, vegetables, containers, etc. Avoid heavy clay soils. High-quality mix provides:
-
Improved drainage from peat, perlite, coir or compost.
-
Rich organic matter for fertility and nutrients.
-
Light, fluffy texture for ample oxygen flow to roots.
-
Moisture retention to reduce watering frequency.
-
A clean, weed-free medium for your crops.
This is the highest quality layer where most of your plants’ roots will grow and take up water and nutrients. Use the best blend you can afford here!
Step 5: Water the Soil & Add Some Mulch
Once your layers are in place, water thoroughly until water drains from the bottom drainage holes. This will:
-
Settle the soil so it compacts together for continuity.
-
Allow you to check drainage and ensure no clogging.
-
moisten the layers and eliminate air pockets.
Then spread 1-2 inches of mulch like wood chips, straw or shredded leaves atop the surface. Mulching:
-
Helps retain moisture so you water less frequently.
-
Suppresses weeds from sprouting in the bed.
-
Keeps soil evenly cool and minimizes erosion.
-
Adds organic matter as it decomposes over time.
Your layered raised bed is now ready for planting!
Step 6: Start Planting!
Now the fun part – it’s time to put in your veggies, flowers and herbs! Follow best planting practices:
-
Follow seed packet spacing guidelines for proper intervals.
-
Plant taller crops like tomatoes only on north side to avoid shading.
-
Water transplants well and add a diluted starter fertilizer solution.
-
Consider crop rotation planning if growing multiple seasons.
-
Use grids, rows, or blocks to
Layering Soil in a Raised Garden Bed
How do you layer a raised garden bed?
The simplest way to layer a raised garden bed is to consider the three-layer model. That’s wood and/or newspaper on the bottom, potting soil and/or compost in the middle, and your high-quality soil towards the top. Remember, you only need a thin layer in high-quality soil for the lasagna method – up to 12” is normally adequate.
Can You layer soil in a raised garden bed?
In this video, Birjette, a local organic seed grower from San Diego Seed Company discusses a method of layering soil in a raised garden bed known as Hugelkultur. Watch the full Layering Soil in a Raised Garden Bed video on the Kellogg Garden Youtube Channel. All of your layering materials need to be organic and toxin/petroleum free.
How do you make a raised bed?
On top of the drainage layer, and forming the bulk of the raised bed, comes the ingredients that will make-up the soil in the bed. Here it is wise to use a combination of compost and topsoil. You can mix in some well-rotted manure or leaf mold into the mix to further boost the level of nutrients in the soil.
How do you fill a raised garden bed?
Fill the raised garden bed right to the top, as the soil will settle over time. This will give your plants the most amount of soil possible to grow in and will be massively beneficial, whether you are planning a kitchen garden, vegetable garden or cut flower garden. Topsoil and compost are mixed together to make a rich soil
- How Fast Does Boston Ivy Grow? A Complete Growth Guide - June 9, 2026
- Gravel for Garden Beds: A Functional and Beautiful Option - June 9, 2026
- The Best Mulch for Raised Garden Beds – Pros, Cons, and Tips - June 9, 2026