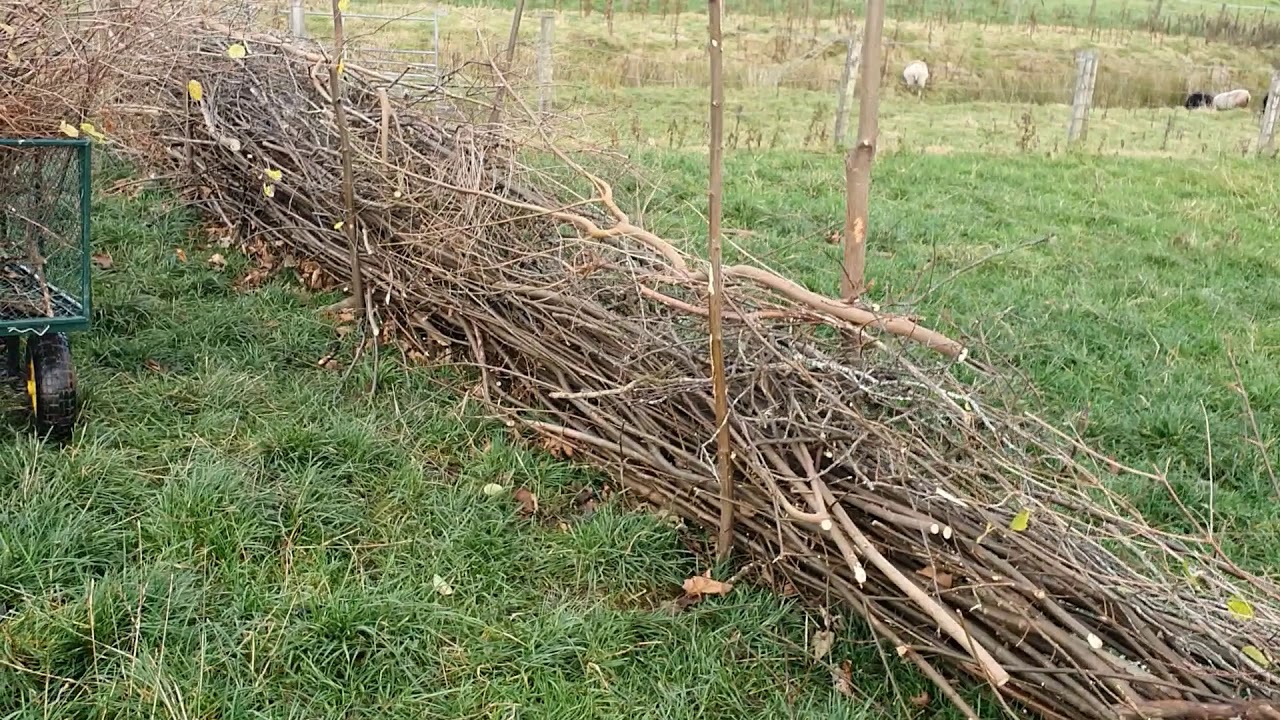
A dead hedge is a unique type of decorative fencing made from gathered branches, twigs, and brush. This rustic garden structure adds natural character to outdoor spaces. Dead hedges provide privacy, define borders, and create cozy spaces for relaxation. Constructing a dead hedge is easy, eco-friendly, and can be done for free using materials found on your own property.
Follow this step-by-step guide to make your own beautiful dead hedge
Choose a Location
- Select an area you want to enclose, divide, or accentuate. Common spots include along a property border, around a seating area, or to frame a planting bed.
- Consider how you will access the space inside the hedge Leave openings for entryways as needed,
- Pick a site with full sun to partial shade. Avoid overly windy locations.
Gather Materials
- The main components are sticks, branches, and brush. Look for straight, sturdy branches for the framework.
- Collect a variety of sizes from thick fallen limbs to thinner sticks and pruned twigs.
- Ideal materials include hazel, willow, birch, and dogwood which bend without snapping.
- Let fresh cut branches cure for 1-2 weeks before use.
- Amount needed depends on hedge length and thickness, but gather way more than you think.
Install Support Poles
- Mark two parallel lines where the edges of the hedge will be. Space width apart based on desired fullness. 2-4 feet wide is common.
- Along the lines, hammer sturdy posts or stakes into the ground every 2-3 feet. These will anchor the structure.
- Use sharpened branches, bamboo, metal stakes, or landscape timbers sunk 6-12 inches into soil.
Weave the Base Layer
- Begin weaving flexible branches horizontally between the posts in a lattice pattern. This is the base.
- Use the more pliable sticks and rough pruned ends first to make sharp points less prominent.
- Place several base layer branches between each set of posts. Space them 1-2 inches apart.
- Check for gaps and fill them by tucking in more sticks. The goal is a tight, impenetrable wall.
- Make this bottom layer slightly higher than desired finish height to allow for settling.
Add Secondary Layers
- Continue building up by adding sticks vertically or diagonally. Alternate directions as you go.
- Place branches so they overlap each other in a shingle pattern with each layer higher than the previous.
- Interlock pieces like puzzle pieces to create a dense, tightly woven look.
- Fill any remaining gaps by tucking in small twigs, stems, evergreen boughs or vines.
Increase Fullness
- As hedge takes shape, step back periodically to check for thin spots. Target those areas and pack in more branches.
- The top and sides especially need thick dense coverage to prevent peeking through. Keep stuffing in sticks.
- For more stability, drive short posts into the ground behind the hedge and lash longer poles to them.
Shape and Style
- Once the main structure is complete, shape as desired by trimming protruding twigs.
- For a neat, rectangular hedge, define clean vertical sides using branch trimmers.
- Or go for an organic flowing look by leaving ends irregular.
- Add ornamental touches like feathers, vines, flowers or reclaimed wood accents if desired.
Maintain and Improve
- Check periodically, especially after storms, and re-pack any damaged or loosened areas.
- Add fresh material as needed over time to fill gaps and keep thick. Continual tweaking is part of the process.
- Plan to rebuild or refresh with new branches every 2-3 years as the original pieces slowly decompose.
Optional Add-Ons
Consider complementing your dead hedge with these optional embellishments:
- Grow climbing vines like jasmine, honeysuckle, or clematis along the structure for living greenery.
- Incorporate attractive wood panels, bamboo fencing, or trellises for accent.
- Hang twinkling lights, rustic signs, wind chimes or bird houses from branches.
- Plant showy shrubs like lilacs or flowering vines at the base for seasonal color.
- Include arbors, gates or circular focal points using similar natural materials.
Dead Hedge Uses
Put your dead hedge to use in these practical and decorative ways:
- Define and enclose outdoor living spaces like seating areas, hot tub decks, or dining patios.
- Separate zones or hide unsightly views within your landscape.
- Frame newly planted gardens until larger shrubs mature to fill the space.
- Edge a woodland path or wandering gravel walkway.
- Provide backing for freestanding flower boxes, potted plants or trellises.
- Serve as a property line divider, noise barrier, or security screen.
- Create cozy play areas for children and pets when woven into shapes.
Dead Hedge Benefits
Constructing a dead hedge offers numerous advantages:
- Provides free fencing using natural found objects requiring only labor.
- Utilizes fallen branches, storm debris, and yard clippings productively.
- Offers habitat, shelter, and food sources beneficial for wildlife.
- Adds winter interest to the garden when trees are bare.
- Relatively quick and simple weekend project achievable for all skill levels.
- Rustic, eco-friendly look complements many landscape styles including cottage gardens.
- As it slowly decays, the decomposing wood nourishes surrounding soil.
- Temporary structure can be adapted, moved, or rebuilt easily as needs change.
Inspiring Dead Hedge Ideas
Now that you know the basics of building a dead hedge, consider incorporating some of these creative touches:
- Shape the hedge into curves or circles around a fire pit or reading nook.
- Use slender willow branches for a delicate freeform look.
- Mimic classic hedge maze or labyrinth patterns on a smaller scale.
- Add arches or tunnels along sections for whimsical passages.
- Frame focal points like sundials, birdbaths, or garden art within hedge.
- Integrate log rounds or stumps as organic seating elements.
- Accent with reclaimed wood doors, architectural fragments, or old window frames.
- Contrast dark dead wood with bright flowering vines and plantings.
- Illuminate hedge with solar lights or lanterns for added drama and visibility at night.
Maintaining Your Dead Hedge
A little ongoing care will help preserve your dead hedge:
- Routinely check for and remove invasive vines that can smother the structure.
- Spot treat damaged areas immediately before they worsen. Replace broken pieces.
- Pack in fresh sticks as older ones deteriorate to maintain the thickness.
- Trim back vigorous companion vines and plantings as needed.
- Weatherproof accessories like signs or lights to prevent rapid deterioration.
- Mulch around the base to reduce grass and weed growth.
- Monitor for insect pests like termites that can accelerate decay.
Building a Decorative, Durable Dead Hedge
The dead hedge is one of the most budget-friendly, natural, and personalized ways to enhance your garden. With a little effort, you can construct a custom organic fence using free recyclable materials. Get creative with the limitless possibilities. Turn an uninspiring blank space into an inviting retreat. Let your dead hedge become an integral part of your landscape.
Some Facts About How To Build A Dead Hedge Fence:
- Dead hedging is a way to make barriers out of piles of branches and twigs that is good for both people and wildlife. (Source: woodlands. co. uk).
- ✅ Small mammals, birds, and insects can hide in dead hedges, and the hedges also act as a linear eco-pile. (Source: woodlands. co. uk).
- ✠ Dead hedging is often used to get rid of the waste that comes from cutting back trees or clearing land in forests. (Source: woodlands. co. uk).
- ✠ The dead hedges are left with gaps so that deer can use them as paths and so that forest managers and owners can get around. (Source: woodlands. co. uk).
- Different things, like leylandii trunks, posts, and cuttings, can be used to make dead hedges. (Source: woodlands. co. uk).
Tips for Maintaining a Dead Hedge Fence
Maintaining a dead hedge fence is essential for its durability and effectiveness. Here are some recommendations to help you keep your dead hedge fence in excellent condition:
- Checking it often: Check your dead hedge fence often for any signs of damage or weakness. Keep an eye out for broken branches, holes, or other structural issues that could weaken the fence. Address these issues promptly to prevent further damage.
- Trimming and pruning: Cut back any overgrown branches or plants that might grow into the dead hedge fence. This will help the fence keep its shape and keep it from getting out of hand.
- Getting rid of trash: Clean out the fence of any leaves, twigs, or other junk that gets stuck in the gaps. This will keep water from building up or organic matter from piling up, which could attract pests or lead to decay.
- Strengthening: Some branches may come loose or fall off from the fence’s main frame over time. To make these weak spots stronger and keep the fence stable overall, use wooden stakes or other supports.
- To keep pests out, look for signs of their activity, like burrows or nests, in the dead hedge fence. Taking the right steps to keep pests away or under control will help keep the fence in good shape and keep the area healthy for animals and plants.
Remember, proper maintenance is crucial for the longevity and effectiveness of your dead hedge fence. By following these tips, you can keep your fence in good condition for many years.
Fact: Dead hedge fences serve as barriers while also providing habitats for small birds and wildlife. The dead wood gives different species a place to hide, a place to nest, and food, which adds to the area’s biodiversity.
Weaving the Dead Hedge at RavenCroft Garden
How do you make a dead hedge?
To start making your dead hedge you will need some branches for posts. The size of the posts will depend on the size the structure that you want to build. Decide how thick you want your dead hedge to be, and put your posts so that they make the hedges boundaries. Your dead branches and twigs will go in-between the posts.
Do Dead hedges decompose?
The dead hedge will take a while to decompose, as the branches aren’t touching the ground. It provides ideal shelter for insects, small birds and small mammals, plus you can top the hedge with more cuttings when it starts to reduce in bulk. A dead hedge, made from posts and scrubby branches, is an ideal temporary windbreak and wildlife habitat.
What is dead hedging?
A dead hedge is a fence, barrier or garden partition, made from branches, logs, twigs and hedge trimmings. These are woven, or simply placed, between stakes, which have been hammered in to the ground, to keep the structure in place. I have been dead hedging for a few years now. I had a lot of prunnings that I didn’t want to dump.
How to build a dead hedge fence?
To construct a dead hedge fence, the first step is to begin gathering suitable dead wood. Look for intact and sturdy wood, avoiding any signs of decay or infestation. Make sure the wood is free from any hazardous substances. Acquire dead wood of various sizes to create a strong framework.
- How Much Water Do Peonies Need? An Expert Guide to Proper Peony Irrigation - May 28, 2026
- How to Prepare Soil for Hydrangeas – A Comprehensive Guide - May 28, 2026
- How Often Should You Water Raised Garden Beds? - May 26, 2026