It’s easy and fun to divide and move agave plants and other plants that make clone offshoots, or “pups.” With a little work and patience, you can make your gardening budget go further by including them in your garden design. If you don’t have any more room, they also make great gifts!
We’re not talking about cuttings, so you don’t need to use a rooting hormone or worry about whether a cutting will “take” because you’re taking a whole plant from the “mother” plant and moving it to a new spot.
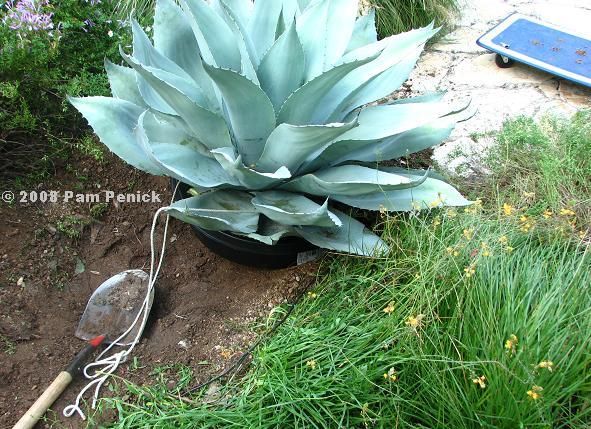
As long as you don’t damage the roots and give it the right soil and just the right amount of water, your newly moved agave should do just fine.
I decided to do a last-minute mini-planting-makeover in a small planting bed left of my home’s entry. I had to quickly get my house ready because it was being switched out for another on a holiday home tour.
Tall, tired plants were taking over the plantings on the left side of my front walk, so I got rid of them all but a palm tree that grew there on its own and some smaller agaves that I put there years ago. (Which were not meant to be a permanent location, but here they are 8 years later!).
One of my favorites, Agave salmiana ‘Ferox,’ was the plant I chose to go in front of my arched window because it was big and beautiful. Their large size and graceful, urn-shaped form make them a stand-out in any landscape. Ferox is Latin for ferocious, and this agave lives up to its name.
The only problem? December ‘tis not the season to be buying landscape plants, even from wholesale nurseries. My wholesaler only had it in a variegated form, which I didn’t want because I already have a bed with variegated Agave americana medio-picta ‘Alba.’
So, I looked all over the Bay Area and found that Cactus Jungle in Berkeley was the only place with one. It was actually Agave salmiana, minus the ‘Ferox’. However, I realized it’s actually the type planted at Cornerstone Gardens in Sonoma, which was my original inspiration. The people at Cactus Jungle told me that it has wider leaves than the Ferox cultivar, which I already think is better.
Stunning display of enormous Agave salmianas with Mexican Feathergrass repeated in rows at Cornerstone Gardens in Sonoma, CA
Being a retail nursery though, the price was quite a bit steeper than I would normally pay. Agaves are slow-growing plants that need a lot of work and time to grow before they can be sold when they’re big, which is why the 10 gallon container cost $185. After hemming and hawing, I decided to bite the bullet.
I always calculate the ROI (return on investment) of larger purchases. Just because I’ve wanted one for years isn’t the only thing that’s on my mind. I also think about the bigger picture. With my design sense, this won’t be a typical landscape when it’s all said and done, designed and installed. Having a plant like this that makes a statement can raise the value of my home, especially if I use landscape lighting to show it off right.
Good design should pay for itself and then some. Along with making something look good and work well, my goal with every design project is to add value. When planning a big project, whether it’s for the inside or the outside, I think you should think about the cost-benefit ratio. This means figuring out where to spend your money to get the most for it. It shouldn’t be the only thing you think about, though. Some parts of a project are there just because they make you happy, which can’t be measured in the same way but is still worth something.
Agave americana var. medio-picta Alba with pups in front of a Canary Island palm. Source | Greenhouse Studio
Some might say that this means it might be better to fund a kitchen project instead of a landscaping project. Maybe, but I think a lot of people can picture themselves remodeling their kitchen and will do a good job of it. As it stands, there are only so many ways to set up a kitchen. You can arrange the appliances, cabinets, and countertops in different ways, and you can choose from different surface and finish materials. All of this is laid out in a flat, usually rectangular box.
But a good landscape? Too often it’s done poorly or is at best, mediocre. Most people can’t handle the many variables in a living system like a garden well. You have to think about things like weather, slope, drainage, sun exposure, and more, in addition to how you arrange the hardscape and vertical elements and then choose the plants.
So, I think a great landscape adds a “wow” factor that other remodeling might or might not, and it can often be done for less money than many home remodeling projects. Therefore, potentially, a better ROI.
Overall, I want to stress that the agave can pay for itself, but not next season because they grow slowly and will need years to reach their full size.
However, this agave came with several pups which I’ll use a in other places in my landscape design. This offsets the cost of a few other plants I would otherwise have purchased from the wholesale nursery.
Agave salmiana “mother plant” is planted at upper left by the entry steps. Other locations for using the divided and transplanted agave pups are circled on the bottom half of plan.
When I realized I had these pups, I chose to use them instead of other plants that were on my home’s planting plan (see above).
With their sculptural shapes and spiky leaves, agaves make striking additions to drought-tolerant gardens. Even better, mature agaves often produce clones or “pups” around their base. Transplanting these pups to use elsewhere in your landscape or share with others is an easy, rewarding task. Follow this step-by-step guide to successfully transplant agave pups.
Why Transplant Agave Pups
Before diving in, let’s review the benefits of transplanting agave pups:
-
Save money – Producing free plants offsets the cost of purchasing mature agaves from a nursery
-
Fill your garden – Use the pups to repeat agaves in your beds and borders for design cohesion.
-
Share the wealth – Give agave pups to gardening friends and family to spread the enjoyment.
-
Prevent overcrowding – Transplant pups to keep the mother plant healthy and prevent competition.
-
Watch them grow – See your new agaves mature over time since you started them early on.
-
Gain confidence – Propagating plants boosts gardening knowledge and skills.
With so many upsides, transplanting agave pups is a gratifying project for any gardener.
What You’ll Need
Here’s a checklist of must-have supplies:
- Sharp shovel or garden trowel
- Pruners or knife to trim roots
- Gloves for protection from spines
- Well-draining potting soil or cactus mix
- Containers if potting up the pups
Optional handy tools include a tarp to keep clean and spray bottle for watering in newly planted pups.
Step 1: Separate the Agave Pups
Don paw patrol and approach the mother plant. Clear any debris from the base area where pups are emerging. Locate the plumpest pups with the strongest root formation. Thinner or diseased pups won’t transplant well.
Use your shovel or trowel to dig wide around the base of the pup to pop it out while causing minimal damage to the mother plant. Angle your digging tool inward and lever underneath the pup.
Trim any excess roots or the thicker connecting root attaching the pup to the main agave. Pruning shears work well for a clean cut. Extract etiolated or elongated pups growing underneath the soil too.
Step 2: Transplant the Pups
Now your pup is ready to be replanted. For best drainage, use a cactus or succulent potting mix. If planting in the ground, dig a hole twice as wide as the pup and backfill with a mix of one-part cactus soil to one-part native soil.
Set the pup’s base higher than the surrounding soil level. This prevents crown rot. Water in well to remove air pockets. Container plants should also drain well to avoid wet roots.
Give newly planted pups partial shade for a few weeks as they establish. Once roots take hold, agaves tolerate full sun like a champ.
Step 3: Water Newly Planted Agaves
Here’s a watering guide to get transplanted pups off to a healthy start:
In ground: Water sparingly the first year. Once established, agaves may only need rainwater depending on your climate.
Containers: Allow soil to dry between waterings. Check weekly and irrigate only when the potting mix is partly dried out.
Adjust frequency based on age, season, and environment. Mature agaves need less water than establishing pups. Avoid frequent deep soaking since agaves detest wet feet.
Special Care for Elongated Pups
You may find odd, elongated agave pups growing beneath the soil. Don’t discard these etiolated pups lacking chlorophyll. They stretch searching for sunlight.
Plant them normally in well-draining soil, allowing the top to sit higher. New compact growth will emerge as the pup adjusts to sunlight. Just have patience as it acclimates.
Creative Uses for Agave Pups
Once your transplanted pups settle in, here are fun ways to show them off:
-
Accent patio containers with contrasting colors and textures.
-
Cluster several matching agaves in a gravel garden for bold impact.
-
Combine agave varieties for mixed succulent displays.
-
Let one make a statement as a standalone specimen.
-
Use as living sculptures in minimalist, contemporary spaces.
-
Contrast dark green varieties against silver-blue rosettes.
-
Plant around boulders and rock groupings.
Troubleshooting Transplanting Issues
Follow these tips to sidestep potential pitfalls:
-
Handle agaves gently to avoid breaking spines or damaging the central growth point.
-
Allow pups to dry and callous over 3-5 days before planting to prevent rot.
-
Plant in gritty soil and avoid moisture retention for healthy roots.
-
Don’t bury the crown of the agave or overwater to prevent disease.
-
Shelter newly planted pups until established to reduce transplant shock.
With proper care, your transplanted agave pups will flourish, giving years of striking, low-maintenance appeal. Keep an eye out for their own babies in time.
FAQs About Agave Pup Transplanting
Here are answers to commonly asked questions about moving agave pups:
How do you separate agave pups?
Use a shovel to dig around the base, loosening the pup. Prune any large connecting roots then extract carefully to not damage the mother plant.
How long does it take for an agave pup to root?
Left attached to the mother, pups typically take 1-2 years to fully root and be ready for transplanting. Severing the connecting root encourages faster root growth.
When can agave pups be transplanted?
Transplant mature pups in spring as growing season begins. Water well and give them shade for 1-2 weeks until established.
Do you need rooting hormone for agave pups?
No, rooting hormone is not necessary since agave pups already have an intact root system. Just take care not to damage roots when transplanting.
How do you plant an agave pup?
Plant agave pups in fast-draining cactus/succulent mix. Keep the crown above soil level to prevent rot. Water sparingly until roots grow, then reduce watering frequency.
How do I make my transplanted agave grow faster?
Give it full sun, excellent drainage, and occasional light feeding. Trim any dead leaves and avoid overwatering. Be patient, as agaves are naturally slow growers.
Bring the Desert Home
Transplanting agave pups allows you to expand your succulent collection economically. Get hands dirty propagating these sculptural plants for unique, waterwise landscaping. Whether used individually or grouped, their bold forms create striking displays.
Budget landscaping + design repetition
Since agaves and other succulents are more expensive than many other plants, repotting your agave pups is a great way to save money on gardening. You can then use your free agave pups in your own landscaping.
Repetition is a core landscape design principal anyway. We generally don’t want to have just one of a particular plant except where you’re showcasing a large tree or specimen plant.
Repetition creates order to the eye, which humans find naturally pleasing.
You can also give agaves as gifts if you don’t need any more of a certain plant. One year, I gave my coworkers at the landscape architecture firm where I worked pups of my Agave americana var. medio-picta Alba in simple terra-cotta pots wrapped with a burlap bow along with Pete’s Coffee cards.
The grayish-green and creamy white variegated stripes made for a nice, “California green” holiday pot. (Many plants that are native to California or that do well in our mild, dry climate are gray-green instead of green-green.)
SHOP THE LOOK (Six of my favorite Agaves!) Queen Victoria Agave (A. victoriae reginae), Etsy Agave Blue Glow, Etsy Agave Blue Flame, Etsy Artichoke Agave (A. parryi var. truncata), Etsy Agave americana mediopicta Alba Agave salmiana Ferox, Etsy.
[Want more design inspo and helpful plant tips? Lets hang out on Instagram!]
I decided to do a last-minute mini-planting-makeover in a small planting bed left of my home’s entry. I had to quickly get my house ready because it was being switched out for another on a holiday home tour.
Tall, tired plants were taking over the plantings on the left side of my front walk, so I got rid of them all but a palm tree that grew there on its own and some smaller agaves that I put there years ago. (Which were not meant to be a permanent location, but here they are 8 years later!).
I knew I wanted a large, specimen agave in front of my arched window, so I planned for one of my favorites – Agave salmiana ‘Ferox’. Their large size and graceful, urn-shaped form make them a stand-out in any landscape. Ferox is Latin for ferocious, and this agave lives up to its name.
The only problem? December ‘tis not the season to be buying landscape plants, even from wholesale nurseries. My wholesaler only had it in a variegated form, which I didn’t want because I already have a bed with variegated Agave americana medio-picta ‘Alba.’
So after searching around, the only place in the Bay Area that had one was at Cactus Jungle in Berkeley. It was actually Agave salmiana, minus the ‘Ferox’. However, I realized it’s actually the type planted at Cornerstone Gardens in Sonoma, which was my original inspiration. I was told by Cactus Jungle that it has a broader leaf than the Ferox cultivar, which I consider to be more desirable anyway.

Stunning display of enormous Agave salmianas with Mexican Feathergrass repeated in rows at Cornerstone Gardens in Sonoma, CA
Being a retail nursery though, the price was quite a bit steeper than I would normally pay. Agaves are slow-growing plants that need a lot of work and time to grow before they can be sold when they’re big, which is why the 10 gallon container cost $185. After hemming and hawing, I decided to bite the bullet.
I always calculate the ROI (return on investment) of larger purchases. Just because I’ve wanted one for years isn’t the only thing that’s on my mind. I also think about the bigger picture. With my design sense, this won’t be a typical landscape when it’s all said and done, designed and installed. Having a plant like this that makes a statement can raise the value of my home, especially if I use landscape lighting to show it off right.
Good design should pay for itself and then some. Along with making something look good and work well, my goal with every design project is to add value. When planning a big project, whether it’s for the inside or the outside, I think you should think about the cost-benefit ratio. This means figuring out where to spend your money to get the most for it. It shouldn’t be the only thing you think about, though. Some parts of a project are there just because they make you happy, which can’t be measured in the same way but is still worth something.
Agave americana var. medio-picta Alba with pups in front of a Canary Island palm. Source | Greenhouse Studio
Some might say that this means it might be better to fund a kitchen project instead of a landscaping project. Maybe, but I think a lot of people can picture themselves remodeling their kitchen and will do a good job of it. As it stands, there are only so many ways to set up a kitchen. You can arrange the appliances, cabinets, and countertops in different ways, and you can choose from different surface and finish materials. All of this is laid out in a flat, usually rectangular box.
But a good landscape? Too often it’s done poorly or is at best, mediocre. Most people can’t handle the many variables in a living system like a garden well. You have to think about things like weather, slope, drainage, sun exposure, and more, in addition to how you arrange the hardscape and vertical elements and then choose the plants.
So, I think a great landscape adds a “wow” factor that other remodeling might or might not, and it can often be done for less money than many home remodeling projects. Therefore, potentially, a better ROI.
Overall, I want to stress that the agave can pay for itself, but not next season because they grow slowly and will need years to reach their full size.
However, this agave came with several pups which I’ll use a in other places in my landscape design. This offsets the cost of a few other plants I would otherwise have purchased from the wholesale nursery.
Agave salmiana “mother plant” is planted at upper left by the entry steps. Other locations for using the divided and transplanted agave pups are circled on the bottom half of plan.
When I realized I had these pups, I chose to use them instead of other plants that were on my home’s planting plan (see above).
STEP 2 – Transplant the pups into pots or plant in-ground
Now you’re ready to transplant. To make sure your agaves get enough air and drainage, use a cactus/succulent mix or add a lot of pumice, lava rock, horticultural sand, or gravel to your usual soil.
- This succulent mix from Amazon is pre-mixed for you.
I scooped up the extra soil from the container and re-used it in the pots. As a general rule, I wouldn’t suggest doing this because it could spread disease, but the pups came from that soil, so if it did contain disease-causing organisms, they would already be contaminated.
Planting in-ground
- Do not plant in a downed spot where water will collect.
- Make the hole twice as wide as the dog needs it to be. Because most agaves’ roots are spread out and not very deep, width is more important than depth.
- Spread the roots out around the pup and put it in the hole. Then, fill the hole back up with a 1:1 mix of cactus and succulent soil and ground soil.
- Plant the crown high and don’t put anything, not even mulch, on top of it. This is to prevent crown-rot. It will sink a bit in time anyway.

My Agave salmiana mother plant in my front garden. Source | Greenhouse Studio
Planting in a container
- Place the agave pup in the middle of the pot and fill it with a mix of cacti and succulents.
- Keep the plant’s crown high, but firmly press down on the soil around it to keep it stable. Add more soil as needed.

One of the Agave salmiana pups transplanted into a pot with cacti-succulent mix soil. Source | Greenhouse Studio
How to repot an Agave and separate its pups.
- How to Grow Gorgeous Climbing Roses on a Wooden Fence - March 24, 2026
- Avoid These Plants When Companion Planting with Oregano - March 24, 2026
- 15 Great Trees to Plant Near Your House - March 24, 2026