Transplanting pumpkin plants can seem daunting, but with some preparation and care, it can be done successfully. Pumpkins thrive in the right conditions, so setting up an optimal garden location is key. Then, you need to gently dig up and move the plant to its new home. After transplanting, attentive monitoring and care will help ensure your pumpkin plant not only survives, but continues to flourish and produce plenty of pumpkins. Follow this simple guide to transplant your pumpkin plants like a pro.
Select and Prepare the New Garden Plot
The first step is choosing the right spot to transplant your pumpkin plant. Pumpkins prefer nutrient-rich, well-draining soil. Heavy clay soil often retains too much moisture, increasing the risk of diseases. Ideally, amend the soil with compost or other organic matter to improve drainage before planting.
Select a site that will get full sun for most of the day. Pumpkins need at least 8 hours of direct sunlight daily once established. Make sure the area has plenty of space, as pumpkin vines can spread 10 feet or more.
If your new garden already has other plants be mindful of proper spacing. Pumpkins should be planted at least 2-3 feet apart to allow for vine growth. Also avoid planting near incompatible plants like potatoes which can inhibit pumpkin growth.
Remove any weeds, rocks or debris that might impede growth Work the soil to loosen it to a depth of 12-15 inches Rake the plot smooth and create shallow furrows or low mounds down each row to plant into. This allows for proper drainage.
If desired, install vertical supports like fencing or trellising for the vines to climb up. You may also want to spread black plastic mulch over the garden area to suppress weeds, retain moisture and heat up the soil. Just be sure to cut holes where each pumpkin will be transplanted.
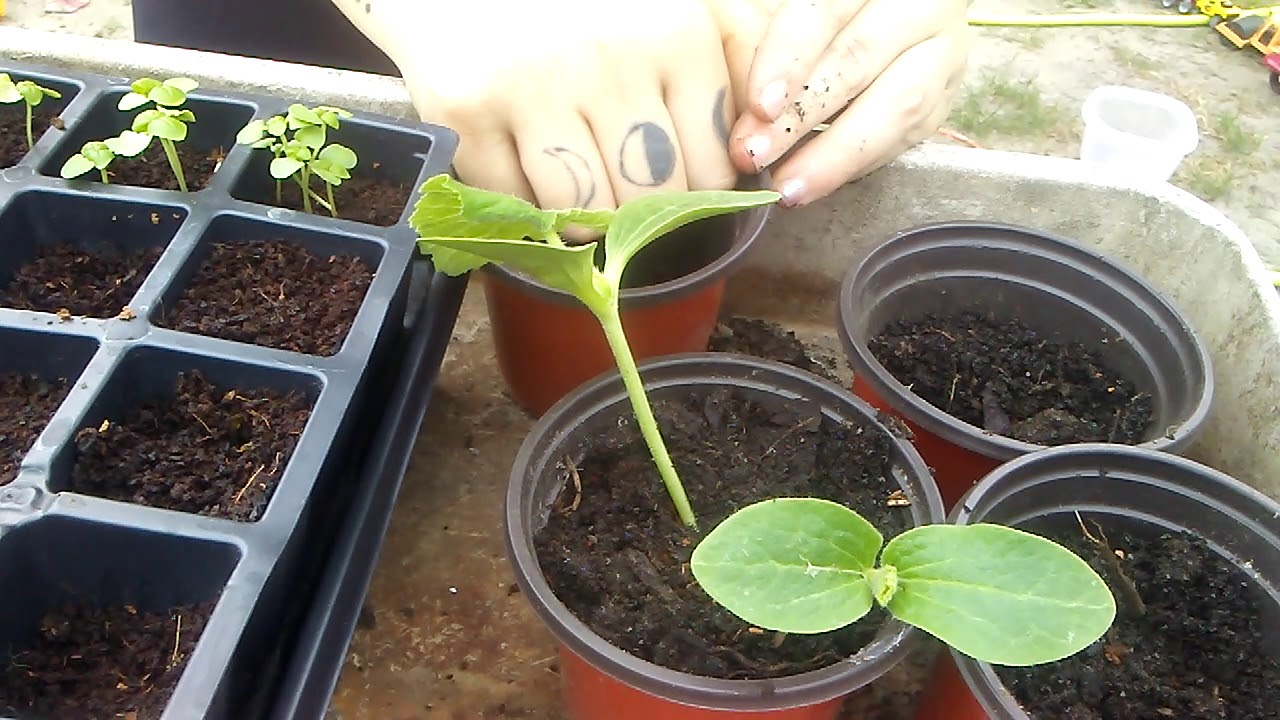
Gently Remove the Plant from its Pot or Garden
When the new garden plot is prepped and ready, it’s time to dig up the pumpkin plant to move it. Water the plant well the day before for easier removal Carefully dig around the outside of the root ball and underneath to loosen the soil.
Slowly lift the entire plant out with the roots and soil intact. Minimal disturbance to the roots is key, so take your time and handle the plant gently. Try to keep as much of the soil around the roots as possible to avoid shocking or damaging the plant.
Inspect the root ball and roots as you remove the plant. Prune off any broken or damaged parts with sterilized pruning shears. This encourages regrowth after transplanting.
You can gently loosen any circling or bound roots to encourage outward spreading in the new location. But be careful not to break healthy roots. Remove any pests like insects or diseases if found.
Place the uprooted pumpkin plant on a tarp or wheelbarrow. Move it to its new garden site right away so the roots don’t dry out. If needed, you can temporarily place it in a bucket of water until ready to replant.
Set the Plant Carefully in the New Location
Now comes the critical step of putting your pumpkin plant in the prepared garden bed. Dig a hole slightly larger than the root ball. Place the plant in the hole, maintaining the same level it was originally planted at. The first set of leaves should sit just above the soil level.
Carefully backfill the hole with soil, pressing gently around the base to stabilize it. Water slowly and thoroughly after planting to remove air pockets and saturate the roots.
If transplanting vining pumpkins, it helps to temporarily stake the plant while new roots establish. Place the stake a few inches from the base on the windward side. Tie the main stem loosely to the stake with soft twine or fabric.
Plant the pumpkin at the same depth it was originally and water thoroughly after backfilling and stabilizing the plant. This saturates the roots and removes air pockets.
Monitor soil moisture levels diligently for the first few weeks after transplanting. Water deeply whenever the top few inches become dry. Avoid overwatering, which can lead to root rot.
Use mulch around the base to retain moisture and reduce weeds. An organic mulch like straw or leaves works well. Just avoid piling mulch against the stem to prevent rotting. A nitrogen fertilizer or compost tea can encourage growth after transplant shock passes.
Monitor the Plant Health Carefully After the Move
Keep a close eye on your pumpkin plant for several weeks after transplanting to ensure it recovers and flourishes. Signs of transplant stress like leaf yellowing, wilting, slowed growth or leaf/flower drop are normal at first. But monitor for ongoing issues indicating a problem.
Make sure the plant gets consistent, deep watering during this adjustment period. Drip irrigation or soaker hoses work well. Look for new leaf and vine growth, indicating the roots have re-established in their new location.
If the existing vine was damaged, trim it above the damaged section to encourage new vines to grow. Monitor for pests or diseases which can attack vulnerable plants. Apply organic treatments promptly if issues develop.
Your transplanted pumpkin may take 2-3 weeks to overcome the shock of moving and resume thriving. Some gardeners recommend transplanting at night to reduce stress. With proper aftercare, the plant should be back on track soon!
From selecting the ideal new site to gently moving and properly replanting your pumpkin, following these basic transplanting tips will give your pumpkin plant its best chance at survival and a bountiful crop. Pay close attention in the weeks after moving the plant. With diligent care and monitoring, you can help your transplanted pumpkin plant flourish and bear loads of fruits in its new garden location.
Reduce the Shock of Transplanting
Care should be taken to not shock the plant at this stage.
Shock to plants can occur from rough handling or more commonly a drastic change in temperature and environment.
This shock can stunt your plants growth, or in the worst case scenario kill the plant.
Cutting your season short forcing you to try and catch up. (this is why backups are important)
When to Transplant Your Giant Pumpkin Seedling?
There are 2 factors to consider when to transplant your giant pumpkin seedling.
- Weather conditions
- Age of seedling
You want your seedling to grow its first true leaf. This allows you to place the seedling into the soil facing in the correct direction.
Looking down on a seedling this first true leaf is the leaf that first forms in the middle.
Remember the vine grows opposite this first true leaf.
If you’re growing pumpkins, here’s what you need to know & a seed giveaway
Can pumpkin plants be transplanted?
Gardening with pumpkins can be a fun and rewarding experience. While the plants are relatively easy to grow, transplanting them can be a bit of a challenge. With the right knowledge and preparation, however, you can successfully transplant your pumpkin plants for a successful harvest.
Can You Grow Pumpkins from seed?
Then simply cure and store them for the holidays. You can grow pumpkins from seed, or from seedlings started indoors before the planting season and sowed into the ground. While you can transplant pumpkin seedlings, pumpkin plants do best when planted directly in the ground. Be sure to wait until the plant soil is 70° or more before sowing seeds.
How do you plant a pumpkin?
Sow pumpkin seeds or set transplants in raised mounds at least 1 foot across. Place a generous amount of aged compost or aged manure into each planting hill before planting. For an extra early harvest, start seeds in peat pots indoors 3 weeks before the last frost for planting out after the last frost. Related articles:
How do you transplant a pumpkin seedling?
To ensure successful transplantation of your pumpkin seedlings, here are some additional tips: Prepare the garden bed by loosening the soil and incorporating organic matter, such as compost or well-rotted manure. Pumpkins prefer well-draining soil with a pH between 6.0 and 7.5.
- How to Grow Gorgeous Climbing Roses on a Wooden Fence - March 24, 2026
- Avoid These Plants When Companion Planting with Oregano - March 24, 2026
- 15 Great Trees to Plant Near Your House - March 24, 2026