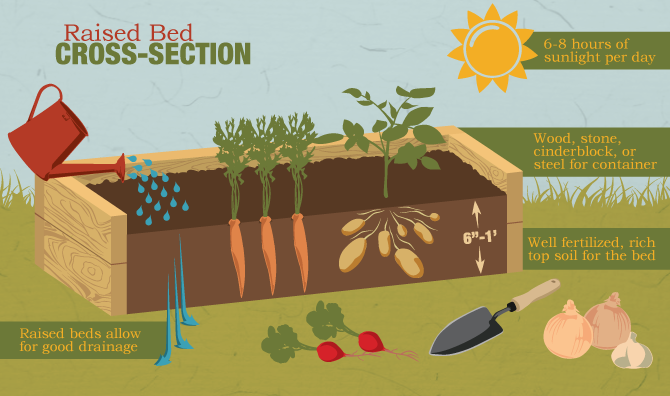
Raised garden beds are a great way to grow vegetables, herbs, and flowers They elevate your plants above the ground, reducing bending for easier maintenance. Raised beds also improve drainage in clay or compacted soils. However, some questions come up when building raised beds – mainly, do they need additional drainage material underneath the soil?
The short answer is it depends. In this complete guide we will look at the pros and cons of adding drainage to raised garden beds and help you decide what’s best for your unique situation.
Why Add Drainage Materials to A Raised Bed?
There are two main reasons you may want to add drainage material like rocks or gravel to the bottom of your raised bed:
1. Improve drainage
Raised beds contain the soil and plants like a big pot or container. In heavy rains, they can become waterlogged if drainage is poor. Adding a layer of gravel, sand, pebbles or other coarse material helps excess moisture percolate out of the soil. This creates a healthier environment for plant roots.
2. Save money on fill materials
Bagged garden soil and compost can get expensive. Drainage materials like gravel cost a fraction of the price. Adding rocks, pebbles, etc to the bottom third or half of the bed saves you money vs filling the entire bed with soil.
When Do Raised Garden Beds Actually Need Extra Drainage Help?
Not every raised bed screams for a gravel layer at the bottom. I used to think I had to add rocks to every single one, but that’s not true. Let’s break it down clearly so you can check your own setup today.
Raised beds that often don’t need extra drainage materials:
- Shallow beds (12–18 inches deep or less). Most vegetable roots stay in the top 12–18 inches anyway, and water drains naturally through the bottom.
- Beds built directly on open ground. Roots can push down into the native soil below, and excess water seeps away naturally.
- Sandy or gravelly sites where the ground already drains fast.
- Beds on a gentle slope or hill.
- Beds where you’ve already loosened and amended the native soil underneath before building.
In these cases, I simply fill the entire bed with quality soil mix and call it done. My first few beds were like this, and they performed beautifully for years.
Raised beds that definitely benefit from extra drainage:
- Taller beds (over 24 inches deep). The extra height means more soil volume, and water can get trapped at the bottom.
- Beds with solid bottoms, like some manufactured metal or wooden designs that sit on concrete, patios, or asphalt.
- Clay-heavy or compacted native soil underneath. Clay particles stick together when wet and block water flow.
- Beds on hard surfaces where water has nowhere to go and can puddle underneath.
- Areas with frequent heavy rain or poor natural runoff.
If your bed falls into the second group, adding a drainage layer or improving the soil mix pays off big time. I’ve converted a couple of my taller beds this way and noticed healthier roots and fewer problems almost immediately.
Here’s a handy quick-reference table I put together based on what works best in practice:
| Bed Depth | Recommended Drainage Layer Depth | Notes |
|---|---|---|
| 6–12 inches | None needed | Fill completely with soil mix |
| 12–18 inches | 3–6 inches | Light layer if on clay or hard surface |
| 18–24 inches | 6–10 inches | Good balance for most veggies |
| 24–30+ inches | 10–15 inches | Essential for tall beds to save soil and improve flow |
Aim for the drainage layer to make up about 30–50% of the total bed depth. This leaves plenty of room for roots while cutting down on expensive soil.
Best Materials for Drainage Layers (And What to Skip)
When we decide to add a layer, the goal is to create spaces for water to move through quickly. Here are my go-to choices:
- Gravel or pea gravel: Small pieces give lots of surface area for water to percolate. I prefer mixed sizes so it doesn’t shift around too much.
- River rock or pebbles: Clean, smooth, and effective. Rinse them well before adding so you don’t introduce dust.
- Crushed concrete or broken bricks: Great recycled option that’s cheap and eco-friendly. Just make sure they’re washed.
- Coarse builder’s sand: Helps water move but can compact over time, so I use it sparingly or mix it in.
I always line the bottom with landscape fabric first. It keeps the soil from mixing down into the rocks while still letting water pass through. Some gardeners skip fabric and mix the layers slightly for better root penetration—both ways work.
Materials I avoid like the plague:
- Wood chips, bark, or any organic matter at the bottom. They break down, collapse, and actually make drainage worse over time.
- Fine play sand. It packs down tight and creates a barrier instead of helping flow.
Step-by-Step: How I Add Drainage to a New or Existing Bed
Here’s exactly how I do it—simple, no fancy tools required.
- Prep the ground: If the bed isn’t built yet, loosen the native soil underneath 6–12 inches deep with a shovel or garden fork. This helps water move even better.
- Line the bottom: Lay landscape fabric across the base. Overlap edges by a few inches.
- Add the drainage material: Pour in your gravel, rocks, or sand. Spread it evenly and gently tamp it down with a hand tamper or the back of a shovel every few inches so it settles firmly but still has air pockets.
- Optional extra barrier: Some folks add another thin layer of fabric or a sprinkle of coarse sand on top of the rocks before soil.
- Fill with soil: Add your prepared soil mix on top. Water it lightly as you go to help it settle without compacting too much.
- Top with mulch: Finish with 2–3 inches of organic mulch (wood chips, straw, or leaves) to hold moisture at the surface and prevent crusting.
The whole process takes me an afternoon, and it makes such a difference. If your bed is already built and struggling, you can carefully lift out some soil, add a drainage layer, and replace it—but it’s easier to plan ahead.
Mastering Your Soil Mix for Built-In Drainage
Even with a drainage layer, the soil itself is the real MVP. I never just scoop dirt from the yard. Instead, I create a custom blend that drains well while holding enough moisture and nutrients.
A solid basic recipe I use often:
- 1 part topsoil
- 1 part compost
- 1 part coconut coir or peat moss
- 1 part perlite or vermiculite
This mix is light, airy, and drains beautifully. For even better results, I sometimes adjust based on what I’m growing:
- Heavy feeders like tomatoes or peppers: Add extra compost for nutrients.
- Root crops like carrots or beets: Mix in more coarse sand for smoother texture.
- Herbs and succulents that hate wet feet: Bump up the perlite or vermiculite for faster drainage.
Perlite is fantastic—it’s lightweight, holds almost no water, and creates tons of air pockets. Vermiculite holds a bit more moisture but still improves flow. Compost feeds the soil life (including earthworms I sometimes add), which naturally aerates everything over time.
I loosen the soil every season with a garden fork or by adding worms. It’s amazing how much better drainage gets after a year or two of healthy soil biology at work.
Picking the Right Location and Bed Design
Location matters almost as much as the bed itself. I always avoid low spots where water pools after rain. Aim for at least 6 hours of sunlight, and if possible, place beds where they get good airflow to help soil dry out between waterings.
Bed material plays a role too. Wood beds are classic but can rot eventually. Metal beds (like the galvanized ones I love) heat up a bit faster and often come with built-in drainage options. Stone or brick beds look gorgeous but can be heavier and hold more heat. Whatever you choose, make sure there are holes or gaps at the bottom if it’s a closed design.
Spotting and Fixing Poor Drainage Problems
Catch issues early and you’ll save your plants. Watch for these signs:
- Water pooling on the surface hours after rain or watering
- Yellowing leaves or stunted growth even with good care
- Foul, sour smell coming from the soil (that’s anaerobic bacteria at work)
- Plants suddenly wilting despite moist soil
If I see any of these, I check moisture with a simple probe or my finger pushed 6 inches down. If it’s still soggy, I improve drainage right away—maybe by adding more perlite to the top layers or installing a perforated drain pipe in extreme cases.
Watering Smarter, Not Harder
Good drainage pairs perfectly with smart watering. I water deeply but less often so roots grow downward. Early morning or evening is best to cut evaporation. I use soaker hoses or drip irrigation whenever possible—they deliver water right to the roots without splashing leaves and spreading disease. A moisture meter is one of my favorite cheap tools; it takes the guesswork out completely.
Busting Common Drainage Myths
I used to believe a few of these myself:
- Myth: You always need rocks at the bottom. Reality: Sometimes they help, but in shallow beds or with great soil, they’re unnecessary and one approach even calls them counterproductive if they create a perched water table.
- Myth: Sandy soil never needs help. Reality: It drains fast but can dry out too quickly and still waterlog if overwatered.
- Myth: Raised beds mean you water less. Reality: They often need more frequent checks because they drain and dry faster than in-ground gardens.
Plant-Specific Drainage Tips
Different plants have different needs. Leafy greens like lettuce tolerate a bit more moisture but still hate sogginess. Root vegetables (carrots, radishes) demand excellent drainage or they fork and split. Herbs like rosemary, sage, and thyme are especially picky—give them extra perlite and they’ll reward you with strong flavor. Tomatoes, peppers, and eggplants do great with balanced drainage layers in taller beds. Even flowers like lavender and marigolds thrive when water moves away fast.
The Cost-Saving and Eco-Friendly Bonus
Adding a drainage layer isn’t just about plant health—it saves money. Good bagged soil is pricey. By filling the bottom third or half with cheap gravel, I cut my soil costs dramatically. It’s also better for the planet: less soil mined and transported, plus I reuse materials like broken bricks from old projects. Over time, healthy drained beds need fewer fertilizers and amendments because plants stay stronger.
Seasonal Maintenance to Keep Drainage Working
Spring: Loosen soil and top-dress with compost. Summer: Mulch thickly and monitor after heavy rains. Fall: Pull spent plants and add a cover crop or more organic matter. Winter: In cold climates, I cover beds with a tarp to prevent compaction from snow or rain.
Every year or two, I refresh the top few inches of soil. It keeps everything draining like new.
7 Beginner Raised Bed Garden Mistakes to Avoid
FAQ
Do raised beds need drainage?
Good soil that drains very well can be quite expensive. But with a proper drainage system, you can even improve the drainage in cheap soil. With the help of a few cheap drainage materials, you can increase the drainage in the soil of your raised beds. Besides, it is easy and economical. Do all the raised beds need drainage?
How do you get good drainage for a raised garden bed?
For raised garden beds, good drainage is enhanced by a mixture of soil, peat moss and perlite in a ratio of 2:1:1 to loosen the soil for easier drainage. For both cases, if soil with poor drainage capacity is used, alternative measures are put in place to fix the drainage issue.
Do garden beds need good drainage?
Garden beds need to have very good drainage. Any garden bed that has poor drainage will encourage soil to retain excess water that causes root rot. Clay soils are the main cause of poor drainage. Their particles are compact and when wet, the soil becomes sticky thus impermeable to water.
How does a garden bed affect drainage?
Soil composition: The type of soil used in the bed can affect drainage. For example, clay soils drain more slowly than sandy soils. Bed construction: The materials and design of the bed can influence drainage. Raised garden beds with adequate drainage holes or gravel at the bottom can improve water flow.
Can I use just compost for drainage?
Compost helps, but it’s not enough alone. Mix it with perlite or sand for best results.
What if I’m in a dry climate?
You still want drainage, but you might lean toward mixes that hold a little more moisture (more vermiculite or coir).
What to put in the bottom of a raised bed for drainage?
This can include compost, or woody material such as logs, dry wood, branches, and leaves. Organic material is the best option, as it improves drainage as well as enriches the soil as it breaks down, and does not need to be removed from your raised beds later on.
- How Fast Does Boston Ivy Grow? A Complete Growth Guide - June 9, 2026
- Gravel for Garden Beds: A Functional and Beautiful Option - June 9, 2026
- The Best Mulch for Raised Garden Beds – Pros, Cons, and Tips - June 9, 2026