Layering materials in raised garden beds is an ingenious method to maximize soil volume while creating a nutrient-rich base for plant roots. Known techniques like Hugelkultur utilize woody base layers that break down over time, while layered topsoils and amendments provide immediate nourishment.
Benefits of layering raised beds:
- Save money on soil costs
- Improve drainage and aeration
- Create thriving environment for microbes
- Retain moisture during dry periods
- Allow plant roots to grow deeply
This comprehensive guide covers key topics for successful layering:
- Reasons to use layering over single-layer methods
- Materials to use for each layer
- Step-by-step instructions for DIY layered beds
- Ongoing care and amendment tips
- Inspiring examples and photos
- Answering common FAQs
Follow along to create nutrient-dense, moisture-retaining raised beds that will boost garden productivity for years to come!
Reasons to Layer Garden Bed Soil?
Filling an entire raised bed with Bagged potting soil or premium organic blends can cost over $100 for a standard 3×8 foot bed. That adds up fast if you want to install multiple raised beds.
By layering different organic materials, you only need to use the more expensive potting mix or soil blend for the top 12-18 inches where most plant roots grow.
The lower layers in the bed provide:
- Gradual nutrient release as the materials break down over time
- A deep root zone for plants to expand into
- Excellent drainage
- Save money on soil volume. Layering lets you fill lower levels with free materials like logs, cardboard, straw – saving your topsoil for just the top 12 inches.
- Improve drainage and prevent soil compaction. Those coarse woody layers create pockets of air while allowing excess moisture to drain away. Healthy roots need that airflow!
- Create a thriving microbial environment. As layers decompose, fungi and beneficial bacteria flourish – just like in nature!
- Retain moisture during dry spells. The organic matter acts like a sponge, releasing water to plant roots.
- Allow plants to develop deep roots to access nutrition.
The layered approach provides an optimal growing environment at a fraction of the cost of filling the entire depth with premium bagged soils.
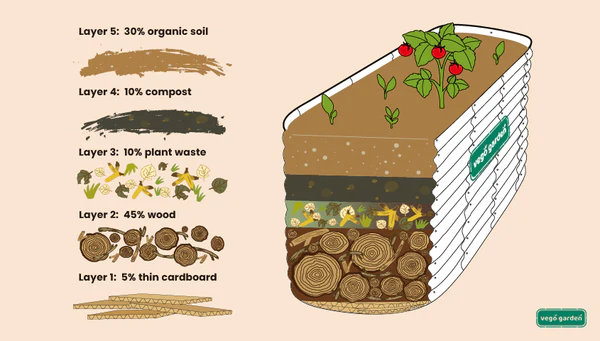
Best Materials for Each Raised Bed Layer
Here are the best options to use when layering different organic materials in your raised garden beds:
Woodsy Base Layers
For the bottom layers, woody materials create that moisture-retaining, pore-filled base:
- Logs – Partially rotten is ideal. Avoid walnut, cherry, or treated woods.
- Branches + twigs – Save pruned limbs or check with local tree companies for discards.
- Wood chips – Get from local arborists or save what you produce at home.
- Straw or pine needles – Available at garden stores; provide aeration.
Middle Layers – Nitrogen and Compost
Next up, nitrogen-rich ingredients to fuel decomposition:
- Manure – Chicken, rabbit, cow, horse – aged 6+ months.
- Grass clippings – Fresh or dried, but pesticide-free.
- Seaweed – Dried or fresh, if you live near coast.
- Compost – Homemade or purchased, boosts microbial life.
- Coffee grounds – Limit to thin layers to prevent matting.
Topsoil Layer
The crowning glory – quality soil for plants’ immediate needs:
- Purchased topsoil – Go for organic blends with compost.
- Homemade compost – Mix with native soil if needed.
- Native soil – Use if loose, rich, and weed-free.
Getting creative with materials you have on hand reduces costs. Check local resources for free or cheap supplies to layer up those raised beds!
Wood materials create a sponge-like water retaining layer. Paper products prevent weed growth from below. The middle layer bridges between the slow-to-decompose bottom layer and nutrient-rich topsoil.
Use the best soil you can afford in the top 12-18 inches where most plant roots actively grow and absorb nutrients.
How to Layer Soil in a Raised Bed
We’ve got our ingredients, now let’s layer that lasagna! Here’s a step-by-step guide to layering your raised garden beds like a pro.
1. Measure Bed Dimensions
Knowing your bed’s length, width, and height is key for calculating materials. Make sure to account for:
- Total volume in cubic feet (length x width x height)
- Depth of each layer
- Leave 5-10 inches of topsoil for plants
Pro tip: Draw up a quick sketch to visualize layers and dimensions!
2. Add Coarse Woody Base
Start by lining the bottom with logs, branches, woodchips. This will:
- Create a moisture-retaining base as it decomposes
- Allow airflow up through the bed
- Form pockets where roots can spread
Aim for 6-12 inches of woody material depending on bed height.
3. Top with Nitrogen Layers
Next up – nitrogen! Add thinner layers of:
- Manure
- Grass clippings
- Compost
- Coffee grounds
These ingredients provide food for vital microbes and fungi to thrive.
4. Include Native or Purchased Soil
Now mix in either:
- Native soil from your yard (if loose and nutrient-rich)
- Purchased topsoil or organic planting mix
This soil will get roots off to a healthy start before they reach the buried woody layers.
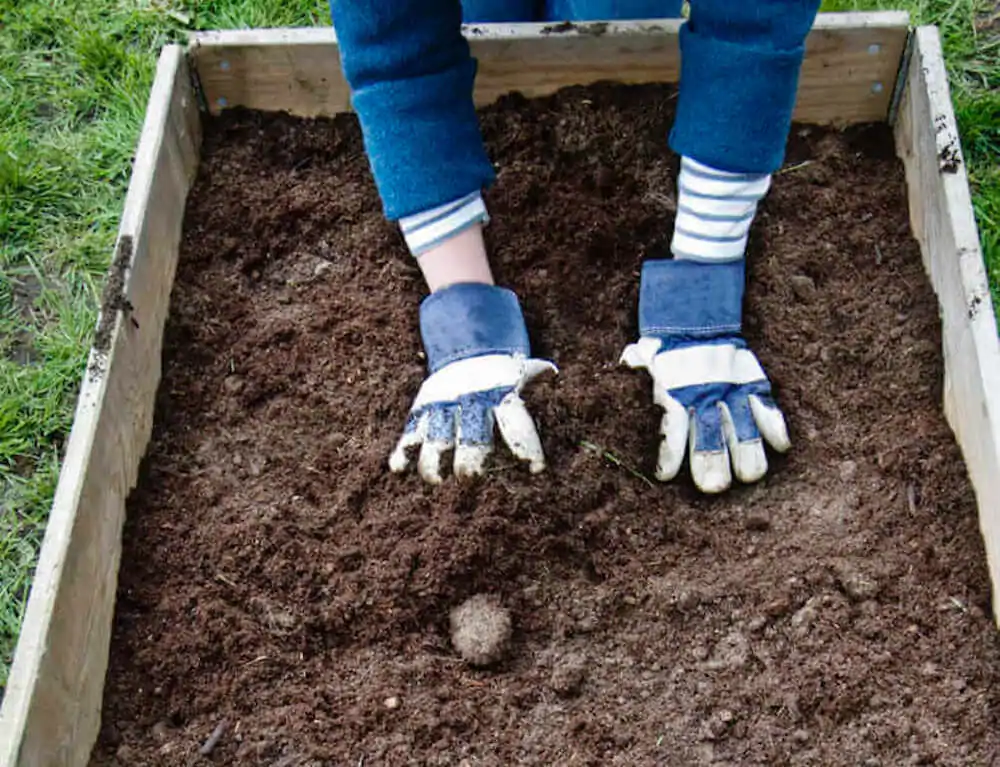
5. Finish with High-Quality Topsoil
The crowning glory! For the top 5-10 inches, use the best soil or compost blend you can get. This is where seeds start and plants continually feed from.
6. Water Between Layers
Moisten each layer as you build to prevent air pockets and help materials settle together.
7. Leave Space for Mulch
Don’t compact soil completely. Leave 3-5 inches to apply protective mulch after planting.
Building layered raised beds takes some upfront effort – but the rewards are well worth it! Pat yourself on the back as you finish stacking those nutrient-rich layers.
It’s that easy to layer different organic materials in your raised garden beds to save money while still providing excellent growing conditions.
Additional Tips for Cost Savings
Hooray, your layered raised bed is ready to grow! Let’s explore how to maximize all those nutritional benefits for happy, thriving plants.
Choosing Appropriate Plants
Match plants to the bed’s sunlight exposure:
- Full sun: Tomatoes, peppers, cucumbers, herbs, lettuce, carrots
- Part sun: Kale, chard, beets, bush beans, broccoli, peas
- Shade: Spinach, arugula, salad greens, radish, strawberries
Consider the roots – deep taproots may hit woody layers sooner. But most plants will happily stretch roots down!
Amending Annually
Replenish layers each season or year:
- Turn over soil with a fork before planting.
- Mix in 1-2 inches of finished compost.
- Add organic slow-release fertilizer.
- Top-dress with fresh compost mid-season.
This keeps nutrients and organic matter at optimal levels!
Troubleshooting Issues
Settling: Add fresh compost or soil as layers decompose.
Dry pockets: Use a rod to penetrate dry areas, then water to saturate.
Weeds: Mulch to block light + hand pull when small.
Pests: Attract beneficial insects and apply organic treatments.
Drainage: Add layers of gravel, sand, or perforated pipe.
Preserving Layers with No-Till
Limit digging that disturbs layers. Instead try:
- No-till practices like sheet mulching
- Raised edges for paths between beds
- Direct seeding and spot composting
- Vertical growing with trellises
Watering, Fertilizing, and Rotating Crops
- Check moisture levels and water when top few inches are dry
- Use liquid organic fertilizers to quickly nourish plants
- Rotate annual crops to replenish nutrients and prevent disease
Maintaining your layered garden is easy with some simple annual care! Just sit back and enjoy the fruits (and veggies) of your labor.
With smart layering and buying, you can create thriving raised bed gardens for a fraction of what it would cost to fill the entire depth with premium bagged soils.
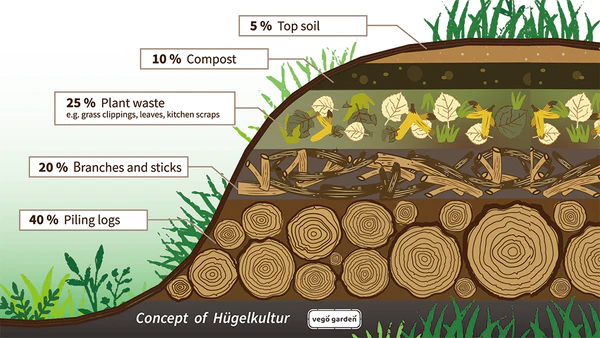
Layering + Hugelkultur = Raised Bed Gardening Success
An excellent variation on layering for raised beds is a method called hugelkultur gardening. Hugelkultur utilizes logs, branches, and other woody materials layered in a mound or trench before installing raised garden bed walls on top.
The key steps when using the hugelkultur approach are:
- Mound or trench logs, branches, brush, and woody materials 2-3 feet high.
- Cover wood layers with nitrogen-rich organic matter – manure, grass clippings, leaves.
- Install raised bed framing directly on top of the layered mound.
- Fill the bed with great potting mix or soil blend as usual.
As the buried wood slowly decomposes over several years, it provides nutrients, retains moisture, and creates air pockets that plant roots penetrate.
Hugelkultur raised beds are essentially self-fertilizing, retain water extremely well, and provide excellent aeration and drainage. The layered logs provide a deep organic sponge for vigorous root growth.
Combining smart layering with hugelkultur techniques results in productive, low-maintenance raised garden beds that can be created on the cheap using available organic resources.
Layering Soil in a Raised Garden Bed Video
FAQ
How many layers should I do?
A good rule of thumb is:
- 1-2 woody base layers
- 2-3 nitrogen/compost layers
- 1 layer purchased or native soil
- 1 layer high-quality topsoil
So aim for 4-6 layers total in most beds.
What are the best materials for each layer?
- Base: Logs, woodchips, straw
- Nitrogen: Manure, grass, coffee grounds
- Soil: Native or purchased loam
- Topsoil: Organic compost blend
How long will layered materials take to decompose?
The woody base takes longest – like 2-5 years. Compost and manure layers break down in <1 year. Topsoil lasts 1-2 years before needing amendment.
Should I layer soil in existing beds?
Absolutely! Just remove some old soil first to make room for fresh layers.
How often should I add new layers?
Plan to Top-dress annually with 1-2 inches of compost or soil. Add thicker layers (4-6 inches) of woody materials and compost every 2-3 years.
Layering does take some work up front, but the payoff is huge for your garden’s health and productivity. Let me know if you have any other questions!
How to layer your raised bed garden?
What do I put on the bottom of a raised garden bed?
How do you prepare soil for raised garden beds?
How deep should soil be in raised garden bed?
- How Fast Does Boston Ivy Grow? A Complete Growth Guide - June 9, 2026
- Gravel for Garden Beds: A Functional and Beautiful Option - June 9, 2026
- The Best Mulch for Raised Garden Beds – Pros, Cons, and Tips - June 9, 2026