After our seeds have germinated, we need to transplant these beautiful seedlings into bigger containers. What we did to keep our plants strong and healthy in our city garden is what I will talk about.
The beauty of seeing your plants grow from seeds is priceless (see indoor seed starting). You know it is time to transplant your seedlings when they grow the second set of true leaves. It should be around the third to fourth week after seed planting. Leaving them in a small space can create damage to the roots. So let’s get started!.
Continuing with our eco-friendly way of thinking, we started using and reusing last year’s containers. We thought that reusing our pots and soil from last year was good enough. Then, we began to see unwanted plant bugs. Where did they come from?.
Since the weather and where you live are different, you may run into problems that have never happened to you before. Now we have to find answers! We looked over our books and videos again and came up with these:
It is important to wash containers well before using them again because they may still have minerals or bacteria from the last year that can hurt your plants. This is how we clean our containers.
Cucumbers are a beloved vegetable to grow for their crisp, refreshing flavor. But getting those seedlings successfully transplanted from starting flats or cells into larger pots can be tricky timing. Move them too soon and the delicate roots may suffer damage. Wait too long and they can become root bound. So when exactly is the right time? Follow this complete guide to transplanting cucumber seedlings for optimal growth and the highest yields.
Seedling Growth Stages
Cucumber seeds typically sprout in 3-10 days when kept warm and moist. The seedlings will progress through three key growth phases:
1. Emergence
-
Hypocotyl stem emerges from seed
-
Seed leaves (cotyledons) unfold.
-
Root system is small and fragile
2. Early True Leaves
-
First 1-2 sets of true leaves establish
-
Stem lengthens between leaves.
-
Taproot extends downward with more side roots.
3. Rapid Growth
-
Multiple leaf sets and branching increases.
-
Stems thicken and can become woody.
-
Large, established root system.
When to Transplant Cucumber Seedlings
Cucumber seedlings are ready for transplanting when they reach the early true leaf stage, usually 2-3 weeks after sowing. Here are the signs mature enough seedlings exhibit:
-
1-2 sets of true leaves beyond the cotyledon leaves
-
Taproot is 1-3 inches long
-
Secondary roots are growing from the taproot
-
Stems have elongated and hardened slightly
-
Leaves are fully unfurled and flat
This stage means roots are developed enough for transplant, but still tender and small enough to avoid damage. Waiting longer risks the taproot becoming too long and thick. It may then resist straightening out in the new container.
Preparing Seedlings for Transplanting
Follow these tips to ensure cucumber seedlings are ready for transplanting:
-
Water seedlings well 1-2 hours before transplanting to hydrate roots and stems.
-
Remove any weak, damaged or crowded seedlings first to give others more space.
-
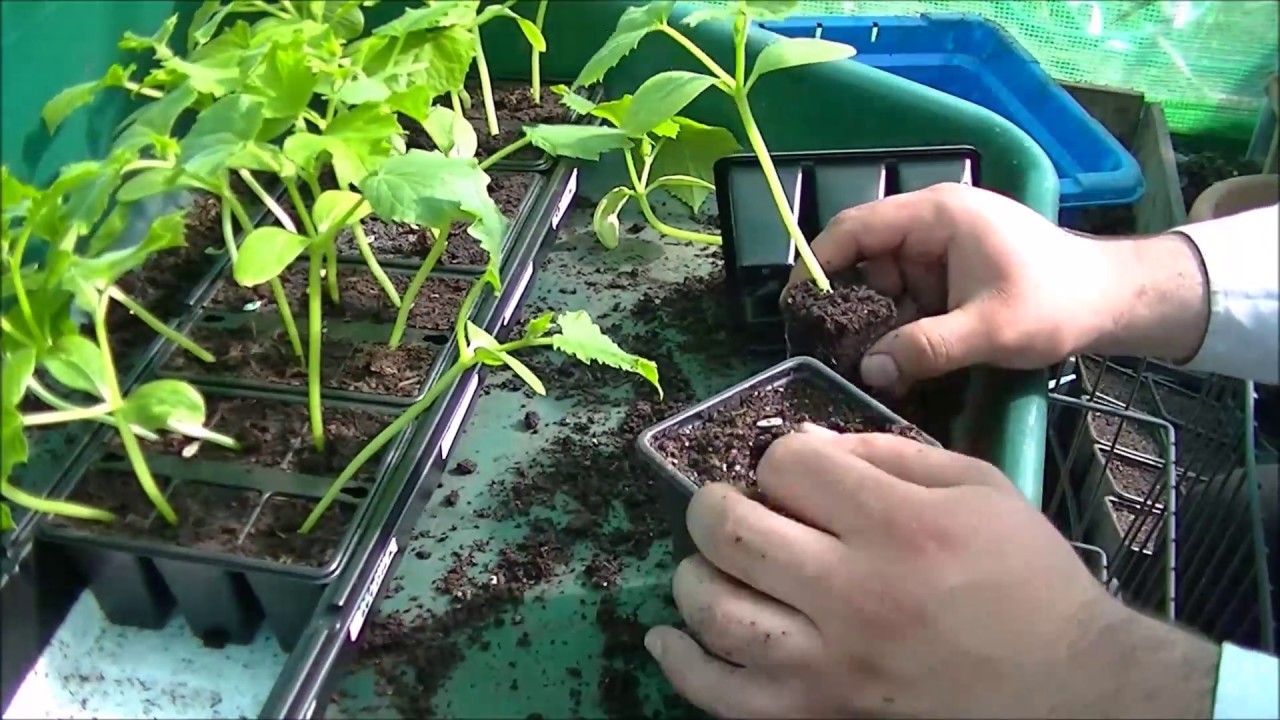
Carefully separate seedlings using a butter knife, spatula or small trowel. Avoid tearing leaves or damaging the taproot.
-
Try to keep some starter mix attached to roots to avoid shocking or drying them out.
-
Gently place seedlings into new pots at the same level they grew in starter cells. The remaining process keeps roots covered.
Selecting the Best Containers
Choosing the right pots or containers for transplanting cucumber seedlings is key. Look for these ideal features:
-
At least 4 inches deep and 6 inches wide. This gives ample room for roots to spread downward.
-
Drainage holes in the bottom to prevent waterlogging.
-
Lightweight plastic, terracotta, wood or breathable fabric materials. Avoid heavy materials that retain moisture.
-
New, sterilized containers to prevent disease transfer from old potting mix or soil.
-
Tapered, cylindrical shapes to gently guide roots down and center the stem.
-
Food-safe and BPA-free if using as final growing pots.
The Best Soil Mix for Transplants
The potting mix used for cucumber transplants should:
-
Be loose, well-draining and nutrient-rich. Dense soil restricts establishing roots.
-
Contain a mix of compost, peat moss or coco coir, perlite and vermiculite. This balances moisture retention and drainage.
-
Have a slightly acidic pH around 6.0-6.5. Cucumbers prefer non-alkaline soil.
-
Be free of weed seeds, pests and diseases. Sterilized commercial mixes avoid these issues.
Moisten the mix before transplanting so it adheres to roots. Avoid dense, water-retaining mix that stays soggy. Test by squeezing a handful – it should crumble apart easily.
How to Transplant Seedlings Step-by-Step
Follow these simple steps for easy, successful cucumber seedling transplant:
-
Fill containers with pre-moistened soil mix to about 1 inch below the rim.
-
Carefully remove a seedling from the starter tray or cell. Handle gently by the leaves, not the stem.
-
Make a hole in the center of the container about 2 inches deep.
-
Place the seedling in the hole at the same soil depth as before, checking the lowest leaves.
-
Backfill soil mix around the stem and taproot to stabilze. Press gently to remove air pockets.
-
Water thoroughly until it drains from the bottom drainage holes. This settles the plant and soil.
-
Repeat with remaining seedlings, spacing containers 3-6 inches apart in a sunny spot.
-
Cover containers with plastic domes or bags to retain humidity for 3-4 days while plants establish.
-
Remove covers once seedlings perk up. Slowly acclimate to lower humidity over a week.
-
Transplant outdoors to the garden once nighttime temperatures stay above 50°F consistently.
With this easy process, your cucumber seedlings will transition smoothly from germination to garden. Just be sure to transplant at the right growth stage for healthiest roots and stems. A little patience goes a long way for robust plants and abundant fruit!
Transplanting from a cardboard egg carton into a bigger container
Because the pot I use for indoor plants is an egg carton made of cardboard, I keep the seedling inside the carton.

The benefit of the egg carton method is that the plant doesn’t have to go through as much stress when it is moved to a bigger pot because it isn’t being taken from where it grew. Better yet, the egg carton is biodegradable and will disintegrate as time goes by.
Materials and tools needed to transplant your seedlings into bigger containers

*This post might have affiliate links, which means I get a small commission from them. It doesn’t cost you anything extra. As an Amazon Associate, I earn from qualifying purchases. See our disclosure policy for more detail.
For moving our seedlings to bigger pots, what else do we need now that our pots are clean and ready?
- Containers: There are different kinds of containers. This post talks about the good and bad things about different types of containers.
- Pebbles (this is optional).
- Mix for pots: Most potting mix on the market already has some nutrients in it for plants.
- Watering can: I have used this for a year. I like that I can add or take off the container’s tip depending on how much water I want to give the plant.
- Added: Worm casting has worked really well for us since we started using it as a soil feed.
Note: When I prepare the soil before transplanting, I add a little manure and worm casting after adding the new potting mix (most potting mixes already have some nutrients in them). Just make sure you don’t add too many nutrients at once. For better results, read the instructions for each product you buy.
How To Grow Cucumbers Part 2 – Replanting
When should cucumber seedlings be transplanted?
The best time to transplant cucumber seedlings is when the soil is warm and the outdoor temperature is consistently above 60 degrees Fahrenheit. In most areas, this is generally a few weeks after the last frost. The soil temperature should be between 55-85 degrees Fahrenheit before transplanting.
How do you transplant a cucumber?
Plant the seedlings: Place each cucumber seedling into a hole in the larger pot, ensuring that the root ball is covered with potting mix. Gently press the potting mix around the base of the seedling to secure it in place. Water thoroughly: After transplanting, water the pots thoroughly to settle the potting mix around the new transplants.
Can I transplant cucumber seedlings into larger pots?
Before transplanting your cucumber seedlings into larger pots, it’s essential to ensure that the pots are prepared and ready to provide the optimal growing environment. Here are some steps to follow when preparing the larger pots:
How do you grow a cucumber in a pot?
Extract the cucumber seedling gently out of the cell tray. Don’t squeeze the stem when pulling it out of the tray. Place the root ball of the seedling in the middle of the pot, and add more soil to a half inch from the edge of the pot. Firm the soil with your fingers to push out air pockets.
- How to Grow Gorgeous Climbing Roses on a Wooden Fence - March 24, 2026
- Avoid These Plants When Companion Planting with Oregano - March 24, 2026
- 15 Great Trees to Plant Near Your House - March 24, 2026