If you’re staring at those hanging wisteria seed pods and wondering how to plant wisteria from seed, I got you covered with every single detail I learned the hard way over years of trying. Wisteria vines are absolute showstoppers with their drooping fragrant blossoms, but lemme tell ya right up front – starting them from seed ain’t quick. Most take 10 to 15 years or more before they bloom, and they might not look exactly like the parent plant. Still, it’s a fun project if you got patience, and I done it myself with my own backyard vines that finally exploded in color after all that waiting.
We’ll jump straight into the most important stuff first: harvesting those pods, scarifying the hard seeds, germinating them proper, and getting seedlings into the ground. I’ll throw in my personal stories, tables, bullet points, and all the tips so you don’t make the same mistakes I did. By the end, you’ll know exactly how to plant wisteria from seed and keep those vines happy for decades. Let’s dig in!
Where Do Wisteria Seeds Come From?
Wisteria seeds form inside hanging seed pods that develop on the vine after flowering ends in spring or early summer. The pods look somewhat like pea pods and can get quite long, up to 6 inches. They will start out soft and green, then dry and turn brown as the seeds mature in late summer or fall.
There are two main types of wisteria – Chinese wisteria (Wisteria sinensis) and Japanese wisteria (Wisteria floribunda). Chinese wisteria pods will contain fuzzy seeds while Japanese wisteria has smooth seeds. Both can be grown from seed.
When to Harvest Wisteria Seed Pods
It’s best to collect wisteria seed pods in fall once they have turned completely brown and brittle. This signifies the seeds are mature. Try to gather them before the pods split open and disperse the seeds. If pods have already opened, you can carefully collect the loose seeds as well.
Look for pods that are undamaged by pests or disease. Avoid any that look moldy or rotted. Take more pods than you think you’ll need since germination rates can be low.
How to Extract and Clean Wisteria Seeds
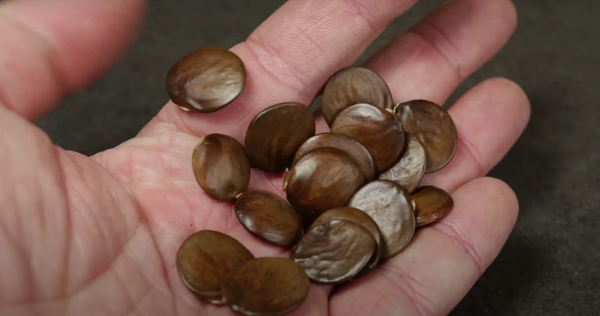
To remove the seeds, twist the pods firmly to split them completely open. Pour out the seeds into a colander or sieve and rinse thoroughly under cool running water. This will wash away the pod debris and pulp coating the seeds.
Spread the clean seeds out on paper towels or screen and allow to dry for 1-2 days. Discard any abnormal looking seeds that are small, shriveled or discolored. Healthy seeds will be plump and firm.
Step One: Harvesting Wisteria Seed Pods – Don’t Wait Too Long or You’ll Lose ‘Em
The whole process kicks off in late summer or fall when your mature wisteria vine drops those pea-like seed pods. I always wait till the pods turn completely brown and get super brittle – that’s when the seeds inside are nice and mature. Chinese wisteria (that’s Wisteria sinensis) gives you fuzzy seeds, while Japanese wisteria (Wisteria floribunda) has smooth ones. Both work great, but Asian types grow more aggressive, so watch out if you’re in a spot where they could spread wild.
Pick the pods before they split open and shoot seeds everywhere. I grab a few extra because germination ain’t 100 percent. Look for undamaged ones, no mold or bug bites. Back when I first tried, I waited too long and half the pods burst – lost a bunch of potential vines that way. Bring ‘em inside to a warm dry spot and let them dry out completely for a few days till they snap easy when you twist ‘em.
Once dry, twist the pods firm to pop ‘em open and shake out the seeds. Rinse the seeds under cool water in a colander to wash off any pod debris or pulp. Spread ‘em on paper towels or a screen and air-dry for 1-2 days. Toss any that look shriveled or weird – only keep the plump, firm ones. I store extras in a sealed container if I ain’t planting right away. Simple as that, and you’re ready for the next big step.
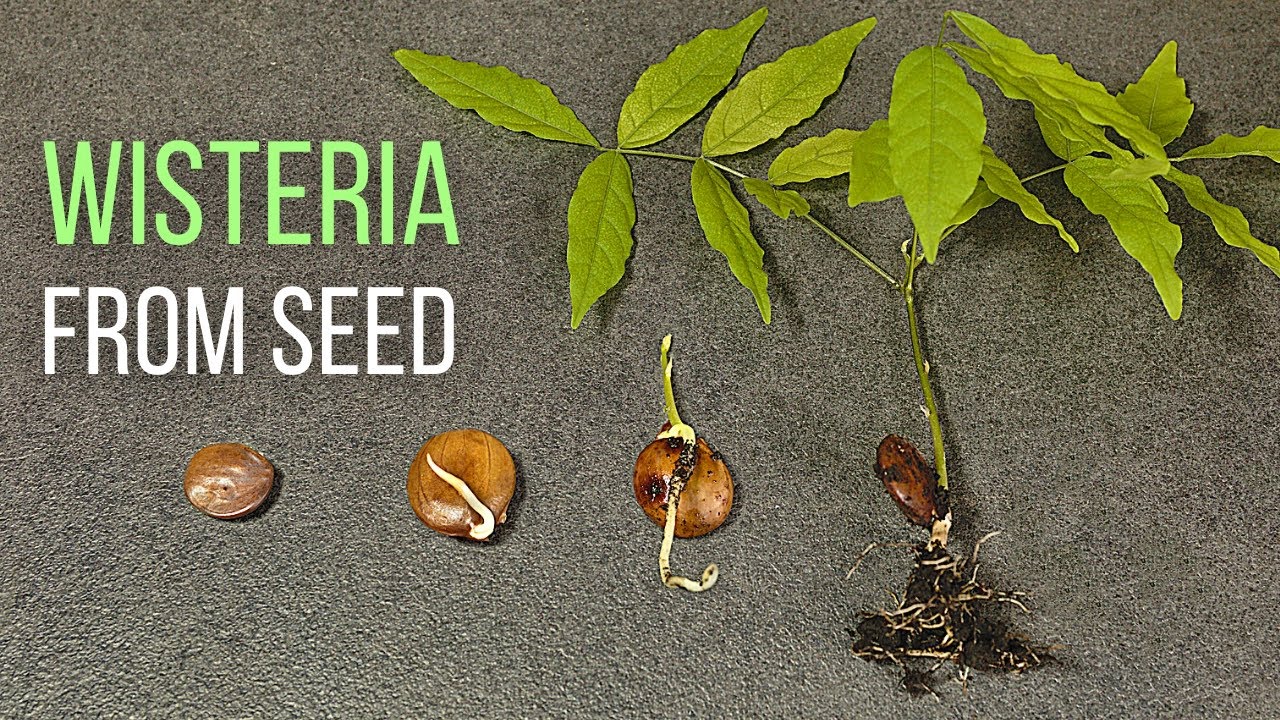
Pre-Treating Those Tough Wisteria Seeds – Scarification Is the Secret I Wish I Knew Sooner
Wisteria seeds got a hard coat that laughs at regular planting. You gotta scarify ‘em or they won’t soak up water and sprout. I use two easy home methods that work every time for me.
First way: the sandpaper trick. Grab fine-grit sandpaper and gently rub the seeds between two sheets. Don’t go crazy – just nick the coat a bit so water can get in. Second way: soaking. I drop the seeds in warm water for 24 hours (or even up to 3 days like I tried once). Change the water halfway through. Either method softens that tough shell perfect.
After scarifying, your seeds are primed and ready. I learned this the messy way – first batch I planted without it sat there doing nothing for months. Scarification bumped my success rate way up, and now I swear by it.
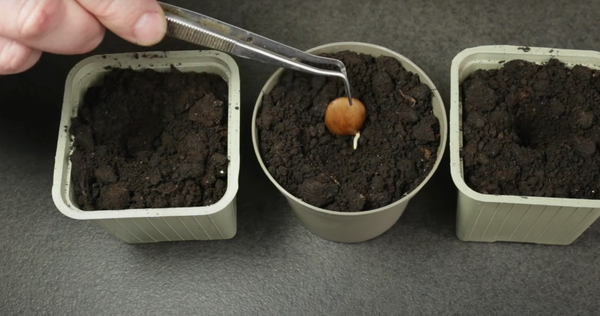
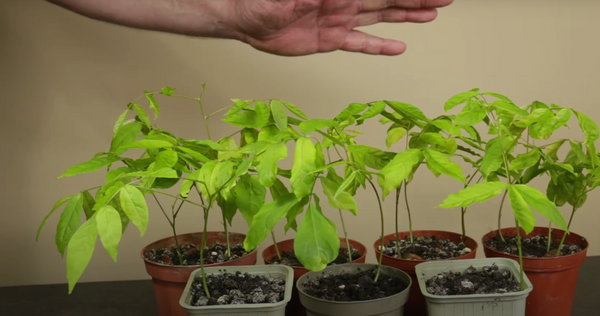
Planting Wisteria Seeds the Right Way – Pots, Soil, and Warmth Make All the Difference
Fill up some sterile starter pots with well-draining sterile seed-starting mix. One pot per seed or maybe two if you’re feeling lucky. I soak the soil first till water runs out the bottom. Plant each seed about 1 inch deep – no deeper or they struggle.
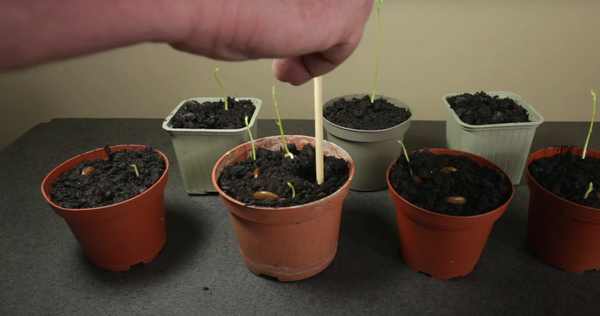
Keep the pots in a spot that stays at least 65 degrees F, ideally 70-75 degrees for faster action. I cover mine with plastic wrap or a clear lid to hold in moisture till sprouts pop up. Water whenever the top of the soil starts drying out, but don’t drown ‘em. Germination usually takes 1 to 2 months, sometimes longer if the temp dips. Be patient here – I checked my pots daily for weeks before seeing those little green shoots.
Once they sprout, remove the cover and give ‘em good light. Grow lights or a sunny windowsill works if you ain’t got a greenhouse. Let the seedlings get to 4-6 inches tall with at least two sets of true leaves before thinking about moving ‘em outside.
Transplanting Your Young Wisteria Seedlings – Pick the Spot Careful or Regret It Later
When spring hits and the last frost is at least 45 days away, it’s time to move those babies outdoors. I choose a spot with full sun for at least six hours a day – wisteria loves that bright light to grow strong. Soil gotta drain well; I mix in some compost if mine feels heavy.
Plant near a strong support like a trellis, fence, arbor, or even a patio overhang. These vines climb fast once established – up to 10-15 feet a year! Space ‘em 10-15 feet apart so they got room to stretch. Dig a hole a bit wider than the pot, set the seedling in at the same depth, and firm the soil around it. Water deep right after planting and keep the area mulched to hold moisture.
I remember my first transplant – I put one too close to the house foundation and the roots got aggressive later. Learned to use root barriers if I plant near buildings now. Wear gloves too, ‘cause some folks react to the sap.
Caring for Your New Wisteria Vines – Water, Prune, and Feed to Build Strong Roots
Young wisteria need consistent care to survive those first years. Water regular, especially during dry spells, but let the soil dry a bit between waterings so roots don’t rot. I mulch thick around the base with bark or compost – keeps weeds down and moisture steady.
Fertilize in early spring with a balanced slow-release plant food. Avoid high-nitrogen stuff or you get tons of leaves and no future flowers. Prune wayward stems as they grow and train the main vines up your support. Remove any root suckers that pop up at the base – they steal energy.
In summer I prune side shoots back to about 6 inches and cut main vines to around 6 feet to encourage branching. Winter protection matters in colder zones – I wrap young vines if temps drop hard. These steps kept my seedlings alive through their slow start.
What to Expect When Growing Wisteria from Seed – The Patience Test I Keep Failing (But Worth It)
Here’s the honest truth I tell every friend who asks: wisteria from seed takes 10 to 15 years or more to bloom the first time. That long juvenility period is why most folks buy cuttings instead. The new plants might not match the parent exactly either. But if you love the experiment, those vines grow fast once established and can become massive beauties.
I started five from seed back in 2012, and only two finally bloomed last spring – gorgeous purple cascades after all that waiting. The others are still building strength but look healthy. It teaches you real gardener patience, that’s for sure.
Common Mistakes I Made Planting Wisteria from Seed (So You Skip the Headache)
I messed up plenty at first. Skipping scarification? Seeds just sat there. Planting too deep? Weak sprouts. Not enough sun? Leggy vines that never took off. Overwatering seedlings? Root rot city. And ignoring the aggressive roots – one vine tried to invade my neighbor’s yard till I dug a barrier.
Here’s a handy table of mistakes versus fixes I use now:
| Mistake I Made | What Happened | My Fix Now |
|---|---|---|
| No scarification | Zero germination | Always sandpaper or soak first |
| Wrong soil or poor drainage | Drowned roots | Use sterile well-draining mix |
| Planting without support | Tangled mess on ground | Trellis or fence right away |
| Too much fertilizer | Leaves only, no future blooms | Balanced slow-release only |
| Transplanting too early | Frost damage | Wait for 4-6 inches and warm weather |
| Ignoring pods splitting | Lost half my seeds | Harvest when fully brittle |
Learn from my errors and your success rate jumps.
Long-Term Care for Wisteria Vines Grown from Seed – Keep ‘Em Blooming for Years
Once your vines hit a few years old, they need ongoing love. Prune twice a year – summer for shape, winter for structure. Fertilize spring only. Water deep during droughts. Watch for pests like aphids or scale; I spray with soapy water early.
Wisteria thrives in USDA zones 4 through 9 depending on variety. Chinese and Japanese types both work, but check your local conditions. They tolerate some shade but flower best in full sun. Train those climbing vines steady and you’ll have a fragrant canopy in time.
I add compost every spring and mulch heavy to keep soil happy. Remove spent flower clusters if any appear early to save energy for bigger shows later.
Why Start Wisteria from Seed Anyway? My Reasons and When to Skip It
It’s fun, cheap, and you get that “I grew this from a pod” pride. Seeds are free if you got a neighbor’s vine. But if you want blooms sooner, cuttings or bought plants are smarter – they flower in 2-6 years instead. I do both now: seeds for the challenge, cuttings for quick beauty.
Wisteria is invasive in some areas, so plant responsible. Roots can damage foundations or pipes if too close. I always use barriers near buildings.
Extra Tips and Tricks I Picked Up Growing Wisteria from Seed
- Start more seeds than you need – I plant double ‘cause some won’t make it.
- Use a propagator or clear cover for humidity during germination.
- Harden off seedlings gradual over 7-10 days before transplant.
- Companion plant with something low to hide bare base while young.
- Keep notes on which pods came from which vine for tracking.
- Protect from deer or rabbits with fencing – they love tender shoots.
- Test soil pH – slightly acidic to neutral works best.
These little things made my wisteria project way more successful.
Seasonal Checklist for Wisteria from Seed – Stay on Track All Year
Fall: Harvest pods, extract and clean seeds, scarify and store or plant. Winter: Check stored seeds, plan supports. Spring: Germinate indoors, transplant seedlings, water new plants. Summer: Train vines, prune, fertilize, watch for pests. Every season: Monitor growth, mulch, and dream about those future blooms.
Following this keeps everything organized and your vines thriving.
My Personal Wisteria Story – From Tiny Seed to Towering Beauty
Back in 2015 I collected my first pods from a friend’s old vine. Followed all the steps – scarified, planted in pots on my sunny porch. Half germinated after 6 weeks. I babied those seedlings through two winters indoors, then planted ‘em out. Today two are climbing my arbor and finally bloomed last year with those drooping fragrant flowers that smell like heaven. The wait felt endless some days, but seeing bees swarm the blossoms? Totally worth every minute of effort.
I expanded to more seeds since, mixing Chinese and Japanese types for variety. My garden looks magical in spring now, all thanks to learning how to plant wisteria from seed the right way.
Pros and Cons of Growing Wisteria from Seed
Pros:
- Super cheap or free if you harvest your own pods
- Fun experiment that teaches patience
- Can end up with unique vines not exactly like the parent
- Satisfying when they finally bloom after years
Cons:
- Takes 10-15+ years for flowers
- Not true to parent plant always
- Aggressive growth needs control
- Lower germination rate without proper scarification
Still, I keep doing it ‘cause the reward hits different.
Wisteria brings such heady fragrance and shade to patios and courtyards. Started from seed, they become your personal legacy in the garden. I prune, train, and care for mine like family now. If you got the space and time, go for it – those graceful blossoms will make you smile every spring once they arrive.
One last thing: always plant wisteria where it can climb strong supports. Give it room, good drainage, and consistent care. Avoid foundations without barriers. With these steps I shared, you’ll have healthy vines growing strong for years.
I could ramble on with more stories about my wisteria adventures, but you got the full picture now. Grab those pods this fall, scarify your seeds, and start your own wisteria journey. Drop a comment if you try it – I love swapping tips with other patient gardeners. Your future fragrant arbor is waiting! Happy planting, friends.
How to grow Wisteria from seed
FAQ
How long does wisteria take to grow from seed?
Should I soak wisteria seeds before planting?
Where should you not plant wisteria?
How to grow wisteria from seed in pots?

Follow me on YouTube
- How to Take a Plant Leaf for Identification or Propagation - May 28, 2026
- When to Cut Back Cannas for Healthy Growth - May 26, 2026
- How Long Do Rose Bushes Live? A Guide to Rose Bush Longevity - April 14, 2026