
Preparing soil for hydrangeas is the single most important step I take before planting these stunning shrubs. When I get the soil right from the start, my hydrangeas grow vigorously, produce bigger and more colorful blooms, and stay healthy with far fewer problems. Hydrangeas thrive in well-draining, slightly acidic soil that’s rich in organic matter. I always test first, amend thoughtfully, and create the ideal environment so my plants reward me with those gorgeous mophead or lacecap flowers all summer long.
In my garden, I’ve learned that skipping proper soil preparation leads to yellowing leaves, weak growth, or root rot. But when I follow these steps, my hydrangeas establish fast and bloom reliably for years. Whether you’re planting bigleaf hydrangeas for their color-changing magic, panicle hydrangeas for their cone-shaped blooms, or oakleaf hydrangeas for their beautiful fall color, the soil foundation stays similar with a few tweaks. Let’s walk through exactly how I prepare soil for hydrangeas so you can do the same and enjoy thriving plants right away.
Why Soil Preparation Matters
While hydrangeas are relatively unfussy plants, they do best when their soil needs are met Taking the time to amend and enrich the soil prior to planting will give your hydrangeas the best start and help them establish quickly and grow vigorously.
Soil preparation serves some key purposes:
- It loosens compacted soils so roots can spread more freely.
- It increases drainage and aeration.
- It adds organic matter to enrich the soil with nutrients.
- It adjusts the pH if needed to match the hydrangea’s preferred range.
Getting the soil right from the start avoids issues and provides the ideal environment for your hydrangeas to thrive.
Start with a Soil Test – Don’t Guess
Before I add anything, I always test the soil in my planting area. A simple home test kit or sending a sample to the local extension office tells me the current pH, nutrient levels, and soil texture. This takes the guesswork out and lets me amend precisely for my hydrangeas.
I test for pH, organic matter percentage, and key nutrients like nitrogen, phosphorus, and potassium. Hydrangeas prefer a slightly acidic range, but it varies a bit by type:
- Bigleaf hydrangeas (the classic mopheads and lacecaps): ideal pH 5.2–5.5 for best blue tones and nutrient uptake.
- Panicle hydrangeas: 5.5–6.5.
- Oakleaf hydrangeas: 5.5–6.5.
I aim for the middle of the range so there’s a little buffer. If pH is too high (alkaline), iron becomes unavailable and leaves turn yellow with green veins—that’s chlorosis, and I fix it by lowering pH. If it’s too low, other nutrients can lock up. Testing once a year after planting keeps everything on track.
Ideal Soil for Hydrangeas: What I Aim For
Hydrangeas do best in loamy soil that balances drainage, moisture retention, and nutrients. Loam contains a good mix of sand, silt, and clay plus plenty of organic matter—roughly 20–30% organic material in the mix.
The soil should be well-draining so water flows through but still holds enough moisture for the roots. Rich organic content feeds the plants slowly and improves structure over time. Slightly acidic pH (generally 5.2–6.5 depending on variety) lets hydrangeas absorb nutrients efficiently and, for bigleaf types, influences those beautiful blue or pink colors.
In my experience, hydrangeas hate sitting in water. Poor drainage is one of the fastest ways to lose a plant to root rot. At the same time, they don’t want bone-dry sandy soil that sheds water and nutrients. That’s why amending is so powerful—it fixes whatever your native soil throws at you.
Step-by-Step: How I Prepare Soil for Hydrangeas
Here’s the exact process I follow every time I plant new hydrangeas or refresh an existing bed.
- Choose the right planting site. I pick a spot with morning sun and afternoon shade for most hydrangeas—especially bigleaf types. Panicle hydrangeas can take more sun. The area must drain well and have enough room for the plant’s mature size (some spread 4–6 feet or more).
- Clear the area. I remove all sod, weeds, rocks, and debris. This prevents competition and makes amending easier.
- Loosen the soil deeply. I dig down at least 12–18 inches, breaking up large clumps. In heavy clay or compacted spots, I go as deep as 2 feet. This lets roots expand freely and improves aeration right away.
- Add organic amendments. I mix in 2–4 inches of organic matter across the bed or planting hole. Compost, well-rotted manure, leaf mold, and peat moss are my go-tos. This boosts nutrients, improves drainage in clay, and helps sandy soil hold moisture.
- Adjust pH if needed. Based on my soil test, I add elemental sulfur or an acidic planting mix to lower pH for bigleaf hydrangeas. For panicle or oakleaf types that prefer slightly higher pH, I use lime if the soil is too acidic. I mix amendments thoroughly into the top 12–18 inches.
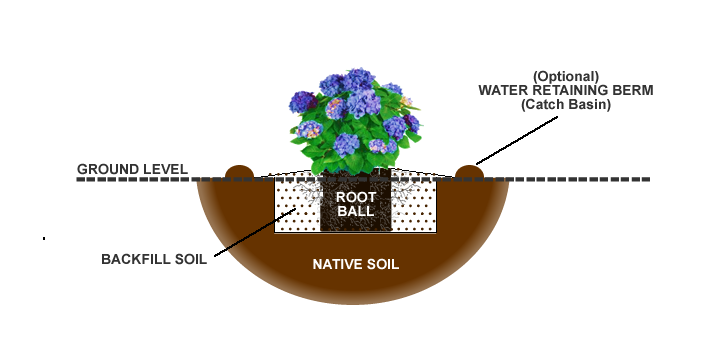
- Backfill and plant. I refill the hole or bed with the amended soil, creating a slight mound so it settles at the right level. I plant the hydrangea at the same depth it was growing before, water deeply, and add a 2–3 inch layer of mulch (wood chips or shredded leaves) to retain moisture and suppress weeds.
I do this work in late fall or early spring when the ground is workable. Container hydrangeas give me flexibility, while bareroot ones need quicker action in cool weather.
Best Soil Amendments I Use for Hydrangeas
Here are the amendments I reach for most often, with how and why I use them:
- Compost: My number-one choice. It adds nutrients, improves structure, helps drainage and water retention, and feeds beneficial microbes. I mix in 2–4 inches and top-dress yearly.
- Peat moss: Lightens heavy soils, retains moisture, and lowers pH naturally. I use up to one-third by volume in the mix, especially for bigleaf hydrangeas that love acidity.
- Well-rotted manure: Adds nutrients and organic matter. I use it sparingly and only well-aged to avoid burning roots or excess nitrogen.
- Leaf mold: Decayed leaves improve moisture retention and add gentle nutrients. Excellent for woodland-style hydrangea beds.
- Elemental sulfur: Lowers pH gradually for more acidic conditions. I apply it months ahead when possible and retest.
- Lime (dolomitic): Raises pH when soil is too acidic for panicle or oakleaf hydrangeas. I use it carefully after testing.
- Sand or gravel: Improves drainage in heavy clay. I add a layer at the bottom of planting holes or mix into the soil, but never in already sandy ground.
- Coco-fiber or similar organic mediums: Great alternatives to peat that improve aeration and moisture balance across soil types.
I always mix amendments evenly and avoid overdoing any one thing—balance is key.
Preparing Different Soil Types for Hydrangeas
Every garden is different, so I adapt my approach:
Clay soil — I loosen deeply (up to 2 feet), add generous amounts of compost, peat moss, and leaf mold to break up the dense particles and improve drainage. Raised beds help tremendously here.
Sandy soil — I add plenty of organic matter like compost, peat moss, and well-rotted manure to increase water and nutrient retention. Top-dressing with compost each year keeps it fertile.
Chalky or alkaline soil — I mix in elemental sulfur or acidic organic material to bring pH down into the ideal range, especially for bigleaf hydrangeas.
Acidic soil — For panicle or oakleaf hydrangeas, I add lime if the pH drops too low. Bigleaf types are usually happy here.
Compacted soil — Deep loosening plus heavy organic amendments restore structure. I sometimes create raised beds or berms for severe cases.
No matter the starting point, adding organic matter and adjusting pH transforms the soil into a welcoming home for hydrangeas.
Planting and First-Year Care After Soil Prep
Once the soil is ready, I plant hydrangeas in late spring or early fall when temperatures are moderate. I water deeply after planting and keep the root zone consistently moist (but not soggy) for the first year while roots establish. The mulch I apply helps tremendously with moisture retention and weed control.
In the first season I fertilize lightly if needed, based on my soil test, and watch for any signs of stress. Healthy soil prep means my new hydrangeas usually settle in with minimal issues and often bloom the first summer.
Ongoing Soil Care for Long-Term Success
Soil care doesn’t stop after planting. Every fall I top-dress my hydrangea beds with 2–3 inches of compost or well-rotted manure and refresh the mulch layer. This slowly adds organic matter as it breaks down.
I retest pH every year or two and adjust with sulfur or lime as needed. I fertilize according to test results—usually a balanced or bloom-boosting formula in spring—and avoid over-fertilizing, which can cause lush leaves but fewer flowers or weak growth.
I also improve drainage if any spots start holding water and watch for nutrient deficiency signs like yellowing leaves. Consistent care keeps the soil fertile and the plants thriving for many seasons.
Common Mistakes I’ve Learned to Avoid
Over the years I’ve made a few soil prep mistakes so you don’t have to:
- Planting without testing or amending—leads to poor growth and constant problems.
- Adding too much of one amendment (like excess sulfur or manure)—can burn roots or throw nutrients out of balance.
- Ignoring drainage—root rot is heartbreaking and almost always preventable with good prep.
- Planting bigleaf hydrangeas in high-pH soil without lowering it—yellow leaves and weak blooms follow.
- Skipping mulch—soil dries out fast and weeds take over.
Taking the time upfront saves years of frustration.
Why Proper Soil Prep Leads to Better Blooms and Healthier Plants
When soil is well-prepared, hydrangeas develop strong root systems that support bigger plants and more flowers. They resist pests and diseases better, handle weather swings more easily, and live longer. I’ve had hydrangeas thrive for over a decade in beds I prepared carefully at the start.
The vibrant colors, lush foliage, and abundant blooms make every bit of effort worthwhile. There’s nothing like walking into the garden and seeing those big, perfect flower heads glowing in the morning light.
Quick Tips and Expanded Advice for Success
- Always improve the entire planting area, not just the hole, for better root spread.
- For color control on bigleaf hydrangeas, maintain the target pH consistently—aluminum availability in acidic soil creates blue tones.
- In very hot climates, extra organic matter and afternoon shade help hydrangeas cope.
- Container hydrangeas need the same well-draining, rich mix—use quality potting soil amended with compost and peat moss.
- If moving or dividing hydrangeas, prepare the new site the same way for quick recovery.
I also love mixing hydrangeas with companion plants that enjoy similar conditions—hostas, ferns, astilbes, and heucheras create beautiful, layered beds that all benefit from the same soil prep.
Final Encouragement
Preparing soil for hydrangeas is one of the most rewarding gardening tasks I do. It’s straightforward once you understand the needs—slightly acidic, well-draining, organic-rich loam—and it sets your plants up for years of beauty. Whether you’re starting a new bed or improving an existing one, the steps I’ve shared will give your hydrangeas the strong foundation they deserve.
I encourage you to grab a soil test kit, spend an afternoon amending, and plant with confidence. Your hydrangeas will thank you with vigorous growth and those spectacular blooms that make summer gardens unforgettable. Start today, be patient with the process, and enjoy watching your hydrangeas thrive. Happy gardening—may your soil be rich and your blooms be abundant!
If you follow these steps and tend the soil each season, you’ll have healthy, floriferous hydrangeas that become the highlight of your landscape. I’ve seen it happen time and again in my own garden, and I know it will work for you too.
Best soil mix for Hydrangeas
FAQ
How do you plant hydrangeas?
Hydrangeas prefer well-draining soil that’s rich in organic matter. So, preparing the soil is an important step when you’re planting hydrangeas. Mixing a healthy amount of compost into your soil is a great way to create the rich soil they love. You can also mix in a balanced fertilizer to get the plant off to a great start.
How do hydrangeas grow?
In my experience, the key to cultivating thriving hydrangeas lies in understanding their soil preferences. These plants favor well-drained, rich loamy soil that retains moisture without becoming waterlogged. Additionally, soil pH significantly influences the color of the flowers, particularly for Bigleaf hydrangeas.
How do you prepare soil for hydrangeas?
Add plenty of high-quality organic material, like a locally sourced compost mix to prepare your soil for hydrangeas. You want to ensure your soil is nutrient-rich, well-draining, and yet still able to retain some moisture between waterings.
Can hydrangeas grow in acidic soil?
Acidic soil, with a pH below 7, is advantageous for hydrangeas seeking that coveted blue flower color. Acidic soil allows the plants to absorb aluminum, which is responsible for the blue pigmentation. Adding organic matter, such as compost or well-rotted pine needles, can help maintain the desired acidic pH level.
How do you prepare the ground for hydrangeas?
Preparing the Planting Site
Hydrangeas do best in soil rich in organic material, well-drained but that does not become completely dry. Whatever your soil is like, use it. Do not try to dig a hole and fill it with soil you bought somewhere else. If your soil is poor, just use extra organic material.
What happens if you cut a hydrangea all the way to the ground?
In late winter or early spring, these shrubs can be cut all the way back to the ground. Smooth hydrangeas will produce much larger blooms if pruned hard like this each year, but many gardeners opt for smaller blooms on sturdier stems.

- How Fast Does Boston Ivy Grow? A Complete Growth Guide - June 9, 2026
- Gravel for Garden Beds: A Functional and Beautiful Option - June 9, 2026
- The Best Mulch for Raised Garden Beds – Pros, Cons, and Tips - June 9, 2026